background image

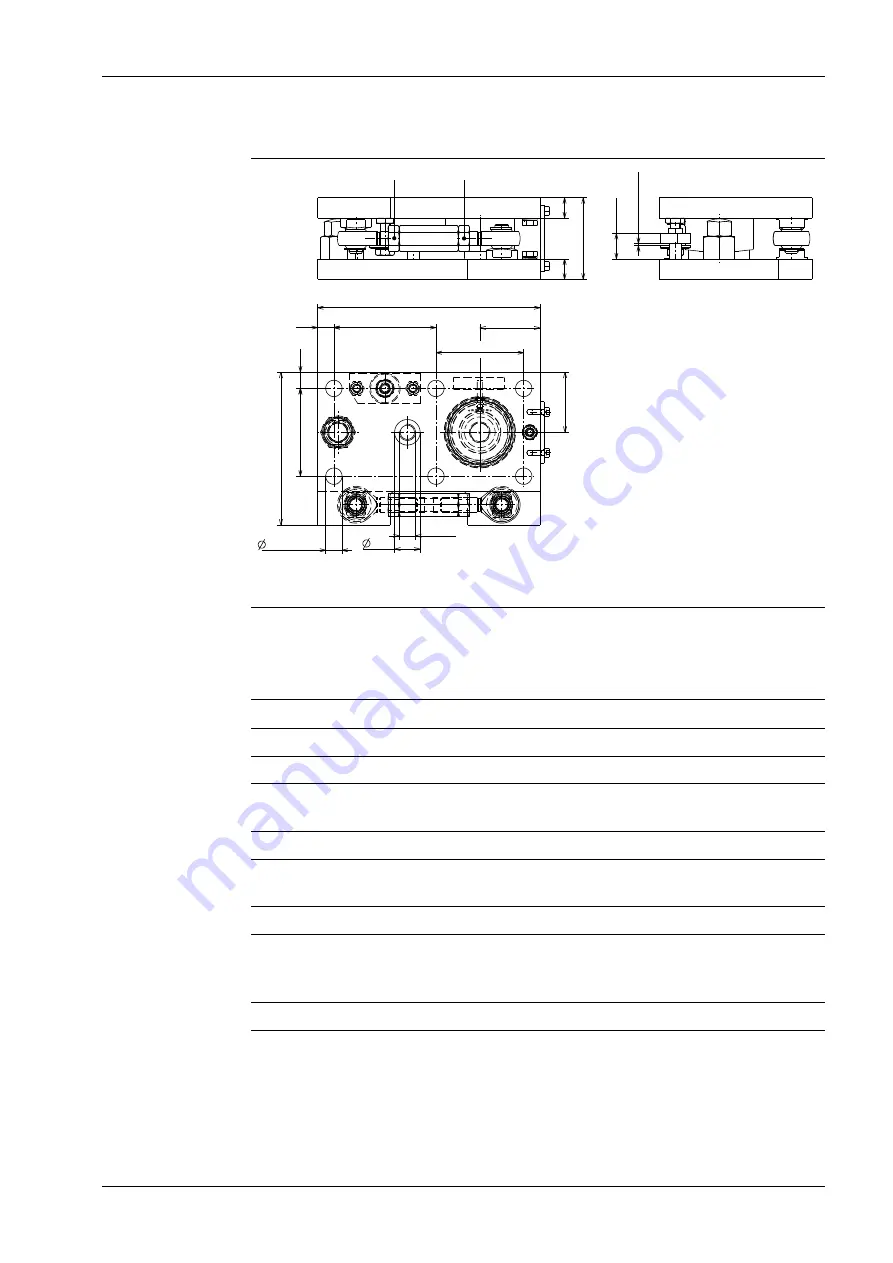
PR 6012/42

8

0

2

0

2

0

2

1.5..

..

5

2

5
(

)

15

0

21 8

1

6

1 6

5

9

5 9

1 6 (12x )

8 6

10 0

8

6

M1 6

2 5

**

*

* Right-handed thread, ** Left-handed thread
all dimensions in mm

4.3

Technical data

Maxi FLEX mounting kits PR 6012/02N and PR 6012/02S

PR 6012/02N

PR 6012/02S

Maximum capacity of load cell

500 kg…10 t

500 kg…10 t

Permissible lifting force

max. 10 kN

max. 10 kN

Permissible vertical load without
load cell

max. 5 t

max. 5 t

Permissible jack-up load

max. 5 t

max. 5 t

Permissible horizontal displace-
ment

max. ±4 mm

max. ±4 mm

Permissible temperature range

-40 °C…+100 °C

-40 °C…+100 °C

Material

Steel S235 with galv. zinc
coating, passivated and
sealed, RoHS-compliant

Stainless steel 1.4301 ac-
cording to DIN EN
10088-3 (AISI 304)

Weight net/gross

6.38 kg/6.77 kg

6.38 kg/6.77 kg

4 Specifications

Maxi FLEX and Maxi FLEXLOCK mounting kits PR 6012/02, ../32, ../42

Minebea Intec

EN-17

Summary of Contents for PR 6012/02

Page 1: ...kits PR 6012 02 32 42 Installation Manual Translation of the Original Installation Manual 9499 053 24200 Edition 1 5 0 06 01 2020 Minebea Intec GmbH Meiendorfer Str 205 A 22145 Hamburg Germany Phone...

Page 2: ...fied personnel In correspondence concerning this product the type name and release number serial number as well as all license numbers relating to the product have to be cited Note This document is pa...

Page 3: ...8 3 3 1 General instructions 8 3 3 2 Jack up 9 3 3 3 Adjusting the built in lift off protection 10 3 4 Additional lift off protection 11 4 Specifications 12 4 1 Equipment supplied 12 4 1 1 Maxi FLEX m...

Page 4: ...sposal 26 8 Spare parts and options 27 8 1 Replacement parts 27 8 2 Options 27 8 2 1 Lift off protection 27 Maxi FLEX and Maxi FLEXLOCK mounting kits PR 6012 02 32 42 Table of contents EN 2 Minebea In...

Page 5: ...s for preventing hazards are not followed DANGER Warning of personal injury DANGER indicates death or severe irreversible personal injury which will occur if the corresponding safety measures are not...

Page 6: ...t may occur if appropriate safety measures are not observed Take the corresponding safety precautions Note User tips useful information and notes 1 6 Hotline Phone 49 40 67960 444 Fax 49 40 67960 474...

Page 7: ...ing over or being shifted thus eliminating danger to people animals or goods even in the case of a break in a load cell or mounting element Installation and repair work must only be carried out by exp...

Page 8: ...l and constrainer arrangement Examples Key Do not constrain this position Constrainer Load application Possible direction of movement Maxi FLEX and Maxi FLEXLOCK mounting kits PR 6012 02 32 42 3 Recom...

Page 9: ...g kits are available for weighing points without constrainers Alternatively the constrainer can simply be removed With elastic constructions it may be necessary to deviate from this recommendation in...

Page 10: ...nal borings apart from the mounting holes in the vessel foot are required Moreover the vessel can be lifted by turning the threaded bolt 4 see Chapter 3 3 2 e g when inserting the load cell The two sc...

Page 11: ...hreaded bolt 4 upwards at the hex and turn the screw 2 downwards to avoid jamming wedging the upper plate 1 3 Repeat until the load cell is unloaded and can be removed together with the load disc 4 In...

Page 12: ...e upper plate 1 2 Turn the threaded bolt 4 downwards until the load cell is loaded 3 Turn the screw 2 upwards until the safety distance A of 1 5 2 5 mm has been established between the washer 9 and re...

Page 13: ...has sufficient free moving space in the drill hole Lock the nuts 2 so that there is a remaining distance A from the washer 3 A 2 mm This distance is essential to avoid force shunts The required tighte...

Page 14: ...pper plate 2 Auxiliary mounting plate 3 Lower plate 4 Internal lift off protection 5 Screw 2 spring washer 2 and washer 2 for the equipotential bonding cable supplied with the load cell 6 Jack up 7 Qu...

Page 15: ...pin 2 and lo cking washer 2 4 Internal lift off protection 5 Jack up The following positions are not shown 6 Auxiliary mounting plate 7 Screw 2 spring washer 2 and washer 2 for the equipotential bond...

Page 16: ...th joint head 2 screwed joint nut 2 joint pin 2 and lo cking washer 2 6 Auxiliary mounting plate The following positions are not shown 7 Screw 2 spring washer 2 and washer 2 for the equipotential bond...

Page 17: ...4 2 Dimensions PR 6012 02 all dimensions in mm 4 Specifications Maxi FLEX and Maxi FLEXLOCK mounting kits PR 6012 02 32 42 Minebea Intec EN 15...

Page 18: ...PR 6012 32 Right handed thread Left handed thread all dimensions in mm Maxi FLEX and Maxi FLEXLOCK mounting kits PR 6012 02 32 42 4 Specifications EN 16 Minebea Intec...

Page 19: ...rce max 10 kN max 10 kN Permissible vertical load without load cell max 5 t max 5 t Permissible jack up load max 5 t max 5 t Permissible horizontal displace ment max 4 mm max 4 mm Permissible temperat...

Page 20: ...4 Weight net gross 8 46 kg 8 81 kg 8 46 kg 8 81 kg Maxi FLEXLOCK mounting kits PR 6012 42N and PR6012 42S PR 6012 42N PR 6012 42S Maximum capacity of load cell 500 kg 10 t 500 kg 10 t Permissible hori...

Page 21: ...ngement on the foundation substructure Generate the drilling pattern of the upper plate of the mounting kit see Chapter 4 2 according to the weighing system arrangement for each vessel lug or vessel f...

Page 22: ...ndation for the washers of M8 mounting screws DIN 7349 d 21 h 4 or DIN 9021 or ISO 7093 2 d 24 h 2 Recommendation for the washers of M12 mounting screws DIN 7349 d 30 h 6 or DIN 9021 or ISO 7093 2 d 3...

Page 23: ...ding clamp of the welding set is fitted as closely as possible to the welding joint 5 3 2 Installing the mounting kit and inserting the load cell Note Screw mounting of the upper and lower plates is d...

Page 24: ...nting kit on the foundation substructure 8 using the mounting drill holes 3 Fasten the lower plate 9 to the foundation substructure 8 and make sure that the plates are in parallel and seated verticall...

Page 25: ...d bolt 10 up at the hex and turning the screw 5 down to prevent wedging the upper plate 4 10 Repeat until the distance between the lower and upper plates is sufficient to insert the load cell 12 toget...

Page 26: ...of the jack up is screwed in and is in the lower position For Maxi FLEXLOCK mounting kits only whether the constrainers 2 have sufficient clearance if necessary loosen nuts 3 and 4 adjust using the sc...

Page 27: ...and around the mounting kit NOTICE Some cleaning agents may not be compatible with the mounting kit material When using cleaning agents ensure that their compatibility with the mounting kit material...

Page 28: ...ipal waste so that it can then be recycled Before disposing of or scrapping the product any batteries should be removed and taken to a suitable collection point Please see our T Cs for further informa...

Page 29: ...on of additional lift off protection No Description Order no 1 Optional extension of lift off protection M12 for PR 6012 02 and PR 6012 32 Equipment supplied 1 threaded bar M12 120 A2 70 3 nut DIN 934...

Page 30: ...Published by Minebea Intec GmbH Meiendorfer Strasse 205 A 22145 Hamburg Germany Phone 49 40 67960 303 Email info minebea intec com www minebea intec com...

Reviews: