background image

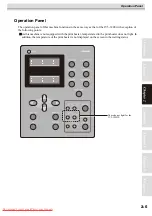
2-7

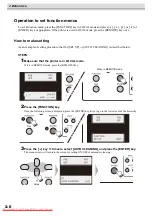
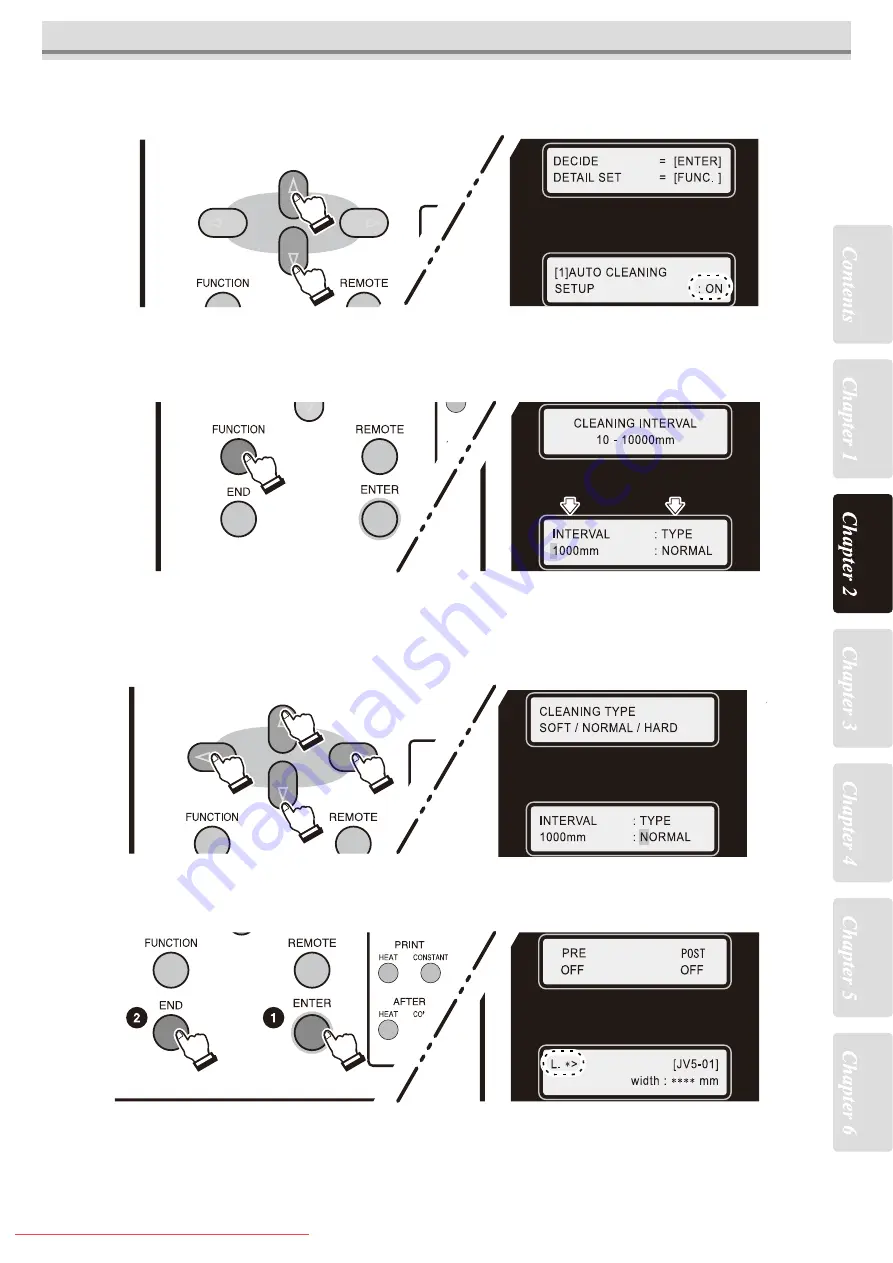
Operation to set function menus

4

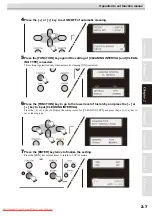
Press the [

] or [

] key to set ON/OFF of automatic cleaning.

5

Press the [FUNCTION] key again if the setting of [CLEANING INTERVAL] and [CLEAN-
ING TYPE] is needed.

This setting is permitted only when automatic cleaning [ON] is selected.

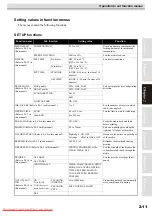
6

Press the [FUNCTION] key to go to the lower level of hierarchy and press the [

] or 

[

] key to input [CLEANING INTERVAL].

Press the [

] or [

] key to display the setting screen for [CLEANING TYPE] and press the [

] or [

] key to 

set a cleaning type.

7

Press the [ENTER] key twice to finalize the setting.

Press the [END] key several times to return to LOCAL mode.

Downloaded From ManualsPrinter.com Manuals

Summary of Contents for JV5-320DS

Page 1: ...mimaki co jp CAUTION This machine is a color ink jet printer for high quality printing realizing printing on fabric media for soft sign based on the JV5 320S To use this machine safely and effectively thoroughly read Dedicated Operation Manual of JV5 320DS this manual and attached JV5 320S Operation Manual and fully understand their contents D202100 10 Downloaded From ManualsPrinter com Manuals ...

Page 2: ...e safely and effectively thoroughly read Dedicated Operation Manual of JV5 320DS this manual and attached JV5 320S Operation Manual and fully understand their contents Dedicated Operation Manual of JV5 320DS this manual Explains unique operation for JV5 320DS and its maintenance JV5 320S Operation Manual Explains operation for JV5 320S and its maintenance For function explanation overlapped with t...

Page 3: ...erarchy 2 8 Setting values in function menus 2 11 CHAPTER 3 Printing Adjusting the head gap 3 2 Setting the media on the printer 3 3 Attaching removing platen sheet metal 3 4 Setting position for fabric media 3 6 Setting media 3 7 Setting the media using the roll holder 3 15 How to operate the take up device 3 16 Notes on media edge surface and pinch roller 3 17 Effective Plotting Area 3 18 Establ...

Page 4: ...it cannot be wiped off with paper towel 4 14 CHAPTER 5 In Case of Trouble Warning errors newly added 5 2 Error messages newly added 5 2 CHAPTER 6 Operation for Functions Functions Invoked by FUNCTION Key 6 2 Invoking SET UP functions 6 3 Registering printing conditions in a lump type registration 6 3 List of functions 6 3 Outline of the setup functions 6 5 Invoking MAINTENANCE functions 6 12 List ...

Page 5: ... of heaters 6 30 How to operate function menus 6 32 Functions related to print quality 6 33 Correcting media feed during printing FEED COMPENSATION 6 33 Functions related to ink 6 34 When ink sets 4 color 6 color are to be changed 6 34 Function Flowchart BOOT 6 36 Function Flowchart LOCAL mode 6 38 Function Flowchart REMOTE mode 6 42 Function Flowchart FUNCTION Key 6 44 Downloaded From ManualsPrin...

Page 6: ...6 Downloaded From ManualsPrinter com Manuals ...

Page 7: ...t can be used 1 2 Basic specifications 1 3 Specifications for ink 1 5 This chapter describes the precautions to be taken for safe use of the printer CHAPTER 1 Safety Precautions Downloaded From ManualsPrinter com Manuals ...

Page 8: ...mum width 3300 mm Minimum width 297 mm Maximum printing width 3250 mm to print on fabric 3290 mm to print on paper Thickness 5 0 mm or less for the media that can be fed Roll weight 1 1 Without deflection of the roll when it is retained at both ends 130 kg or less Roll outside diameter φ 250 mm or less Roll inside diameter 3 inches Side printed You can print on both sides Roll end treatment The ro...

Page 9: ...tment The roll end is gently fixed to the core with weak adhesive tape or weak glue for easy removal Margin 2 Left end and right end to print on fabric 25 to 50 mm Default to print on paper 25 to36 mm Default Front 150 mm Rear 0 mm Distance accuracy Absolute accuracy Whichever the larger one of 0 3 mm or 0 3 of the designated Reproducibility Whichever the larger one of 0 2 mm or 0 1 of the designa...

Page 10: ...quivalent to normal office level Weight Main unit 1200 kg Outside dimensions Width 5170 mm Depth 1610 mm Height 1640 mm 1 Without deflection of the roll when it is retained at both ends 2 The margin of the right and left changes depending on the clipping of the media retainer 3 When option is used 4 Main unit and heater Item Specification Downloaded From ManualsPrinter com Manuals ...

Page 11: ...of 40 C is permitted within a month Transportation 1 to 60 C Storage at temperature of 60 C is only permitted within 120 hours and at tem perature of 40 C is permitted within a month Do not disassemble ink cartridges or refill them with ink Ink could freeze if kept in a cold place for an extended period If the ink freezes thaw it at room temperature 25 C spending more than three hours before use W...

Page 12: ...1 Safety Precautions 1 6 Downloaded From ManualsPrinter com Manuals ...

Page 13: ...ion and head row 2 4 Operation Panel 2 5 Operation to set function menus 2 6 How to make setting 2 6 Outline of menu hierarchy 2 8 Setting values in function menus 2 11 This chapter describes the names of parts and how to use the operation panel CHAPTER 2 Before Use Downloaded From ManualsPrinter com Manuals ...

Page 14: ...this machine Front side of machine left side Here only different in point from the JV5 320S are explained For other names and functions refer to the JV5 320S Operation Manual Ink tray When drawing on coarse textured fabric media ink that passed through the media is pooled Downloaded From ManualsPrinter com Manuals ...

Page 15: ...ust the weight of the take up feeding ten sion bar Media setting position NG label This is the guide for setting the media Make the edge sur face of the media do not enter within the black area of the label otherwise the media press does not function Downloaded From ManualsPrinter com Manuals ...

Page 16: ...nd cartridges of ink station are different from the selection of ink set 4 color ink set 6 color ink set when the full up ink is performed K Black M Magenta BL Blue Y Yellow LBL Light Blue Lm Light Magenta 4 color ink set Four ink cartridges for each color 6 color ink set Two ink cartridge for each of K Y LBL and Lm and four ink cartridges for each of M and BL 4 color ink set 6 color ink set Head ...

Page 17: ... with exception of the following points As this machine is not equipped with the print heater lamps related to the print heater does not light In addition the temperature of the print heater is not displayed on the screen in the waiting status These do not light for the JV5 320DS Downloaded From ManualsPrinter com Manuals ...

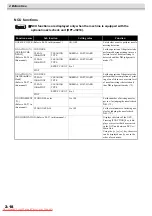
Page 18: ...UTO CLEANING is described below STEPS 1Make sure that the printer is in LOCAL mode If it is in REMOTE mode press the REMOTE key 2Press the FUNCTION key Once the following screen is displayed press the ENTER key twice to go to the lower level of the hierarchy 3Press the key 11 times to select AUTO CLEANING and press the ENTER key The menu screen will turn into the screen for setting ON OFF of autom...

Page 19: ...only when automatic cleaning ON is selected 6Press the FUNCTION key to go to the lower level of hierarchy and press the or key to input CLEANING INTERVAL Press the or key to display the setting screen for CLEANING TYPE and press the or key to set a cleaning type 7Press the ENTER key twice to finalize the setting Press the END key several times to return to LOCAL mode Downloaded From ManualsPrinter...

Page 20: ...2 Before Use 2 8 Outline of menu hierarchy Function menu Press the FUNCTION key to invoke the function menu Downloaded From ManualsPrinter com Manuals ...

Page 21: ...2 9 Operation to set function menus POST Downloaded From ManualsPrinter com Manuals ...

Page 22: ...2 Before Use 2 10 Direct keys Pressing direct keys will easily invoke frequently used functions Downloaded From ManualsPrinter com Manuals ...

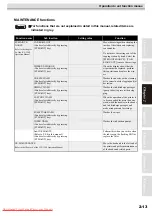
Page 23: ...l SCAN 0 0 to 19 9 sec Sets the time to wait for ink drying Draw END 0 to 999 sec PRE FEED Refer to P 6 8 in this manual ON OFF Feeds the media back and forth before printing MARGIN Refer to P 6 8 in this manual 20 to 75 mm Sets a non printing area along the right and left edges of the media COLOR PATTERN Refer to P 6 9 in this manual Right edge ON OFF Left edge ONx1 to ONx5 OFF Draws a color patt...

Page 24: ...to set items on the right SCAN COUNT 10 to 9990 times The heads are automatic wiped while printing OFF HEAD GAP Refer to P 3 2 in this manual 1 5 to 5 0 mm Sets the head gap height from the media to the nozzle plane of the heads MEDIA DETECT Refer to P 6 11 in this manual AUTO Sets the method for detecting the media MANUAL SETUP RESET Resets the setting values to the default values Function name S...

Page 25: ... a cleaning kit to correct nozzle clogging and jet deviation DISWAY WASH Can be selected directly by pressing ST MAINT key Washes the ink discharge passages pump tubes to prevent their clog ging CUSTODY WASH Can be selected directly by pressing ST MAINT key When the operation of the printer is to be suspended for more than one week wash the nozzles in the heads and ink discharge passages and make ...

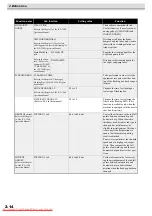
Page 26: ...time for cleaning or replacing of flushing box FILTER EXCHANGE LV Refer to P 4 4 in this manual 5 5 to 1 5 Changes the time for replacing the filter on the flushing BOX This function is available only when the machine is equipped with the nozzle check unit option DROP POScorrect Refer to the Chapter 3 of the JV5 320S Operation Manual PATTERN 1 to 4 40 0 to 40 0 dot Correct the difference in the in...

Page 27: ...e performed CLEANING CLEAN INTER VAL OFF 1 to 168 h Set the interval in hours at which cleaning operation is to be per formed CLEAN TYPE Normal Soft Hard Set a type of cleaning WIPER LEVEL Refer to the Chapter 4 of the JV5 320S Operation Manual 10 10 to 1 10 The wipers are consumables The heads can get dirty easily in a dusty atmosphere The heads cannot be cleaned ade quately with curled or worn w...

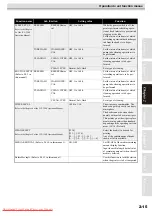
Page 28: ...he pre feed operation FORE BACK HEATER SETUP Refer to P 6 18 in this manual STD set 5 C set 10 C set 15 C set 20 C Change the temperature range of the post heater that determines whether the temperature is reached TIME SET Refer to P 6 18 in this manual ON OFF Set the date and time on the printer UNIT SETUP Refer to P 6 19 in this manual TEMP C or F Change the units of temperature length and area ...

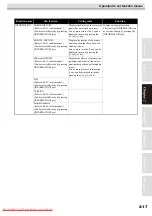
Page 29: ...e cuted up to now Two or more records if any can be displayed in turn by pressing the or key PRT modeHISTORY Refer to P 6 21 in this manual Can be selected directly by pressing INFORMATION key Displays the history of information printing conditions of the online printing that has been performed up to now Two or more pieces of information if any can be displayed in turn by pressing the or key LIST ...

Page 30: ...6 27 in this manual CONTINUE Set the operation of the printer to be performed after completion of print ing of one file in case a certain level of nozzle missing is detected and thus NG judgment is made 2 CLEAN ING CONT CLEANING TYPE NORMAL SOFT HARD CLEAN ING STOP CLEANING TYPE NORMAL SOFT HARD RETRY COUNT 0 to 3 STOP NG JUDGEMENT 1 Refer to P 6 27 in this manual CLOGG NZL color 1 to 180 Set the ...

Page 31: ...ate the take up device 3 16 Notes on media edge surface and pinch roller 3 17 Effective Plotting Area 3 18 Establishing the Origin 3 19 Other notes 3 20 Handling of media after drawing 3 20 When cutting media 3 21 Use method of rear surface dryness fan 3 22 This chapter describes a series of operations and settings ranging from power on to end of printing CHAPTER 3 Printing Downloaded From Manuals...

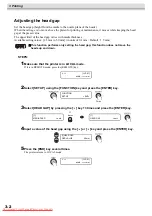
Page 32: ...ter is in LOCAL mode If it is in REMOTE mode press the REMOTE key 2Select SET UP using the FUNCTION key and press the ENTER key 3Select HEAD GAP by pressing the key 13 times and press the ENTER key 4Input a value of the head gap using the or key and press the ENTER key 5Press the END key several times The printer returns to LOCAL mode This function performs only setting the head gap this function ...

Page 33: ...dia is exposed to direct sunshine the media width may not be detected cor rectly Do not use printed media otherwise ink can adhere to pinch rollers and thus media may be stained or may not be detected Significantly or internally curled media must be straightened so that it will be fed prop erly without floating above the platen When setting media make the center of the roll media match the center ...

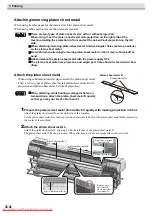
Page 34: ... it it does not matter either side is in front There are two types of platen sheet metal with or without projection When using it set the platen sheet metal with projection on the right side of the machine making the projection in front and set the one without projection on the left side When attaching removing platen sheet metal hold rectangular holes on two positions on the platen sheet metal Be...

Page 35: ...platen sheet metal 1Hold rectangular holes on two positions on the platen sheet metal concurrently and remove it quietly 2Wipe ink blot adhering on the removed platen sheet metal with soft cloth or paper towel If ink blot adheres to the platen sheet metal wipe ink blot with paper towel immersed in cleaning liquid for maintenance 3Place the platen sheet metal L R on the platen sheet metal storage l...

Page 36: ...annot be used A black and white label is pasted on the rear of this machine back of heavy media feed ing machine media setting position NG label Do not put the edge surface of the media into the black area of this label If the edge surface of the media is in this area move the media to right and left to adjust it so that the edge surface of the media comes outside the area Label Downloaded From Ma...

Page 37: ... power supply 2 Set a paper core to the take up side Front of the printer Refer to the JV5 320S Operation Manual Set paper core for media on the heavy duty take up device on the front of the printer 3 Set a media to the feeding side Back of the printer Refer to the JV5 320S Operation Manual Set a media on the heavy duty feeding device on the back of the printer 4 Adjust the media Refer to P 3 8 in...

Page 38: ...ht to the take up direction paste it so that the media on the ink tray has no surface waviness if the media has surface waviness paste it again slack Pulling the media straight to the take up direction paste adhesive tape Makeintervalsof adhesive tape within 500mm Makeintervalsof adhesive tape within 500mm Pulling the media straight to the take up direction paste adhesive tape Fixing method when t...

Page 39: ...ng with your hand Number of take up times to paper core set on heavy media take up machine Setting method of media press The media press of the JV5 320DS differs from that of the JV5 320S Set the media press depending on the media to be used P 3 13 6 Set the media press After pasting media on the paper core loop the media twice using the switch of the heavy media take up machine For details of loo...

Page 40: ... enter values from 0 1 to 5 0 mm When the MEDIA DETECT in the setting mode to AUTO entering the thickness of the media starts detect ing media After detecting media it returns to the local mode When the MEDIA DETECT in the setting mode to MANUAL proceed to the Step 4 4Press the or keys to enter the width of the set media and then press the ENTER key You can enter values from 210 to 3300 mm MEDIA D...

Page 41: ...atically The position moving to the left from the right edge of the media by the media width entered in the Step 4 will become the left edge In the Step 6 you can fine adjust the media left edge position 1 Press the key in the Step 6 2 Press the keys to move the carriage to the left edge of the media 3 Align the drawing origin arrow of the head cover with the left edge of the media 4 Press the ENT...

Page 42: ...e counter weight confirming the media condition Take up side as a guide Attach so that media on the ink receiver does not slack maximum number which can be attached Feeding side as a guide Attach so that media does not wrinkle maximum number which can be attached By the counter weight the tension bar lightens and media feeding improves Attach the counter weight as many as possible A heavy tension ...

Page 43: ...f the media press is not set on the proper position the media width can not be detected properly When using thick media of 0 5 mm and above do not attach the media press In this case the automatic detection of the media cannot be performed Detect the media referring to P 3 10 If the media cannot be detected automatically If there is a screw on the position on which you wished to paste the media pr...

Page 44: ...r paper 1Prepare the media press for transfer paper 2Paste the media press on both edges of the media Make arrow marks of the media press match the edge surface of the media Arrow marks Downloaded From ManualsPrinter com Manuals ...

Page 45: ...tion the media width can not be detected properly No Operation Outline 1 Check the platen sheet metal Refer to P 3 4 in this manual Attach the platen sheet metal depending on the type of the media to be used Before attaching platen sheet metal be sure to turn OFF the power supply 2 Set media to the back roll holder Refer to the JV5 320S Operation Manual Set media to the feeding device on the back ...

Page 46: ... only press the END key when the value to be input is identical with the previously input value Initial value 50 m Input range 1 m to 500 m in units of 1 m 4The printer returns to LOCAL mode How to operate the take up device The take up device is equipped with a switch that selects the direction in which the media is to be wound Input of MediaLength MEDIA LENGTH 50 m Torque limiter Switch Download...

Page 47: ...th the pinch roller when you moved down the clamp lever the media may not be fed properly If the pinch roller is on the media edge surface make the pinch roller on the media edge surface be lifted using the attached clamp fixing spacer x 30 Clamp fixing spacer Media edge surface Downloaded From ManualsPrinter com Manuals ...

Page 48: ...ht and the left differs depending on the media detection method or the media type to use Use the following value as reference When printing on fabric Automatic media width detection 71 mm from media press Manual media detection 40 mm from media edge surface When printing on paper Automatic media width detection 49 mm from media press Manual media detection 25 mm from media edge surface You can cha...

Page 49: ...he printer displays the effective printing area and then returns to LOCAL mode When the roll media is used the value in X direction is not displayed From the time the printer starts next printing it uses the origin that has been established here unless the origin is newly established at another point When moving the origin to the back of the media switch the moving direction as fol lows Origin Len...

Page 50: ...a taken up will be left on the floor etc for long hours as it is in roll status it may set off due to the media s own weight When you store the media in roll status be careful so that the printing part can be lifted as described below Status of printing part being lifted Status of printing part being left on the floor etc Downloaded From ManualsPrinter com Manuals ...

Page 51: ...ally 2 Return the tension bar to the waiting position and cut the media on the cut groove located on the dryness fan Cut it using scissors etc 3 Cut the feeding side in the rear of the machine in the same way Return to the tension bar to the waiting position and cut it in front of the Pre heater 4 Release the clamp and remove the media remaining on the platen surface The media remaining on the pla...

Page 52: ...ESS FAN by pressing the key and press the ENTER key 4Press the ENTER key to proceed to the lower hierarchy and with the keys set the strength of the dryness fan After setting the strength of the dryness fan register it with the ENTER key 5Press the END key several times to return to LOCAL mode If you use the rear surface dryness fan the media may be lifted You can avoid the media from being lifted...

Page 53: ...of flushing Box filter replacement FILTER EXC LV 4 4 Cleaning the flushing tray 4 6 Replacing F Box filters 4 8 Replace the filter of exhaust fan in the rear 4 10 Replace the filter of the slider fan 4 11 Cleaning of ink tray ink tray sheet metal 4 13 If ink is hardened and it cannot be wiped off with paper towel 4 14 This chapter describes the recovery procedure for ink clogging and the cleaning ...

Page 54: ...to the sensor surface with a cotton swab Sublimation transfer ink Cleaning Liquid Bottle Kit A29 SPC 0137 Sold separately Water based Cleaning Liquid Cartridge SPC 0259 Sold separately When cleaning if you wish to move the platen sheet metal on the machine check that there is no ink adhering to the platen sheet metal If there is ink blot wipe it off Wipe softly the platen sheet metal when cleaning...

Page 55: ...ble for the following items REFRESH Set the interval at which refreshing operation is to be per formed periodically Refer from Refresh Interval while in stand by mode to Cleaning interval while in stand by mode of the Chapter 4 in the JV5 320S Operation Manual TUBE WASH Set the interval at which cleaning of the pump tubes is to be performed periodically CLEANING Set the cleaning type and the inter...

Page 56: ...the status of the stains on the filter STEPS 1Make sure that the machine is in local mode and after selecting MAINTENANCE with FUNCTION key press ENTER key When it is in the remote mode press REMOTE key 2With key select FLUSHING BOX and press ENTER key This function is available only when the machine is equipped with the optional nozzle check unit OPT J0218 The replacement of the flushing BOX filt...

Page 57: ...cal mode When the warning for flushing BOX cleaning or error has not been issued FLUSHING BOX BOX EXCHANGE LV ent FLUSHING BOX CLEANING COMP ent FLUSHING BOX FILTER EXC LV ent 2 times When the warning for flushing BOX cleaning or error has been issued FLUSHING BOX FILTER EXC LV ent 1 time DirtCond of The Filter FILTER EXC LV LEVEL 5 5 is seen and changed Downloaded From ManualsPrinter com Manuals ...

Page 58: ...d F BOX filter base 3Remove the flushing tray and clean the ink accu mulated in the tray 4Fix the flushing tray Also fix the F BOX filter and F BOX filter base in the same man ner When the ink is in contact with skin or gets in the eye immediately wash it out com pletely with water The ink tray of the INK TRAY CLEANING CANCEL EXEC Flush BOX is cleaned The ink tray of the INK TRAY CLEANING CANCEL E...

Page 59: ...n the ink on the flushing tray every day When it is continuously used without cleaning there could arise material failure to the machine from functional decline due to the stains An ink tray is INK TRAY CLEAN COMPLETED ent removed and cleaned Being Initialized PLEASE WAIT L 1 JV5 01 width mm Downloaded From ManualsPrinter com Manuals ...

Page 60: ...PS 1Make sure that the machine is in local mode and press ST MAINT key CARRIAGE OUT is indicated 2With key select Sub INK MAINTE and press ENTER key INK TRAY CLEAN is indicated The message below is displayed only when the machine is equipped with the optional nozzle check unit When the ink is in contact with skin or gets in the eye immediately wash it out com pletely with water L 1 JV5 01 NearExcg...

Page 61: ...filter base 5Attach new F BOX filter to F BOX filter base 6Close the maintenance cover and press the ENTER key 7The operation returns to the Local Mode Sub INK MAINTE FILTER EXCHANGE ent 1 time F BOX filter F BOX fil ter base Filter of the F BOX FILTER EXCHANGE COMPLETED ent avobe is replaced L JV5 01 width mm Being Initialized PLEASE WAIT Downloaded From ManualsPrinter com Manuals ...

Page 62: ...ilter set sold separately It is recommended to replace the filter per 1000m2 drawing STEPS 1Pull the filter Assy out 2Remove the filter press and replace the filter inside 3Return the filter Assy to the original status and insert it into the exhaust fan in the rear Replace the filter after checking the carriage stops Exhaust fan in the rear Downloaded From ManualsPrinter com Manuals ...

Page 63: ...ey 2Press the ST MAINT key and press the ENTER key When CARRIAGE OUT is displayed press the ENTER key Then the carriage moves to above the platen 3Open the front cover 4Remove the knurled screws fixing the filter two positions for one side 5Replace the filter located between the filter plates The slider fan is located on both sides of the carriage When replacing replace both fil ters L JV5 01 widt...

Page 64: ...erforming the initial operation the printer returns to LOCAL mode Be careful about the attaching direction of the filter plate If the direction is wrong you cannot fasten it with the knurled screws Fasten the knurled screws ST MAINTENANCE COMPLETED ent Being Initialized PLEASE WAIT Downloaded From ManualsPrinter com Manuals ...

Page 65: ...ray and the ink tray sheet metal when replacing media STEPS 1Wipe the ink tray and the ink tray sheet metal to the direction indicated with an arrow If ink is hardened wipe with paper towel immersed in cleaning liquid for maintenance Ink tray Ink tray sheet meta Downloaded From ManualsPrinter com Manuals ...

Page 66: ...the figure below 5Open the ink discharging cock Discharge cleaning liquid filled with the ink tray 6After discharging cleaning liquid wipe inside the ink tray with paper towel 7Dispose the polyethylene resin tank for drain For disposition perform the same process as the waste ink tank If ink in the ink tray is hardened and it is hard to clean it with paper towel use the JV5 320DS ink tray clean ki...

Page 67: ...errors newly added 5 2 Error messages newly added 5 2 This chapter describes the actions to be taken when the printer develops any trouble CHAPTER 5 In Case of Trouble Downloaded From ManualsPrinter com Manuals ...

Page 68: ...ed Time to replace the filter of the flush ing BOX is coming soon Replacing the filter is recommended Error message Cause Remedy ERROR 145 F BOX FILTER EXCHAG 1 1 Only when the machine is equipped with the nozzle check unit option this error is displayed Time to replace the filter on the flush ing BOX has come Replace the filter as soon as possible ERROR 215 PLATEN During the power supply is ON th...

Page 69: ...unctions 6 25 List of functions 6 25 Setting a NCU functions 6 25 Outline of the NCU functions 6 26 DISPLAY setting 6 28 Applied settings of functions 6 29 Settings of heaters 6 29 Detailed settings of heaters 6 30 How to operate function menus 6 32 Functions related to print quality 6 33 Correcting media feed during printing FEED COMPENSATION 6 33 Functions related to ink 6 34 When ink sets 4 col...

Page 70: ... MAINTENANCE Maintenance functions are to be executed to keep the printer in good condi tion P 6 12 MACHINE SETUP Display various information of the printer or set time or units of measure P 6 16 NCU 1 1 NCU can be used only when the optional nozzle check unit OPT J0218 is mounted Set operations concerning the nozzle missing detection function P 6 25 DISPLAY Set a language to be used with the prin...

Page 71: ... 5 INK LAYERS Sets the number of layers in which ink is to be applied P 6 7 DRYING TIME Sets the time to wait for ink drying P 6 7 PRE FEED Feeds the media back and forth before printing P 6 8 MARGIN Sets a non printing area along the right and left edges of the media P 6 8 COLOR PATTERN Draws color patterns on both edges of the media P 6 9 REFRESH Refreshes the print heads during printing P 6 9 D...

Page 72: ...CAL mode and then select SET UP using the FUNCTION key and press the ENTER key If it is in REMOTE mode press the REMOTE key 2Select an appropriate one of Type 1 to Type 4 by means of or and press the ENTER key Set the printing conditions 3Select a setup function and make setting L JV5 01 width mm FUNCTION SET UP ENT SET UP SELECT TYPE 1 SET UP SELECT TYPE 2 Downloaded From ManualsPrinter com Manua...

Page 73: ...540 dpi resolution in the Y axis direction Available setting values STD FINE FAST Press the FUNCTION key while the quality item is selected Then the printer permits setting the number of passes for every resolution and setting high speed printing ON OFF The table below shows the combinations of the elements that can be set COMPENSATION Compensates the feeding amount of the media SPEED SWITCHING Se...

Page 74: ...de 1440x1440 is fixed SCAN DIRECTION Set the printing direction Available setting values Bi D Uni D Resolution in FINE mode 4 colors 6 colors FINE quality Passes High speed printing Passes High speed printing 540x720 dpi 6 ON OFF 6 ON OFF FAST 12 ON OFF 12 ON OFF STD 24 ON OFF 24 ON OFF FINE 720x720 dpi 4 ON OFF 8 ON OFF FAST 8 ON OFF 16 ON OFF STD 16 ON OFF 32 ON OFF FINE 720x1080 dpi 6 ON OFF 12...

Page 75: ... Set the time to wait for ink drying SCAN Set the time to wait for ink drying after each pass During bidirectional printing the printer stops tempo rarily after every outward trip and every homeward trip Available setting values 0 0 19 9 sec in steps of 0 1 sec Draw END Set the time to wait for ink drying after completion of printing Available setting values 0 999 sec in steps of 1 sec The setting...

Page 76: ...MARGIN Set a non printing area along the right and left edges of the media Left margin Set the width of the non printing area along the left edge of the media Available setting values 20 75 mm In steps of 1 mm Right margin Set the width of the non printing area along the right edge of the media Available setting values 20 75 mm In steps of 1 mm The setting values for each user type are stored sepa...

Page 77: ...x5 and can be changed the width of the pattern The setting values for each user type are stored separately from those for other user types Check pattern REFRESH Set the head refreshing level running flush interval Available setting values 0 3 Enhancing the level shortens the interval The setting values for each user type are stored separately from those for other user types DRYNESS FAN Sets the st...

Page 78: ... the interval at which cleaning is to be performed periodically during printing Available setting values 10 10000 mm Default 1000 mm CLEANING TYPE Set a type of automatic cleaning Available setting values SOFT NORMAL HARD The setting values for each user type are stored separately from those for other user types Maintenance while printing Refer to the Chapter 3 Maintenance while Printing of the JV...

Page 79: ...thod Available setting values AUTO MANUAL Default AUTO When AUTO is selected After entering the thickness of the media when starting media detection the media width will be detected automatically When MANUAL is selected After entering the thickness of the media when starting media detection enter the media width manually and set the media edge surface position If you use media that cannot be detec...

Page 80: ...to let the equipment realize the execution of cleaning after the cleaning of the flushing box P 2 14 DROP POScorrect Once the head height or ink type is changed correct the dot position P 2 14 PG DROP ADJUST Set the reference value for correcting the misalignment of the ink fall points between outward trip and homeward trip in bi directional printing when the head height has been changed This func...

Page 81: ... If it is in REMOTE mode press the REMOTE key once 2Select a maintenance function and make setting Operation procedure with the ST MAINT key ST MAINTENANCE 1Make sure that the printer is in LOCAL mode If it is in REMOTE mode press the REMOTE key once 2Press the ST MAINT key As ST MAINTENANCE is displayed perform each maintenance operation L JV5 01 width mm FUNCTION MAINTENANCE ENT L JV5 01 width m...

Page 82: ...dia length is input the print length is displayed STEPS 1Make sure that the printer is in LOCAL mode and then select MAINTENANCE using the FUNCTION key and press the ENTER key If it is in REMOTE mode press the REMOTE key once 2Select MEDIA RESIDUAL by pressing the key 10 times and press the ENTER key 3Set the setting of remaining amount to ON or OFF by pressing the or key Register the setting by p...

Page 83: ...ct BeforeMovingIt by pressing the key 11 times and press the ENTER key 3Make preparation for moving the printer When preparation has been made press the ENTER key 4Press the power button in the front The lamp on the power switch is put off 5Turn the main power supply OFF unplug the power cable and move the printer When moving the printer it must be held up by several people as illustrated below Th...

Page 84: ...TUP Make settings for outputting the date and time and printing conditions after printing P 6 19 CART PRIORITY You can select the cartridge status to use first with the double cartridge function of ink supply P 6 20 Test Draw Arrange You can set the placement direction of the drawn test pattern when perform ing test drawing repeatedly P 6 20 MACHINE NAME When the printer is connected through the U...

Page 85: ...to CONTINUE the fan will always operate RENEW Switches the fan operation Depending on the setting operates the fan motor Available setting values ON OFF Setting contents will not be saved Rear mist fan operates during drawing and from drawing has completed it operates depending on the setting of the stop timer Feeding TakeUP UNIT SELECT For heavy duty feeding take up device set whether to use or n...

Page 86: ...when FORE is selected Available setting values 10 to 1000mm When FORE BACK is set a media is pre feeded back and forth at specific amout to avoid media sticking HEATER SETUP Set the temperature that determines whether the post heater is reached to the specified temperature Available setting values STD set 5 C set 10 C set 15 C set 20 C When STD is set this machine assumes the post heater temperatu...

Page 87: ...g With STAMP SETUP set to ON the printer prints the conditions and the date and time after completion of printing one file Available setting values ON OFF With STAMP SETUP set to ON the printer outputs the following particulars after printing on each page Machine name F W Version Resolution Number of divisions Printing direction Scanning speed Number of layers Media feed correction value Head gap ...

Page 88: ...lace the test pattern in the SCAN direction MACHINE NAME When the printer is connected through the USB 2 0 interface to a system to which two or more machines are connected set the identifier of the printer to have the system recognize it As a machine name enter only the printer number in the form JV5 printer number Available setting values 01 99 Default 01 INFORMATION INFORMATION one of the MACHI...

Page 89: ...record of one maintenance operation PRT modeHISTORY Displays the information printing conditions of the online printing that has been performed up to now since power on Max 50 Using or key the display can be changed in the order of printing Display Date history number resolution number of passes printing direction data format Variable Normal scanning speed number of layers print lenght at completi...

Page 90: ...6 Operation for Functions 6 22 Settings of the setup functions grouped for each user type Settings of the maintenance functions Downloaded From ManualsPrinter com Manuals ...

Page 91: ...tings of the machine setup functions Settings of NCU Settings of DISPLAY Settings of REPLACE COUNTER Date and time Drawn only when the machine is equipped with the optional nozzle check unit OPT J0218 Downloaded From ManualsPrinter com Manuals ...

Page 92: ...ion of the equipment Serial DealerNo Displays the serial No and dealer No of the printer Item Display Remarks Model JV5 320DS Main F W Version NCU F W Version I F type USB I F USB 2 0 I F F W Version MRL III command Version Downloaded From ManualsPrinter com Manuals ...

Page 93: ...the ENTER key If it is in REMOTE mode press the REMOTE key once 2Select an NCU function and make setting Name Function Page in this manual NOZZLE CHECK Set whether or not to perform nozzle missing detection P 6 26 NG ACTION 1 Set the operation of the printer to be performed in case the preset number of or more missing nozzles are detected and thus NG judgment is made 2 P 6 26 NG JUDGEMENT 1 Set th...

Page 94: ...selected CLEANING TYPE CLEANING CONT CLEANING STOP Set a type of cleaning Available setting values NORMAL SOFT HARD Default NORMAL RETRY COUNT CLEANING STOP Set the number of times cleaning is to be retried Available setting values 0 3 Default 3 With RETRY COUNT set to 3 the printer will perform cleaning operation a maximum of four times as long as clogged nozzles are not corrected including the f...

Page 95: ...NZL color Set the number of missing nozzles per row for judging the nozzle check NG 2 Available setting values 1 180 Default 10 CLOGG NZL ALL Set the total number of missing nozzles for judging the nozzle check NG 2 Available setting values 1 180 Default 10 COND INDICATION Displays the status of the NCU Pressing FUNCTION key it displays every error that has occurred in the NCU and between NCU Main...

Page 96: ... 28 DISPLAY setting Set a language to be used with the printer Language Japanese English German French Spanish Italian Portuguese The setting is reflected on the indications on the LCDs Downloaded From ManualsPrinter com Manuals ...

Page 97: ...e printer receives data at the preheat temperature the heaters automatically raise their temper atures up to the preset levels and then the printer starts printing When NONE is selected the temperatures do not drop to the preheat level NONE 0 90 min In steps of 10 minutes OFF TIME The heaters are turned off in the following case If a preset time has passed without printing while the printer is in ...

Page 98: ...de The heater temperatures are set on the computer Setting value of temperature Rough guide for temperature setting Use this printer at 20 35 to ensure reliable printing The heater temperatures may not rise to the set values depending on the ambient temperature The heater temperatures can be controlled on your application software if it has a function to do so For setting on the application softwa...

Page 99: ...ones of the and keys Use the or key to change the setting values of temperatures the or key to move the cursor and the ENTER key to register the setting values in memory 5Press the key select SET TIME and set SET TIME Use the or key to change the seting value of the time the or key to move the cursor and the ENTER key to register the setting values in memory 0 90 min In steps of 10 minutes 6Press ...

Page 100: ...icon means pressing the or key to switch between setting values or items This icon means pressing the ENTER key once to execute the setting value or item that is currently displayed This kind of icon means pressing the indicated key once This icon means pressing the ST MAINT key once This icon means pressing the END key to cancel the execution This graphic represents the display This graphic shows...

Page 101: ...ibed operation is executed in LOCAL mode However the operation described here is to be executed to correct the media feed rate in REMOTE mode or during printing of image data FEED COMPENSATION 0 FEED COMPENSATION 0 1 FEED COMPENSATION SAVE ent 500 500 Change is canceled L JV5 01 width mm L JV5 01 width mm R JV5 01 m R JV5 01 m The correction value is valid temporarily The correction value will be ...

Page 102: ...8 9ABC DEFG Set the cleaning liquid cartridge It is being absorbed PLEASE WAIT Remove the cleaning liquid cartridge Remove all washing liquid cartridges 1234 5678 9ABC DEFG It sBeingDischarged PLEASE WAIT Set all washing liquid cartridges 1234 5678 9ABC DEFG Set the cleaning liquid cartridge It is being absorbed PLEASE WAIT Continued to the next page L JV5 01 width mm Processing completed Processi...

Page 103: ...ashing liquid cartridges 1234 5678 9ABC DEFG It sBeingDischarged PLEASE WAIT Please select according to situation COMPLETED WASH Do you discharge a mainte Wash liquid No Yes Remove the cleaning liquid cartridge Remove all washing liquid cartridges There is a CARTRIDGE It sBeingDischarged PLEASE WAIT HD MAINTENANCE DISCHARGE WASH ent Processing completed Check the condition Check the condition Proc...

Page 104: ...6 Operation for Functions 6 36 Function Flowchart BOOT JV5 320DS Downloaded From ManualsPrinter com Manuals ...

Page 105: ...6 37 Function Flowchart BOOT Downloaded From ManualsPrinter com Manuals ...

Page 106: ...6 Operation for Functions 6 38 Function Flowchart LOCAL mode Downloaded From ManualsPrinter com Manuals ...

Page 107: ...6 39 Function Flowchart LOCAL mode S Downloaded From ManualsPrinter com Manuals ...

Page 108: ...6 Operation for Functions 6 40 Downloaded From ManualsPrinter com Manuals ...

Page 109: ...6 41 Function Flowchart LOCAL mode Downloaded From ManualsPrinter com Manuals ...

Page 110: ...6 Operation for Functions 6 42 Function Flowchart REMOTE mode Downloaded From ManualsPrinter com Manuals ...

Page 111: ...6 43 Function Flowchart REMOTE mode Downloaded From ManualsPrinter com Manuals ...

Page 112: ...6 Operation for Functions 6 44 Function Flowchart FUNCTION Key Downloaded From ManualsPrinter com Manuals ...

Page 113: ...6 45 Function Flowchart FUNCTION Key Downloaded From ManualsPrinter com Manuals ...

Page 114: ...6 Operation for Functions 6 46 Downloaded From ManualsPrinter com Manuals ...

Page 115: ...6 47 Function Flowchart FUNCTION Key Downloaded From ManualsPrinter com Manuals ...

Page 116: ...6 Operation for Functions 6 48 Downloaded From ManualsPrinter com Manuals ...

Page 117: ...6 49 Function Flowchart FUNCTION Key Downloaded From ManualsPrinter com Manuals ...

Page 118: ...6 Operation for Functions 6 50 Downloaded From ManualsPrinter com Manuals ...

Page 119: ...6 51 Function Flowchart FUNCTION Key Downloaded From ManualsPrinter com Manuals ...

Page 120: ...6 Operation for Functions 6 52 Downloaded From ManualsPrinter com Manuals ...

Page 121: ...6 53 Function Flowchart FUNCTION Key Downloaded From ManualsPrinter com Manuals ...

Page 122: ...6 Operation for Functions 6 54 Downloaded From ManualsPrinter com Manuals ...

Page 123: ...6 55 Function Flowchart FUNCTION Key Downloaded From ManualsPrinter com Manuals ...

Page 124: ...6 Operation for Functions 6 56 Downloaded From ManualsPrinter com Manuals ...

Page 125: ...6 57 Function Flowchart FUNCTION Key Downloaded From ManualsPrinter com Manuals ...

Page 126: ...6 Operation for Functions 6 58 Downloaded From ManualsPrinter com Manuals ...

Page 127: ...6 59 Function Flowchart FUNCTION Key Downloaded From ManualsPrinter com Manuals ...

Page 128: ...6 Operation for Functions 6 60 Downloaded From ManualsPrinter com Manuals ...

Page 129: ...6 61 Function Flowchart FUNCTION Key Downloaded From ManualsPrinter com Manuals ...

Page 130: ...6 Operation for Functions 6 62 Downloaded From ManualsPrinter com Manuals ...

Page 131: ...6 63 Function Flowchart FUNCTION Key Downloaded From ManualsPrinter com Manuals ...

Page 132: ...6 Operation for Functions 6 64 Downloaded From ManualsPrinter com Manuals ...

Page 133: ...6 65 Function Flowchart FUNCTION Key Downloaded From ManualsPrinter com Manuals ...

Page 134: ...6 Operation for Functions 6 66 Downloaded From ManualsPrinter com Manuals ...

Page 135: ...6 67 Function Flowchart FUNCTION Key Downloaded From ManualsPrinter com Manuals ...

Page 136: ...6 Operation for Functions 6 68 Downloaded From ManualsPrinter com Manuals ...

Page 137: ...6 69 Function Flowchart FUNCTION Key Downloaded From ManualsPrinter com Manuals ...

Page 138: ...6 Operation for Functions 6 70 D202100 10 27112009 Downloaded From ManualsPrinter com Manuals ...

Page 139: ...Downloaded From ManualsPrinter com Manuals ...

Page 140: ...Printed in Japan MIMAKI ENGINEERING CO LTD FW 6 0 NH Downloaded From ManualsPrinter com Manuals ...

Reviews: