MIMAKI jV100-160 Requests For Care And Maintenance Download Page 31

4. Consumable Item Replacement

31

5

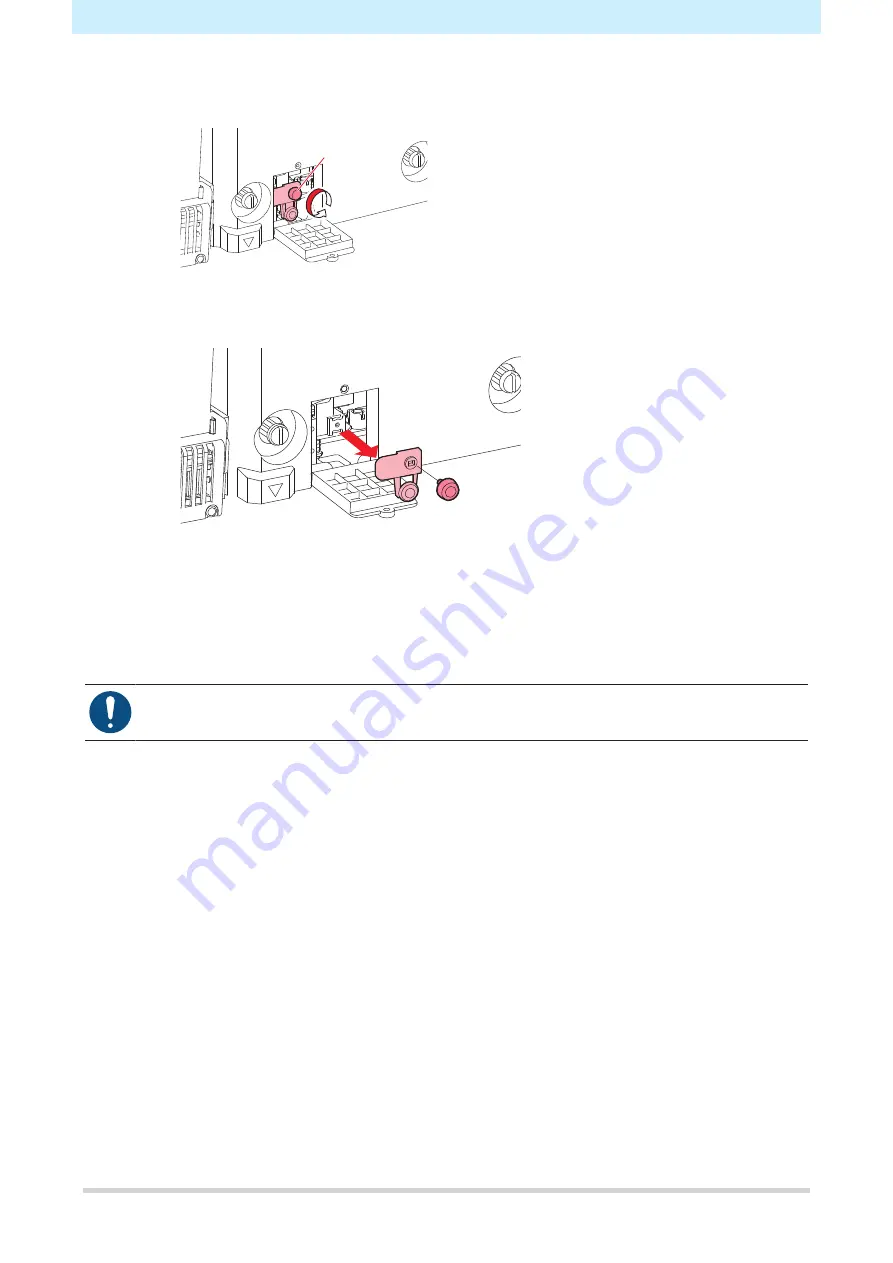
Replace the media cutter.

(1) Unscrew the cutter screw.

Screw

(2) Remove the cutter.

(3) Attach a new cutter.

(4) Tighten the screw to clamp the cutter.

6

Close the carriage cover hatch, then retighten the screw.

7

Once replacement is complete, close the front cover, then press the [ENTER] key.

• When disposing of the product, contact an industrial waste disposal operator or dispose of the

product in accordance with the local laws and regulations.

Summary of Contents for jV100-160

Page 1: ...Cartridge ink model You can also download the latest manual from official website MIMAKI ENGINEERING CO LTD https mimaki com D203530 10 Original instructions...

Page 2: ...e Channel Cleaning 13 Media Sensor Cleaning 13 Automatic Correction Sensor DAS Cleaning 14 Media Holder Cleaning 15 Platen Cleaning 15 Cover Exterior Cleaning 16 When Not in Use for Extended Periods 1...

Page 3: ...3 Maintenance To ensure years of precise performance maintain this product periodically or based on frequency of use Read the maintenance precautions thoroughly before maintaining this product...

Page 4: ...g a soft cloth soaked in dilute detergent and thoroughly wrung out Pay close attention to ventilation and be sure to wear safety glasses gloves and a mask when handling ink maintenance liquid waste in...

Page 5: ...sor Automatic Correction Sensor DAS Cleaning P 14 Clean the media holder Media Holder Cleaning P 15 Clean the ink discharge channel Ink Discharge Channel Cleaning P 13 Clean the platen Platen Cleaning...

Page 6: ...uct in locations accessible to children Ink Maintenance If ink constituents are sedimented the ink density may become uneven We recommend shaking the Ink bottle periodically to keep printing consisten...

Page 7: ...against the nozzle surface leading to printing defects e g nozzle clogging or deflection Be careful to avoid leaving fragments from the cleaning stick behind when cleaning These fragments will increas...

Page 8: ...e liquid Make sure none remains 7 Reattach the wiper at the original position Lug Do not remove the absorbent material in the absorbent material case Doing so may result in leaking ink 8 Once cleaning...

Page 9: ...ean stick moistened with maintenance liquid Wipe off the maintenance liquid Make sure none remains Cap rubber 5 Check to confirm that the cap slider is not tilted once cleaning is complete If the cap...

Page 10: ...g stick moistened with maintenance liquid Wipe off the maintenance liquid Make sure none remains Insert the cleaning stick as far as the line shown in the illustration 5 Once cleaning is complete clos...

Page 11: ...liquid Wipe off the maintenance liquid Make sure none remains Clean the print head sides dark red area using a cleaning stick Never touch the nozzle surface Clean using a cleaning stick or soft cloth...

Page 12: ...aintenance liquid Close the front cover The cap cannot be filled with maintenance liquid unless the front cover is closed This is also true if the maintenance liquid cartridge is empty 8 Open the fron...

Page 13: ...the front cover The cap cannot be filled with maintenance liquid unless the front cover is closed This is also true if the maintenance liquid cartridge is empty 3 Open the front cover Check to confir...

Page 14: ...ntenance covers then press the ENTER key Automatic Correction Sensor DAS Cleaning The DAS sensor is located on the carriage underside If dust or debris accumulates on the sensor an error may occur in...

Page 15: ...er feeding of the media It will also cause dried ink and attached dust to rub against the head nozzle surface and lead to print defects e g nozzle clogging deflection Media holder Do not allow liquids...

Page 16: ...e susceptible to dust accumulation Remove any debris carefully Cover Exterior Cleaning Do not allow liquids to get inside the product Otherwise there is a risk of failure electric shock or fire For he...

Page 17: ...ose the front cover The cap cannot be filled with maintenance liquid unless the front cover is closed This is also true if the maintenance liquid cartridge is empty 8 Open the front cover Check to con...

Page 18: ...ower supply will disable the automatic maintenance function including nozzle clogging prevention function and ink discharge channel cleaning function This will increase the risk of print defects e g n...

Page 19: ...ing this product in locations accessible to children Wiper Replacement This product maintains a count of the number of wiping cycles The Replace Wiper message appears when a preset count is reached Re...

Page 20: ...wiper Lug 8 Once replacement is complete close the front cover then press the ENTER key The wiper usage count is reset Wiper Cleaner Replacement Replace with a new wiper cleaner once a year 1 On the...

Page 21: ...not to lose the rubber seals 5 Remove the wiper cleaner Pull it forward to detach it 6 Attach a new wiper cleaner Slide backward to attach 7 Install the fitting There is a risk of maintenance liquid...

Page 22: ...m 1 On the LOCAL mode screen select MENU Maintenance then press the ENTER key The Maintenance menu is displayed 2 Select Station Carriage Out Move To Platen Right End then press the ENTER key The carr...

Page 23: ...ery dirty or if ink drips on to the media replace with a new cap absorber 1 On the LOCAL mode screen select MENU Maintenance then press the ENTER key The Maintenance menu is displayed 2 Select Station...

Page 24: ...r Check to confirm that the carriage returns to the station Waste Ink Tank Replacement Ink used during head cleaning and other processes is collected in the waste ink tank at the lower right of the pr...

Page 25: ...te ink tank referring to Replace the waste ink tank P 25 3 On the LOCAL mode screen select MENU Maintenance then press the ENTER key The Maintenance menu is displayed 4 Select Waste ink tank then pres...

Page 26: ...nk tank and use tape to prevent leakage of waste ink When disposing of the product contact an industrial waste disposal operator or dispose of the product in accordance with the local laws and regulat...

Page 27: ...t Fan filter cover Claw 2 Remove the filter Blowing fan filter 3 Attach a new filter and the fan filter cover Push in the fan filter cover until the tab clicks Pinch Roller Replacement Replace worn or...

Page 28: ...rollers Pinch roller 5 Attach new pinch rollers and secure them using the O ring 6 Close the front cover Media Holder Replacement If the media holder becomes deformed and touches the carriage or print...

Page 29: ...der stopper 3 Remove the media holder 4 Remove the sliders from the media holder Be careful to avoid misplacing the sliders 5 Attach the sliders to the new media holder Engage the holes in the sliders...

Page 30: ...this product in locations accessible to children 1 On the LOCAL mode screen select MENU Maintenance then press the ENTER key The Maintenance menu is displayed 2 Select Station Carriage Out Move To Pla...

Page 31: ...ter 4 Tighten the screw to clamp the cutter 6 Close the carriage cover hatch then retighten the screw 7 Once replacement is complete close the front cover then press the ENTER key When disposing of th...

Page 32: ......

Page 33: ......

Page 34: ......

Page 35: ...Care and maintenance November 2020 MIMAKI ENGINEERING CO LTD 2182 3 Shigeno otsu Tomi shi Nagano 389 0512 JAPAN D203530 10 10112020...

Page 36: ...MIMAKI ENGINEERING CO LTD 2020 YM FW 1 0...

Reviews: