background image

DRONE CONTROL BY REMOTE CONTROL

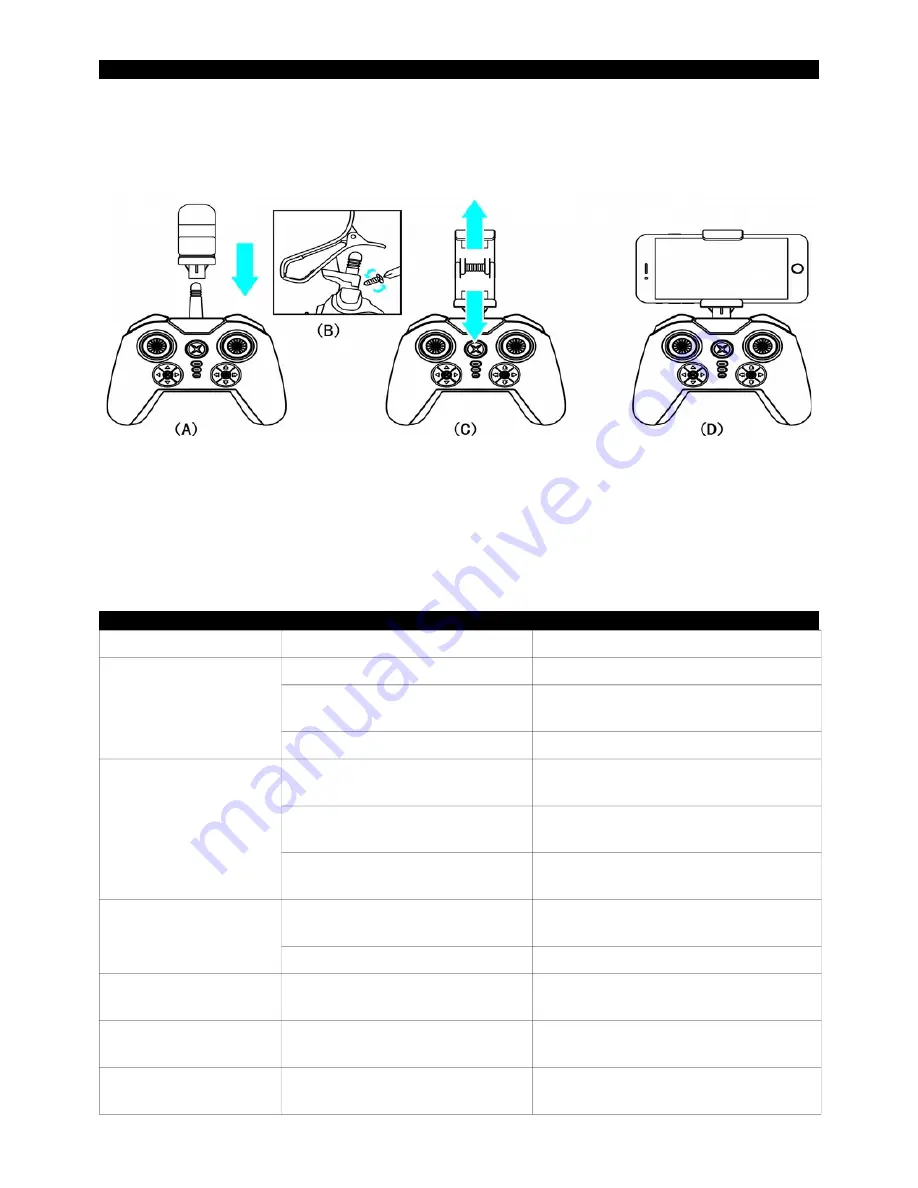
You can mount the smartphone on the remote and use the smartphone screen for video display only.

INSTALLING THE SMARTPHONE ON REMOTE CONTROL

Follow the instructions below to install the mobile phone mount on the remote control and to secure the 
smartphone on it.

FLIGHT PREPARATION 

First synchronize the drone with the remote control as explained earlier in this manual.
Then start the Midrone 160 App on the smartphone and disable the display of joysticks on the control 
interface.
You can now control the drone with the remote control and enjoy the video transmission on the screen of 
your smartphone.

TROUBLESHOOTING

Problem

Cause

Solution

The remote control does 
not work at all

1. The batteries are used

Remplace the batteries

2. The batteries are not well 
installed

Check polarity indications and insert the 
batteries in the right direction

3. The ON/OFF switch is on OFF

Power ON the remote control

The controls do not work
properly

1. The drone battery is not correctly
installed

Verify the connection of the battery

2. The remote control and drone are
not synchronized

Start again the synchronization 
procedure explained in this manual

3. Bad weather conditions

Do not fly the drone in windy conditions 
or if it rains

The drone does not take 
off

1. The propellers are not rotating 
fast enough

Push the left joystick upward

2. The drone battery is discharged

Recharge the battery

Brutal landing

1. The left joystick is pulled down 
to quickly

Pull the left Joystick slowly for a soft 
landing

Loss of control

1. Exceeding the maximum range 
of the remote control

The maximum range is approximately 70
m with remote and 30m in WiFi

2. Bad weather conditions

Do not fly the drone in windy conditions 
or if it rains

Summary of Contents for SKY 160 WIFI FPV

Page 1: ...part of the product or the information contained in this manual Please refer to our website www midrone com for more information SAFETY INSTRUCTIONS The propellers in movement can cause more or less s...

Page 2: ...e material or in a vehicle 5 When the drone has just finished flight the battery temperature is higher it is preferable to wait for 30 minutes and charge the lithium battery when cooled otherwise it m...

Page 3: ...landing and charge the battery before next flight REPLACEMENT OF THE PROPELLERS If a propeller replacement is necessary pay special attention to the direction of rotation The propellers that rotate c...

Page 4: ...press the one key landing button the drone will descend slowly to the land The propellers will stop rotating after 3 to 5 seconds NOTE you can still control the direction of the drone with the remote...

Page 5: ...FORWARD BACKWARD FLY right joystick SIDEWARD FLY right joystick FLYING MICRO ADJUSTMENTS TRIM...

Page 6: ...Once this step is done and the drone is flying press the mode Headless button on the remote control to activate CF Mode Direction Lock The LED lights of the drone will flash quickly to confirm that th...

Page 7: ...s the one key return button on the remote control The drone s front and back lights flash quickly together Press this button again or push the forward joystick to exit this function the drone will hov...

Page 8: ...start Midrone SKY 160 application on the smartphone Important informations 1 It is recommended to set the smartphone in airplane mode during control of the drone to avoid receiving a call during the...

Page 9: ...the smartphone 8 Press this button to show or hide the virtual joysticks and other controls of the drone 9 Press this button to show or hide the setup menu 10 Headless mode 11 Gyroscope calibration 12...

Page 10: ...on the control panel icon 8 above image is ON 2 The virtual joysticks work the same way as the physical joysticks of the remote control 3 Please move slowly the ball of virtual joysticks for not losin...

Page 11: ...of the screen in left hand mode and on the left of the screen for right hand mode G SENSOR CONTROL Enable G sensor control on the control interface icon 7 in the control interface description on the...

Page 12: ...teries are not well installed Check polarity indications and insert the batteries in the right direction 3 The ON OFF switch is on OFF Power ON the remote control The controls do not work properly 1 T...

Page 13: ...in the manufacturer s manual The serial number or lot number labels and stickers sabotage must be intact with no signs of tampering The guarantee is not applicable for Damage resulting from misuse acc...

Page 14: ...50mAh 3 7V USB Charger 4 batteries AAA 1 5V needed for remote controller not included in the pack RESPECT THE ENVIRONMENT This product or its battery can not be disposed of with household waste it mus...

Page 15: ...th the essential requirements and other relevant provisions of the European Directive RED 2014 53 EU This product has been tested with the listed standards and found in compliance with the following E...

Reviews: