Unlocking Method
Fingerprint
Password
RF Card
Mechanical key
Virtual password
Unlock
Place a registered fingerprint on the fingerprint input area to unlock the
door.
Enter any characters before and after the correct password (not more than
20 characters, part of which should include the correct password), and
press to unlock the door.
Enter the correct password and press to unlock the door.
Press and enter the user password to mute the unlocking sound.
Place a registered RF card close to the reading area to unlock the door.
Insert and rotate the supporting mechanical key to unlock the door.
System Settings
Step 1:
Step 2:
Step 1:
Step 2:
Step 1:
Step 2:
Modify the
administrator
password
Menu
Volume settings
High
Medium
Press to enter menu volume settings, Press to adjust to medium
volume.
Enter the menu. Press
to enter System Settings. Press
to adjust
volume.
Press to enter menu volume settings, Press to adjust to high
volume.
Enter the menu. Press
to enter System Settings. Press
to adjust
volume.
Press
to enter the new administrator password twice based on the
voice prompt. After confirmation, the system will prompt that the
password has been changed successfully.
Enter the administrator password, and press to enter the menu. Then
press to enter System Settings.
3
3
2
2
2
1
1
1
1
3
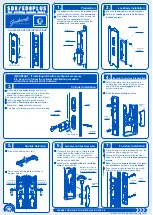
Installation Precautions
• Before installation, check whether the door is within the allowable thickness range of 40 to 90 mm. If not,
contact the dealer.
• When fixing the exterior and interior units, do not press the internal connection cables.
• When installing the exterior and interior units, handle them carefully to avoid scratching the unit surface
and affecting the appearance.
• Choose the correct accessories according to the door thickness. For details, please refer to the accessories
package.
C
Indoor
Indoor
Indoor
D
Indoor
Installation
Door Opening Direction
Remove & Install the Battery Cover
Installation Procedure
A
B
Handle
Press the battery cover and push it (arrow direction as
shown) to remove the battery cover.
After installing the battery, match the battery cover on the
back plate, press and gently push in and fasten.
Left-handed door: The 1st and 2nd pictures above show the left-handed doors, which can be classified into
the push-in and pull-out types.
Refer to the other two figures for right-handed doors if you want to change the door opening direction.
Please refer to the Holes Diagram and Installation Procedure during installation. For any questions, please
consult the local dealer.
Left-handed door (push-in)
Right-handed door (pull-out)
Right-handed door (push-in)
Left-handed door (pull-out)
2
2
3
1
1
3
3
4
Press to enter menu volume settings, Press to adjust to low
volume.
Step 1:
Step 2:
Step 1:
Step 2:
Menu
Volume settings
Low
Mute
Enter the menu. Press
to enter System Settings. Press
to adjust
volume.
Enter the menu. Press
to enter System Settings. Press
to adjust
volume.
Press to enter menu volume settings, Press to adjust to mute
mode.
Summary of Contents for MLHBF211D21
Page 1: ...MLHBF211D21 www mideahk com MLHBF211D21 6V 50uA 200mA 4 8V 0 2V AA CNT...
Page 2: ...09 10 10 11 01 01 08 08 02 03 03 04 2A 2 50 25 50...
Page 3: ...party 90 90 Party 6 8 1 2 2 3 5 5 90 3...
Page 4: ...0 9 4 2A 1 2 5 1 2 1 2 6 12 Micro USB 5V 2A...
Page 6: ...20 90 1 2 1 2 1 2 2 3 3 2 2 2 1 1 1 1 3 40 90 C D A B A B 2 2 3 1 1 3 3 4 1 2 1 2 7 8...
Page 17: ...128g 210 145 V A 20210508...