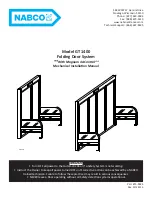
Prepare the door according to the table and diagram
below, to suit the application.
375 mm
961 mm
961 mm
546 mm
546 mm
961 mm
[A]
[B]
375 mm
367mm
S14R/P
S14R/L
S14R/H
Code
S14R/S
Suit 1500
Low
High
Sample
With the
top
remote lock
connected to the
top
rod
,
slide the
free-end
of the
top rod
though the
top
remote lock cutout.
Repeat the above process for the
bottom remote lock
.
Rod lengths for each application are given in the table
below for reference. If using the Adjustable Rod system,
see over page for setup instructions.
Fit a supplied
o-ring
on each rod 60 - 80mm from the
remote end (not needed for Adjustable Rods).
Assemble corresponding
rods
to the
top
and
bottom
remote locks
, ensuring the
UP arrows
on the
remote
locks
are pointing towards the top of the door.
NOTE:
DO NOT SCREW THE REMOTE LOCKS IN YET.
top
remote lock
bottom
remote lock
o-ring
o-ring
rod
free-ends
top
remote lock
top cutout
bottom cutout
bottom
remote lock
399 mm
985 mm
570 mm
TOP Rod
993 mm
578 mm
993 mm
BOT. Rod
399 mm
399 mm
Suit 1500
Low
High
Sample
=[A]+24
mm
=[B]+32
mm
Formula
go to Step 3.
Mark the cutout dimensions
A
and
B
on the
Measurement Guide
provided.
NOTE: The standard cutout positions are pre-marked.
If you are fitting several doors with the same cutout
dimensions, it is recommended that you securely tape
the
Measurement Guide
to a benchtop or piece of
timber. Then drill holes (4.5mm diameter) to locate and
secure the rod ends while fastening.
Follow this step if using Adjustable Rods, otherwise
coupling
central hole
(large hole upwards)
rod length
min. 100
coupling
min. 100
rod
rod
drive pin and rolled pin
flush inside the coupling
The
coupling
should be placed in the center between
the two
rod ends
, and have the larger
central hole
facing upwards.
NOTE: If the distance between the straight rod ends and
the bent rod ends is less than 100mm (as shown above)
you must cut-down the rods enough to provide this
clearance.
The
rod ends
must be pointing downwards into the
benchtop. If you are not drilling holes for the
rod ends
,
you will need to place a flat block (10mm thick) under
the
coupling
.
Insert the
steel rods
into the brass
coupling
as shown.
tap with hammer until it is fully inside the
coupling
.
CHECK THAT THE ROD ENDS ARE PARALLEL AND
POINTING STRAIGHT DOWN
.
Re-align if necessary and check the overall length.
Insert the
rolled steel pin
into the large
central hole
and
rolled pin
and hammer until it is fully inside the
coupling
.
Place the pointed end of the
drive pin
into the top of the
coupling
rolled pin
drive pin
central hole
The Adjustable Rod is now ready for installation.
rolled
pin
drive
pin
E TH
L
C
IS
Y
P
C
A
E
C
R
K
E
A
S
G
A
IN
E
G
L
P
172
156
64
19
60
60
19
25
16 Slot Width
[A]
[B]
Centre Line
of Cutout
64
Illustrated fitting instructions
ILLUSTRATED FITTING INSTRUCTIONS
S14R
multi-point rod kit
Austral
Lock
for sliding security doors
1.
Prepare Door
2.
Adjustable Rod Setup
(OPTIONAL)
3.
Install Remote Locks
(PK0190) S14R Instructions A4 R13.cdr
Insert the
rod free-ends
into the two
Ø5 drive holes
on the rear of the centrelock.
Pull the
free-ends
of the
rods
out through the
centrelock
cutout.
Insert the centrelock into the
centrelock cutout
and
secure with two
#8x13mm lock body screws.
rod
free-end
lock body
screw
PLEASE TURN PAGE FOR STEPS 6 - 11
4.
Remove Plug in Centrelock
Remove
plug
in the
drive tab
on the rear of the
centrelock
and discard.
Ø5mm
REMOVE
Ø5mm plug
drive tab
5.
Install Centrelock
centrelock
cutout