background image

12

13

1. For the first use, please charge for 12 hours;

Remote control will work when within 16 feet of the robot.

2. When the battery is low power, please charge it as soon as possible;
3. If you do not use the appliance for an extended period of time, fully charge the battery and

put it in a ventilated and dry place;

4. If the appliance is not used for more than 3 months, charge the appliance for 12 hours.

NOTE

NOTE

a. Before using remote, insert the 2 included AAA batteries. Remove back battery cover and insert
in correct orientation.
b. To prevent the robot from accidentally falling down stairs, there is no backwards direction.

NOTE

Low Power Test Mode
In this mode, the wifi module will enter the IDLE state, and the cleaner is in a low-power 
consumption state and cannot work normally.
Entry: After the cleaner is turned on for 30 seconds, press the left bumper and mute button on the 
remote control simultaneously. The operation need to be completed within 1 minute.
Exit: Restart the cleaner.

NOTE

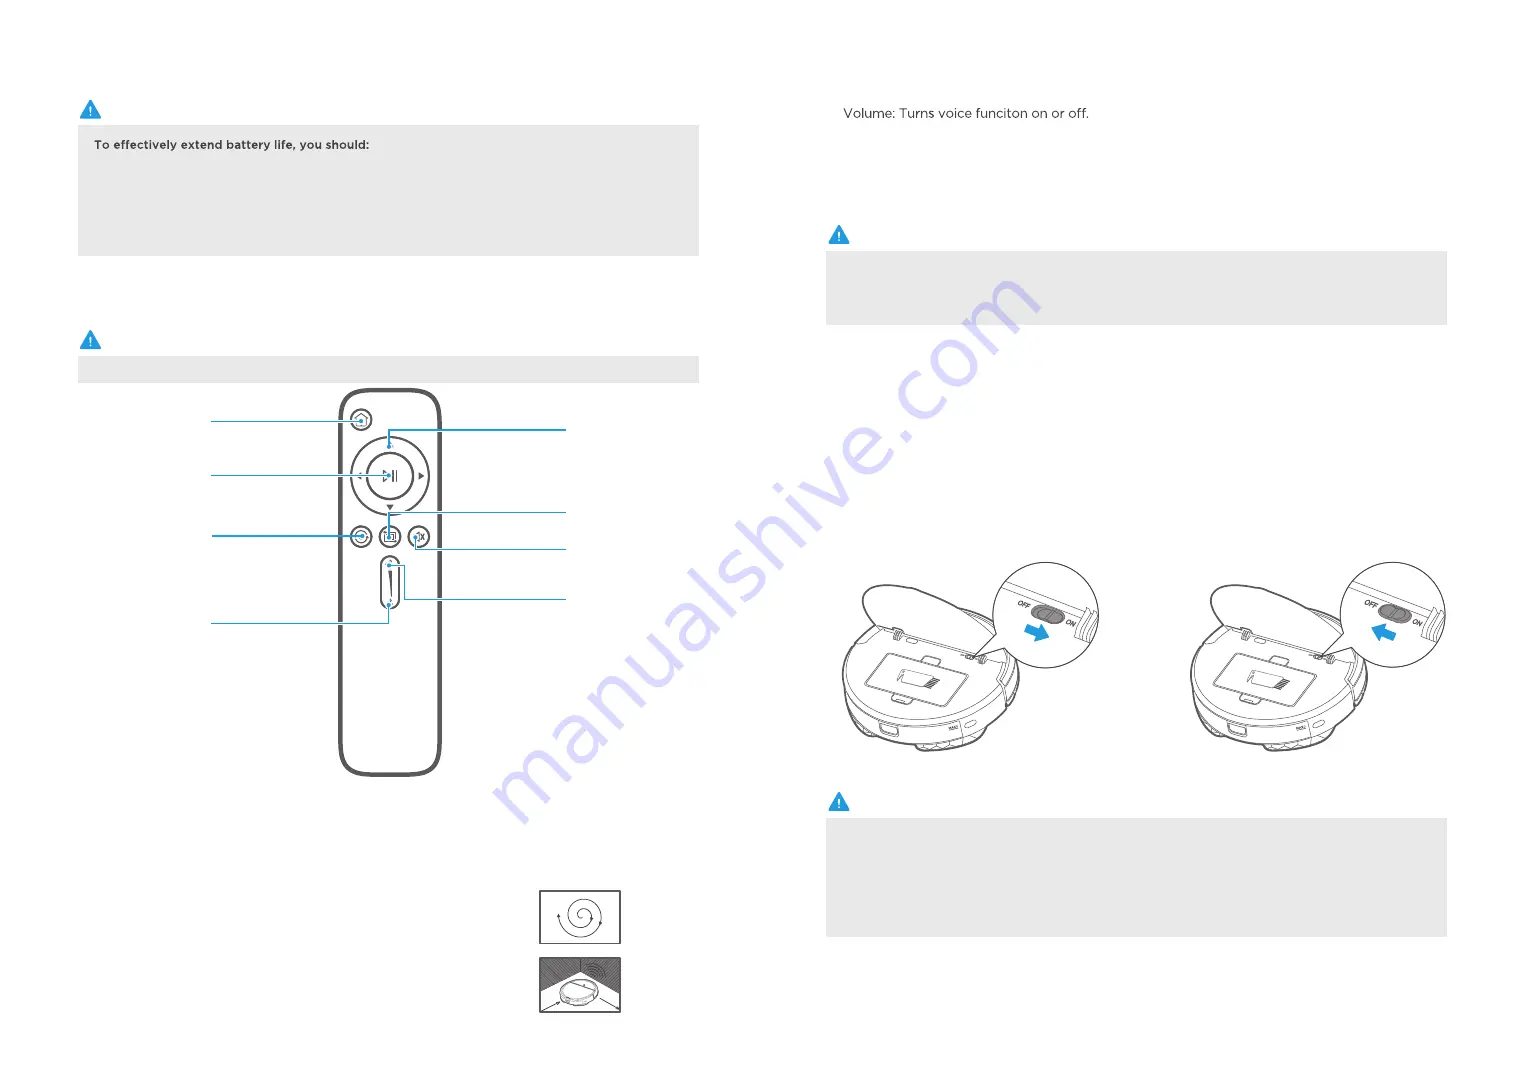
Docking: Vacuum will return to docking station to charge.

1

6

Suction increase: Increases the suction power.

7

Suction decrease: Decreases the suction power.

8

Direction: Manually control the direction of the robot (forward, left, and right). Note that the robot 

2

does not vacuum when in manual mode.
Start/Pause: Start or pause cleaning. The robot will automatically begin Smart Path cleaning.

3

Power ON/OFF

Introduction of Remote Control

1

Open the cover and slide power switch 

to on.

Docking

Start/Pause

Spot cleaning

Suction decrease

Direction

Edge cleaning

Volume

Suction increase

Spot cleaning: The robot will clean a specific area in a spiral pattern.

4

Edge cleaning: The robot will clean edges of the room and furniture.

5

Summary of Contents for Eureka i5

Page 1: ...ROBOT VACUUM CLEANER INSTRUCTION MANUAL Please read the Manual carefully before use and keep it properly...

Page 2: ...ntroduction of Remote Control Power ON OFF Clean Pause Guide for network accessing con guration Connect robot with Amazon Alexa Mopping Product Maintenance Cleaning the Side Brush Cleaning the Dust Bi...

Page 3: ...pack is not in use keep it away from other metal objects like papre clips coins keys nails screws or other metal objects that can make a connection from one terminal to another Shorting the battery t...

Page 4: ...t Introduction 6 7 Instruction manual X1 Manual Mop holder X1 Spare filter X1 Side brush X2 Pairs Remote control X1 Docking station X1 Battery X2 Mopping pad X2 Cleaning brush X1 Robot Vacuum Power co...

Page 5: ...wer socket 8 9 Brushroll cover Side brush Brushroll Wheel Universal wheel Battery cover Cover for water outlet Mop holder Dust bin Docking station Water tank assembly Product Introduction Illustration...

Page 6: ...white light will start flashing indicating the robot is charging Charge for 12 hours before first use 3 1 5 M 5 ft 1 5 M 5 ft 1 5 M 5 ft 1 5 M 5 ft 1 Put the docking station well Place the docking st...

Page 7: ...te and cannot work normally Entry After the cleaner is turned on for 30 seconds press the left bumper and mute button on the remote control simultaneously The operation need to be completed within 1 m...

Page 8: ...or password is changed Network accessing config operation of the cleaner Hold the start key 3 seconds after the cleaner is power on and release after a tick sound is heard now the cleaner is configure...

Page 9: ...ent NOTE 1 Open the upper cover of the cleaner and press power switch 2 When 1st using slow flickering of wifi indicator light indicates that the cleaner gets into the state of network accessing confi...

Page 10: ...any cleaning solutions c It is recommended to observe the robot when mopping to ensure it does not go onto carpet NOTE Attach the mopping pad to the holder 1 Press the button on tank and pull to remo...

Page 11: ...rapping 1 Product Maintenance Press the dust bin removal button and lift out the dust bin Cleaning the Side Brush Cleaning the Dust Bin Sponge and Filter Open the cover 1 2 Press dust bin release butt...

Page 12: ...he Pour out the remaining water from the water tank 3 Cleaning the Water Tank Wipe dry the water tank and set aside Exposure to sunlight is not recommended 4 Wipe the sensor and wheels gently with a s...

Page 13: ...pside down place your thumb in the open slot between the two tabs 1 Press brushroll lock and lift up to access brushroll 2 Clean the brushroll with a soft cloth or warm water Dry THOROUGHOLY and reins...

Page 14: ...n matter stuck Turn on the power switch of appliance Reset and make appointment The appliance gets stuck Not cleaned completely and recharge it No cleaning according to the preset time After the mop h...

Reviews: