background image

10

11

Product Operation

NOTE

a. When vacuum is charging, a white light will flash on the top of the vacuum;
b. When charing is complete, the white light will remain constant, followed by a audible description
stating "Charging completed";
c. When the battery is low, an audible description stating "Low battery" will be heard, followed by
a red flashing light;
d. If the robot is cleaning when low battery is identified, the robot will automatically find the
docking station to charge.
e. The robot can also be manually sent back to the docking station to charge by using the remote,
or app.
f. Before charging, it is suggested to empty the water tank and remove the mopping pad and holder.

NOTE

Charging your Robot Vacuum

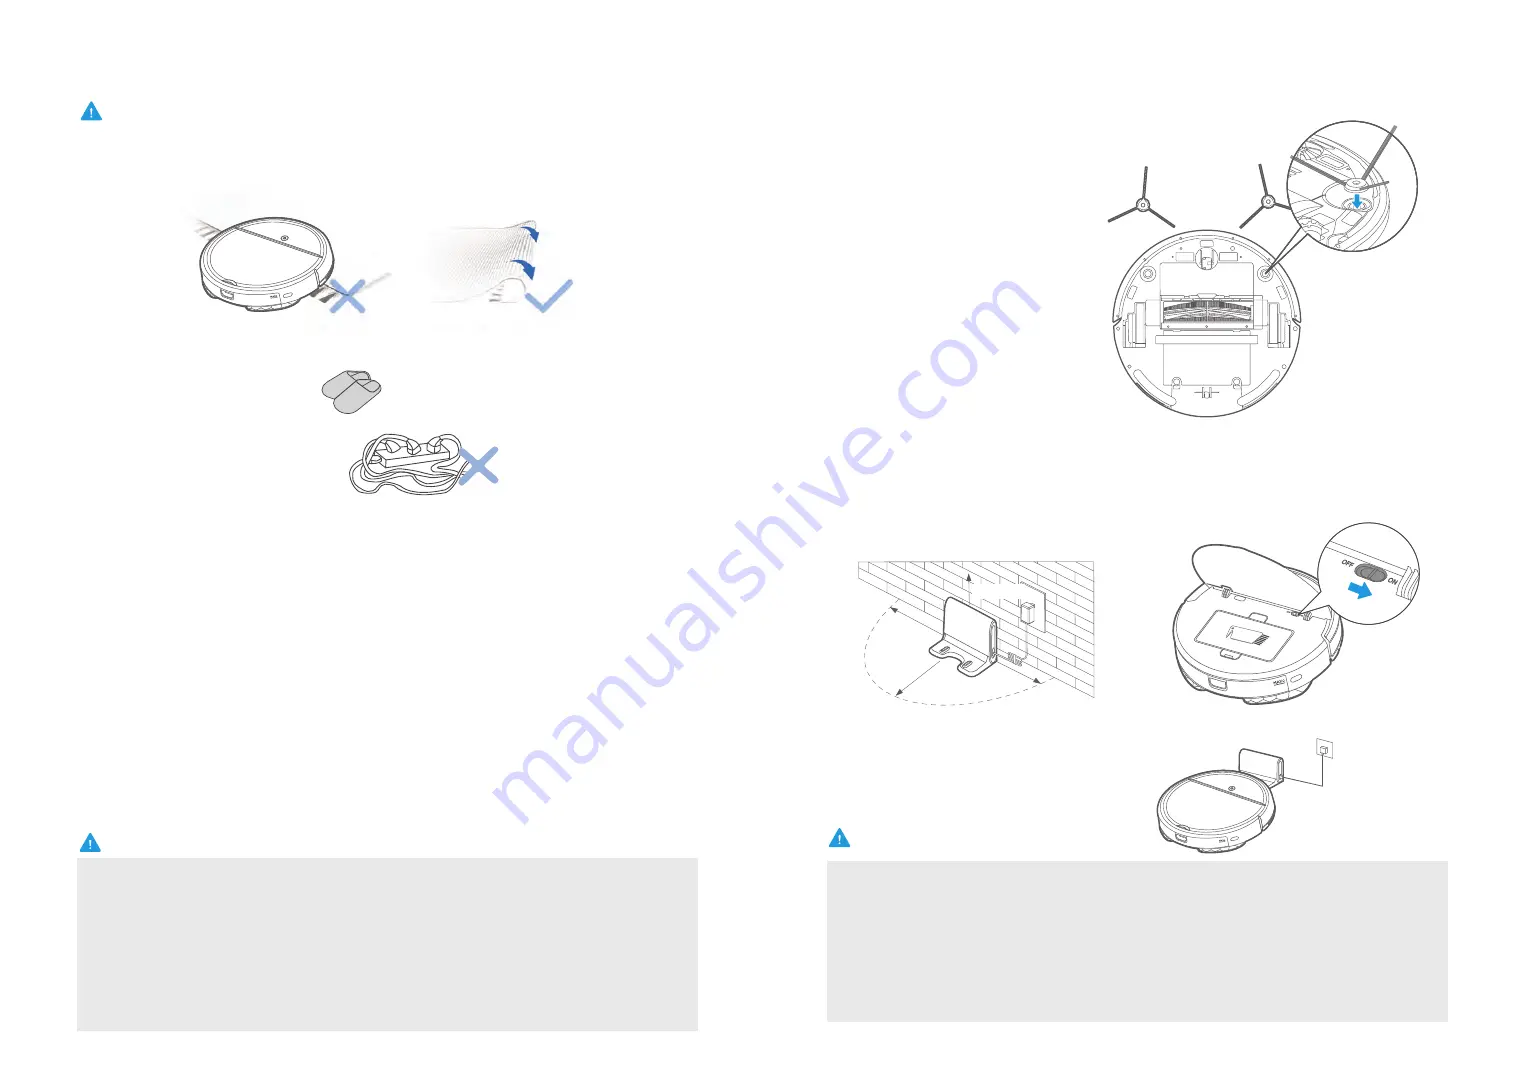
Installing the Side Brushes

a. Turn the unit over.

b. With unit upside down, align side brush over brush post

c. Press down side brush until it snaps in place.

d. Ensure side brushes can rotate freely.

Open the cover and slide power switch 
to on.

2

Place vacuum on the docking station, ensuring the charging contacts are touching. A white 

light will start flashing, indicating the robot is charging. 

Charge for 12 hours before first use.

3

1.5 M/5 ft

1.5 M/5 ft

1.5 M/5 ft

1.5 M/5 ft

1

Put  the  docking  station  well

Place  the 

docking station against a wall and remove 
all  of  obstructions  around  the  docking 
stand, as shown in the figure below.

1. Do not use your robot on wet surfaces or surfaces with standing water. Before using the
product on a rug with tasseled edges,please fold the rug edges under.

2 .Prepare room for cleaning, it is suggested to tidy up the room such as picking up small 

objects from the floor and clearing away loose cords.

a. Put the docking station against the wall, and place it as far as possible in an open position. It is

better that there is no obstacle within 1.5m around the docking station;

b. Remove glass, ceramics and other fragile items on the floor to prevent damage to the items when

the sweeper crashes;

c. Remove the wires and other things on the ground to make the sweeping more smoothly;
d. Remove the patch panel on the ground to avoid the safety problems such as electric shock

caused by the sweeper cleaning to the patch panel;

e. It is normal phenomenon that has the voice of high speed airflow while the product running.

NOTE

Summary of Contents for Eureka i5

Page 1: ...ROBOT VACUUM CLEANER INSTRUCTION MANUAL Please read the Manual carefully before use and keep it properly...

Page 2: ...ntroduction of Remote Control Power ON OFF Clean Pause Guide for network accessing con guration Connect robot with Amazon Alexa Mopping Product Maintenance Cleaning the Side Brush Cleaning the Dust Bi...

Page 3: ...pack is not in use keep it away from other metal objects like papre clips coins keys nails screws or other metal objects that can make a connection from one terminal to another Shorting the battery t...

Page 4: ...t Introduction 6 7 Instruction manual X1 Manual Mop holder X1 Spare filter X1 Side brush X2 Pairs Remote control X1 Docking station X1 Battery X2 Mopping pad X2 Cleaning brush X1 Robot Vacuum Power co...

Page 5: ...wer socket 8 9 Brushroll cover Side brush Brushroll Wheel Universal wheel Battery cover Cover for water outlet Mop holder Dust bin Docking station Water tank assembly Product Introduction Illustration...

Page 6: ...white light will start flashing indicating the robot is charging Charge for 12 hours before first use 3 1 5 M 5 ft 1 5 M 5 ft 1 5 M 5 ft 1 5 M 5 ft 1 Put the docking station well Place the docking st...

Page 7: ...te and cannot work normally Entry After the cleaner is turned on for 30 seconds press the left bumper and mute button on the remote control simultaneously The operation need to be completed within 1 m...

Page 8: ...or password is changed Network accessing config operation of the cleaner Hold the start key 3 seconds after the cleaner is power on and release after a tick sound is heard now the cleaner is configure...

Page 9: ...ent NOTE 1 Open the upper cover of the cleaner and press power switch 2 When 1st using slow flickering of wifi indicator light indicates that the cleaner gets into the state of network accessing confi...

Page 10: ...any cleaning solutions c It is recommended to observe the robot when mopping to ensure it does not go onto carpet NOTE Attach the mopping pad to the holder 1 Press the button on tank and pull to remo...

Page 11: ...rapping 1 Product Maintenance Press the dust bin removal button and lift out the dust bin Cleaning the Side Brush Cleaning the Dust Bin Sponge and Filter Open the cover 1 2 Press dust bin release butt...

Page 12: ...he Pour out the remaining water from the water tank 3 Cleaning the Water Tank Wipe dry the water tank and set aside Exposure to sunlight is not recommended 4 Wipe the sensor and wheels gently with a s...

Page 13: ...pside down place your thumb in the open slot between the two tabs 1 Press brushroll lock and lift up to access brushroll 2 Clean the brushroll with a soft cloth or warm water Dry THOROUGHOLY and reins...

Page 14: ...n matter stuck Turn on the power switch of appliance Reset and make appointment The appliance gets stuck Not cleaned completely and recharge it No cleaning according to the preset time After the mop h...

Reviews: