background image

6

Getting Started

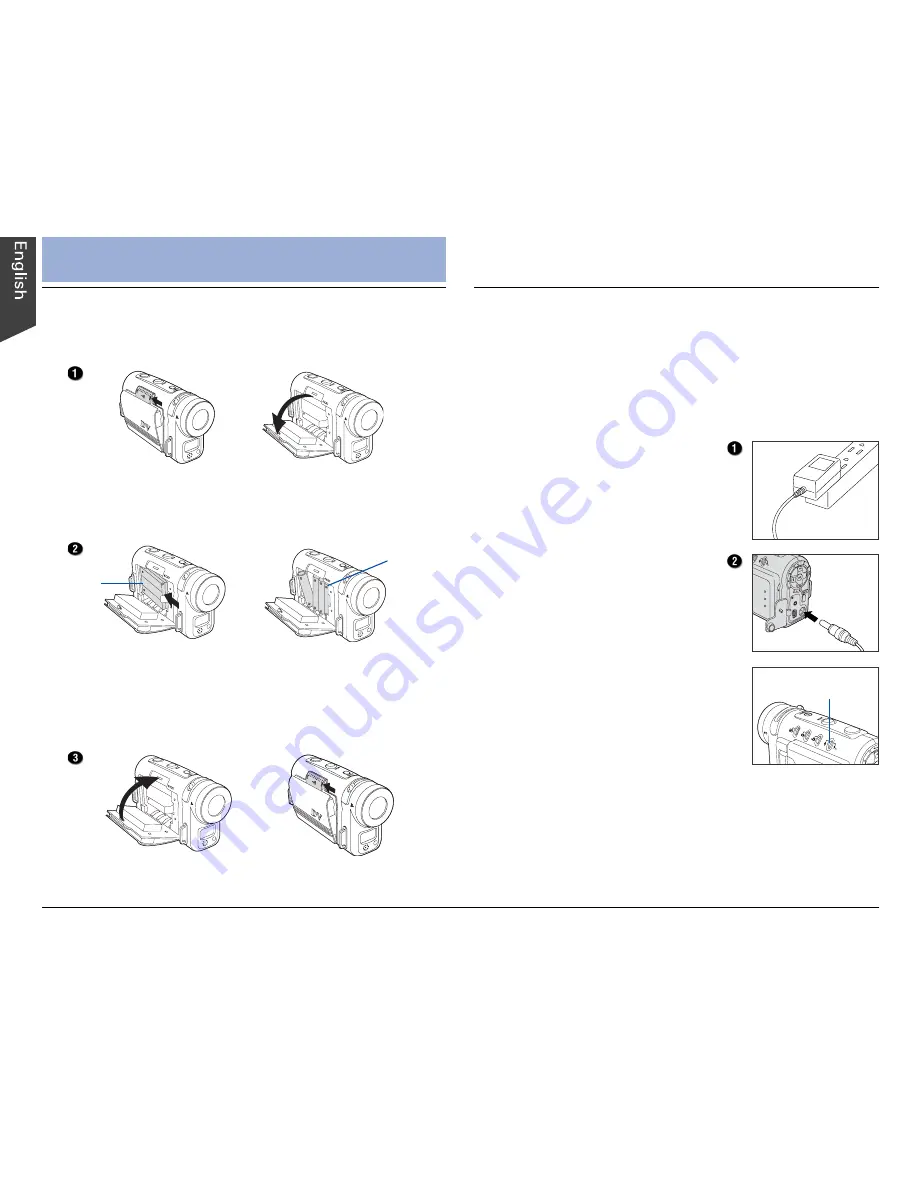
1. Loading the Battery

1. Push the battery door latch in the direction indicated

by the arrow to open the battery door.

2. Insert the battery into the compartment.

Ensure that the battery is inserted properly with the

Mylar pull tab held down.

3. Hold the battery in place and close the battery door

securely.

Push the battery door latch in the direction indicated by

the arrow to close.

NOTE

: Power accessories you receive depends on the

configuration of the DV camera purchased.

or

2. Charging the Battery

If your DV camera is supplied with a Lithium ion battery,

charge the Lithium ion battery first before using the DV

camera. This battery charging procedure is not suitable

for alkaline batteries users.
Follow the procedures below to charge the battery:

Charger LED

NOTE:

• Use only the AC adapter supplied with the DV camera to

charge the Lithium ion battery (Nokia 8210 compatible

only). Using any other adapter may damage the DV

camera.

• To minimize the risk of fire and/or explosion, DO NOT

use the AC adapter to charge alkaline batteries.

1. Plug the supplied AC

adapter (5V, 2A) into the

power source.

2. Ensure that the DV camera

is turned off; then connect

the DC plug of the AC

adapter to the DV camera’s

DC-in connector.

When the DV camera is

connected, the battery starts

to charge, and the charger

LED (Audio mode indicator)

lights up red. After charging

for several hours, the red light

disappears, indicating that the

battery is fully charged.

Li-ion

battery

AAA

batteries

Summary of Contents for Take-it MV320

Page 1: ......

Page 2: ...s or electrical shock Another source of possible burns is heat from the flash or DV camera itself Touching the flash after it has been used extensively can cause burns The camera body itself may burn your hands if the DV camera has been operated for a lengthy period of time Do not drop batteries or let them be banged around This could damage the casings causing the batteries to leak If the interna...

Page 3: ... lever 5 Lens 6 Flash 7 Self timer indicator 8 Microphone 9 Strap ring s 10 Battery door latch 11 Battery compartment 12 Battery door 13 Secure Digital SD compartment 14 SD card compartment cover 15 Tripod mount DV camera Components Attach the Strap SD card is optional and is not included with your purchase ...

Page 4: ...er LED Audio mode indicator 3 Multifunction 4 way arrow button Up Zoom In Play Pause Down Zoom Out Stop Right Fast Forward Flash Left Rewind 4 OK Pan button 5 MENU button 6 TV out connector 7 DC in connector 8 USB connector 9 Connector cover 10 LCD screen ...

Page 5: ...rnal memory support Plug and play USB 1 1 and Video connection Macro function 5 flash modes with selectable Red eye Reduction 10 sec self timer delay Functions as Digital still camera Digital audio recorder Functions as Web Cam Mass storage device Picture video player Unpacking Unpacking the DV Camera Open your DV camera package and check that you have all of the components listed below If any com...

Page 6: ...a This battery charging procedure is not suitable for alkaline batteries users Follow the procedures below to charge the battery Charger LED NOTE Use only the AC adapter supplied with the DV camera to charge the Lithium ion battery Nokia 8210 compatible only Using any other adapter may damage the DV camera To minimize the risk of fire and or explosion DO NOT use the AC adapter to charge alkaline b...

Page 7: ...nsert and push the SD card into the compartment until you hear a click Ensure that the orientation of the SD card matches the SD card marking in the SD compartment 3 Close the SD card compartment cover securely Using the Flash The flash allows you to take pictures in environments with insufficient lighting It works only in Photo mode Press the Flash button until the desired flash mode appears on t...

Page 8: ...e Press to enter Photo mode this Using the Menus Press the MENU button to display a menu for the selected mode The Setup menu appears in all modes Audio Mode Press to enter Audio mode allows you to record audio clips of unlimited length maximum length dependent on the size of available memory Playback Mode Press to enter Playback mode allows you to browse and delete images and video audio clips To...

Page 9: ...nges and to return to the Setup menu screen 7 Press the MENU button to exit the menu To adjust the time setting 1 In the Setup menu use the button to select Time then press the button A Time adjustment screen appears on the screen allowing you to set the time 2 Use the button to toggle through the HH MM and SS formats The selected option is highlighted with color 3 Use the button to enter a new va...

Page 10: ...r two seconds The DV camera is ready to take another still image when the Busy message vanishes from the LCD screen Shooting Shooting Video Video mode allows you to record video clips the length of which is determined only by the size of your available memory Video clips are recorded in ASF or AVI file format at a resolution of 640 x 480 or 320 x 240 pixels 1 Press the MODE button and then the but...

Page 11: ...ded Specifying the Startup Image The DV camera allows you to specify a captured image as a new startup image of the DV camera if desired To specify a new startup image 1 Press the MODE button and then the button to enter Playback mode The recorded video audio or still image appears on the LCD screen as a composite display of nine images 2 Use the 4 way arrow button to select a captured still image...

Page 12: ... image display Playback Playback Zoom This feature lets you enlarge a captured still image at up to four times the original viewing size 1 Select an image you want to magnify 2 Press the button to zoom in and the button to zoom out In this display mode you can use the button to toggle forwards backwards through all the recordings 4 Press the button to start the video audio playback During the play...

Page 13: ...se the 4 way arrow button to select the unwanted recording then press the OK button A trash icon appears and the selected recording s border color changes to red indicating that the selected recording is checked and can be deleted Use the 4 way arrow button to select more recordings to delete if so desired 3 Press the OK button once more A confirmation screen appears allowing you to delete the sel...

Page 14: ...Printing Selected 1 In the Print options menu choose Select then press the OK button A nine image display appears 2 Use the 4 way arrow button to select the still image you wish to print The selected image is enclosed in a yellow border and comes with a confirmation screen of the number of copies to be printed 3 Use the button to set the number of copies if desired Printing All 1 In the Print opti...

Page 15: ...e Australia China Singapore etc 3 Press the button then the MENU button to exit the menu B Viewing the Image on a TV Set 1 Make sure that both TV set and DV camera are turned off 2 Connect the DV camera to your TV set using the provided Video cable Connect one end of the Video cable to the DV camera s TV output connector 3 Turn on the TV set and select the channel through the Video Input 4 Power o...

Page 16: ...ss the MENU button to enter the Setup mode b Select USB Switch then select USB Mode c Press the button to confirm your selection then the MENU button to exit the menu NOTE If you are using Windows 98SE please install the camera driver contained in the Microtek CD ROM first Restart your computer after you have successfully installed the camera driver To view the recorded images on your computer fol...

Page 17: ...era s internal memory alone 3 Drag and drop the files into any folder on your hard disk Windows 98SE 2000 Me Windows XP Without an SD card installed D Browsing Files Double click a file in the folder that contains the files downloaded from the DV camera The file opens with your system s default image audio or video application NOTE If you cannot play the transferred video files e g ASF with your s...

Page 18: ... the DV camera to Web Cam mode a Press the MENU button to enter the Setup mode b Select USB Switch then select Web Cam c Press the button then the MENU button to exit the menu 3 Connect the DV camera to your computer using the provided USB cable Connect one end of the USB cable to the DV camera s USB connector Web Cam Windows Only Connect the other end of the USB cable to the USB connector of your...

Page 19: ... Adds a DPOF print mark on the recording for professional print services to determine which prints are to be printed at a photofinisher Startup Image Default Cancel Select Specifies the startup image for the DV camera Setup Menu Options Description Brightness Adjusts the brightness level of the LCD screen Beep On Off Toggles camera beep sounds on and off Date yyyy mm dd Sets the date for the DV ca...

Page 20: ...Built in Flash Fixed Flash Modes Auto Auto with Red eye reduction Forced flash Forced flash with Red eye reduction Flash off Self timer 10 sec delay Audio Clip Unlimited length maximum length dependent on SD card Print Format DPOF Digital Print Order Format Quality Levels Best Fine Normal Storage Media External SD Secure Digital card support Storage Included 16 MB internal flash memory Driver USB ...

Reviews: