background image

 4-2 

PC Workstation 2010 Setup Guide-

LCD/Touchscreen Head Configuration
Disassembling the 12.1” LCD/Touchscreen Head

Disassembling the 12.1” LCD/Touchscreen Head

The PCWS 2010 LCD/Touchscreen Head is identical to the LCD/Touchscreen Head 
used on later production units of the Eclipse. This section describes how to 
disassemble the head to access the LCD/Touchscreen Controller board. The 
LCD/Touchscreen Interface Board is described along with supported LCD panel and 
jumpers settings.

Removing the Rear Cover and Interface Board Shield

1. Place the LCD/Touchscreen Head face down on your work surface.

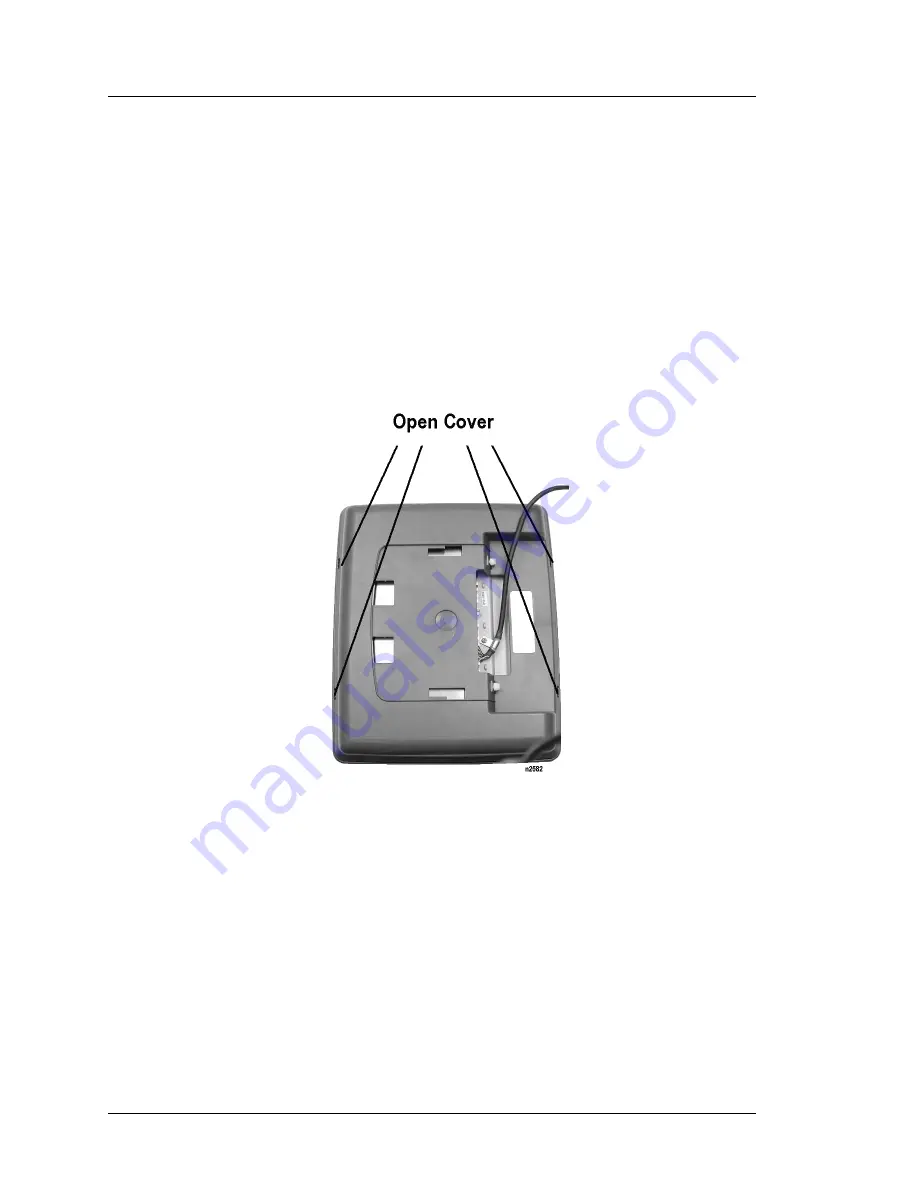
2. Refer to Figure 4-1 and with a small flat bladed screwdriver, gently pry the rear 

cover open at the locations indicated. 

Figure 4-1: Removing the LCD/Touchscreen Head Cover

The LCD/Touchscreen Interface Board is installed under a shield which must be 
removed to access the interface board.

Summary of Contents for PCWS 2010

Page 1: ...micros Systems Inc PC Workstation 2010 Setup Guide Copyright 2005 By MICROS Systems Inc Columbia Maryland USA All Rights Reserved Part Number 100016 144 1st Edition...

Page 2: ...Inc Intel Celeron M Pentium M SpeedStep and the Intel logo are trademarks or registered trademarks of Intel Corporation or its subsidiaries in the United States and other countries Microsoft Windows...

Page 3: ...r 1 5 Features 1 6 Expansion Capabilities 1 6 Serial Ports 1 6 USB Ports 1 6 Mini PCI Card Slot 1 6 CF Daughter Card 1 6 MULE MICROS USB Legacy Extensions 1 7 Dual Display Support 1 7 Sound 1 7 Built...

Page 4: ...g the PCWS 2010 1 29 Using the AC Power Switch 1 29 Using the Magnetic Card Reader 1 30 Calibrating the Touchscreen 1 30 Chapter 2 BIOS Setup Utility Starting the PhoenixBIOS Setup Utility 2 2 Require...

Page 5: ...2 2 14 IGD Device 2 Function 1 2 14 IGD Memory Size 2 14 IGD Boot Type 2 14 IGD LCD Panel Type 2 14 IGD Panel Scaling 2 14 IGD TV Standard 2 14 IGD Portrait Mode 2 14 IGD ACPI LCD Address 2 14 IGD S3...

Page 6: ...s Check Reminder 2 19 System backup reminder 2 19 Password on Boot 2 19 Power Menu 2 20 Power Savings 2 20 Resume On Time 2 20 Resume Time 2 20 Resume On Modem Ring 2 20 Power Button Function 2 21 Sus...

Page 7: ...ing the Modem Card 3 30 Installing the 802 11b g a Wireless Card 3 33 Installing a USB Disk On Chip 3 36 External USB Connectors 3 38 Reassembling the PCWS 2010 3 39 Installing the 12 1 LCD Touchscree...

Page 8: ...odular Connectors B 2 COM4 IDN RS422 B 2 COM4 RS232 B 3 Modular COM Ports B 3 10 100 Ethernet Connector B 4 DB9 RS232 Connectors B 4 Digital Video Interface DVI Connector B 5 Cash Drawer 1 and 2 Conne...

Page 9: ...preface you ll find information about this manual Refer to the preface if you have questions about the organization conventions or contents of this manual In this section Why Read This Manual x How Th...

Page 10: ...installing the PCWS 2010 unit and is not specific to a particular software application To use the PCWS with a specific application consult the Related Manuals section listed below Who Should Use This...

Page 11: ...ardware configuration Topics include how to remove the cover identify the major components and how to upgrade or configure such items as the main memory processor and hard disk or to install the optio...

Page 12: ...0 Corel Draw 7 0 Line drawings Corel Draw 7 0 NOTE This symbol brings special attention to a related item WARNING This symbol indicates that specific handling instructions or procedures are required t...

Page 13: ...WS 2010 This chapter introduces the PCWS 2010 features and options In this chapter The System 1 2 Features 1 6 Options 1 10 Specifications 1 22 Care and Handling 1 24 The I O Panel 1 26 Connecting Per...

Page 14: ...play used on the Eclipse The 2010 I O Panel features four USB 2 0 ports and four available RS232 serial ports for connecting peripherals in addition to standard MICROS cash drawer customer display and...

Page 15: ...2 contains an 800x600 TFT LCD panel coupled to a 5 wire resistive touchscreen It is compatible with the LCD Touchscreen Heads used on later production versions of the Eclipse See Chapter 4 for more i...

Page 16: ...VI connector supplies all LCD touchscreen backlight control and data signals as well as 12V to the LCD Touchscreen Head At the PCWS API level internal modifications allow this display to emulate the 1...

Page 17: ...roduct The overall depth of the cover has been increased by to accommodate the larger I O panel tray This increased depth combined with the removal of the Smart Card Tray used in the Eclipse MCR impro...

Page 18: ...kwards compatible with USB 1 1 o Four USB 2 0 connectors are available on the I O Panel for general purpose use With the addition of the optional USB Extension Cables two of these ports can be placed...

Page 19: ...ed digital connection replaces the conventional analog RGB interface to CRT monitors The DVI interface allows the display content to remain in a lossless digital format from the chipset graphics contr...

Page 20: ...phone for DSVD modems Hardware MIDI synthesis Built in Speakers Like the Eclipse the 2010 includes a pair of water resistant speakers mounted on each side of the I O panel tray The Speakers are drive...

Page 21: ...s by the POS application to access the Cash Drawers Customer Displays and IDN Printing to the MULE driver The MULE driver in turn interacts with the hardware on the 2010 System Board MICROS OLE for Re...

Page 22: ...an optional modem card Figure 1 5 shows the modem card outlined in White installed the system board socket The board is positioned so that the modular RJ 11 telephone connector is available at the I O...

Page 23: ...option attaches to the rear of the system unit chassis viewed through a smoked Plexiglas lens mounted to the system unit plastics It is a 2x20 VFD receiving power and data from a system board connect...

Page 24: ...r Displays USB Disk On Chip The PCWS 2010 system board supports the optional M Systems uDOC USB Disk On Chip The device is available in sizes ranging from 64M to 2G and attaches to an internal USB hea...

Page 25: ...ce using the same casework and LCD Touchscreens the PCWS 2010 uses a new power supply and system board with an updated processor and memory architecture In addition the 2010 adds new connectivity opti...

Page 26: ...Chipset Intel i810 Intel i855GME Front Side Bus 100Mhz 400Mhz RAM Two DIMM Sockets Max 512M Two DIMM Sockets Max 2GB RAM Type PC100 133 SDRAM PC2100 PC2700 DDR SDRAM Hard Disk One IDE 3 5 currently 8...

Page 27: ...d Disk 300334 009 Not Compatible PCWS 2010 does not accommodate 3 5 HDs Hard Disk Foam Ears 300334 008 Not Compatible Disk On Chip 700901 001 Not Compatible USB Floppy Disk Drive 700352 085 Compatible...

Page 28: ...12 Compatible Chassis Various Not Compatible System Board s Various Not Compatible Heat Sink and Fan 600249 006 Not Compatible Speaker Covers 600538 010 Not Compatible PCMCIA Card Cage 600572 001 Not...

Page 29: ...s not include PS 2 PS 2 Remote MSR Supported Not Supported 2010 does not include PS 2 Integrated VFD Customer Display Supported Supported Integrated VFD and LCD Pole cannot be used simultaneously VFD...

Page 30: ...were responsible for cables and mounting Parallel Port Backpack CD DVD Reader Writer Supported Not Supported 2010 does not include a parallel port Explore USB alternatives Coin Changers Supported Supp...

Page 31: ...or MSR Integrated Mag Stripe Reader COM4 RJ45 LCD IDN RJ45 IDN IDN Peripheral or Serial Peripheral COM5 RJ45 Available RJ45 Available Serial Peripheral COM6 RJ45 Available DB9 Available Eclipse suppor...

Page 32: ...le Customer Display External Pole Display Aux Power 5V 12V None To power R W MSR Scanner etc Printer Power 24V Epson Printer Power 24V Epson Printer Power For powering One Epson Printer Microphone Yes...

Page 33: ...ported 3 20 Supported Supported 8700 Version PCWS Eclipse PCWS 2010 1 0x Not Supported Not Supported 1 12 Not Supported Not Supported 1 50 Not Supported Not Supported 2 00 Not Supported Not Supported...

Page 34: ...over 35 million touches Backlight s Can be set to one of three intensity levels through the PCWS API DVI Interface Connector The Front Panel DVI Connector supports either the 12 1 or optional 15 LCD...

Page 35: ...47 63Hz Input Current 0 5A to 1 2A 115VAC 24VDC Printer Power Out 24VDC 4A Max Storage Temperature 25 C 13 F to 85 C 185 F Operating Temperature 0 C 32 F to 45 C 113 F w Hard Disk 0 C 32 F to 50 C 122...

Page 36: ...f the carpeting surrounding the area containing the equipment is not composed of anti static material the use of static discharge mats should be considered The recommended type of anti static mat inco...

Page 37: ...that its temperature is within 15 F 8 C of room temperature to prevent damage to internal circuitry Cleaning The Touchscreen and Cabinet Instructions for cleaning the Cabinet and LCD Touchscreen are...

Page 38: ...Display This connector part of the MULE interface supports a single pole mount LCD or VFD Customer Display It is identical to the Customer Display connector located on the WS4 and KWS4 The Internal V...

Page 39: ...identical to the 8 pin modular connectors on the PCWS Eclipse COM 3 This 8 pin modular port is configured as COM 3 It is reserved for the front panel 3 track magnetic card reader housed in the MCR co...

Page 40: ...f the IO panel is a group of four audio connectors Each is detailed below Line Out The Green Line Out jack is capable of driving external stereo powered speakers Mic In Microphone input jack allows yo...

Page 41: ...such as Windows 2000 Professional 2003 Server or Windows XP Professional a wide variety of USB storage devices can be connected to the unit 24V Printer Power This connector provides power to a single...

Page 42: ...over is removed Figure 1 16 Using the PCWS 2010 Power Switch Turning the Workstation On When the workstation is OFF and connected to AC power the Power LED is amber to indicate the unit is in the Soft...

Page 43: ...to clean the reader head This type of card has a felt strip in place of the mag stripe which cleans the head as it is swiped through the reader Calibrating the Touchscreen Calibration is the process...

Page 44: ...10 unless the 15 LCD option is purchased 1 From the Desktop select Start Programs Hampshire Touchscreen Control Panel 2 Select the Calibration tab 3 Press the Configure button to define the calibratio...

Page 45: ...o If you press ESC or do not touch the screen within 20 seconds the calibration process aborts with no change in calibration values 4 The hand points to the first calibration target in the lower left...

Page 46: ...1 34 PC Workstation 2010 Setup Guide What Is The PCWS 2010 Operating the PCWS 2010...

Page 47: ...it is available even if a hard disk or operating system is not installed All settings are stored in battery protected CMOS RAM for retention when AC power is off For information on the latest BIOS ver...

Page 48: ...text splash screen connect a USB keyboard to the unit and press ESC just as the blue splash screen appears then press the Pause Break key to freeze the BIOS text screen Counting down from the top of t...

Page 49: ...hard disks or Compact Flash card Exit You may save your changes and exit discard your changes or load default setup values from this menu Keys Used During Setup The table below summarizes the function...

Page 50: ...Setup Utility Home or PgUp Moves the cursor to the first field End or PgDn Moves the cursor to the last field F9 Load Setup Defaults from any screen in the Setup Utility F10 Press F10 then Enter to s...

Page 51: ...uto The PCWS 2010 supports one or optionally two 2 5 hard disks installed within the system unit chassis The Primary Master is the first hard disk We recommend the default setting of Auto This enables...

Page 52: ...erring data between the hard disk and memory The values shown may vary depending on the hard disk installed Ultra DMA Mode Mode 5 This field selects the method of transferring data between the hard di...

Page 53: ...ect the language then press F10 Enter to enable System Memory Extended Memory These fields are display only The size of System Memory will typically be 640K The size of Extended Memory field is determ...

Page 54: ...re shown in Figure 2 2 The Advanced BIOS Menu Installed O S Other This selection allows you to define the operating system installed on the hard disk Other is the default WARNING If you create OS imag...

Page 55: ...h This selection enables disables the system board IDE primary and secondary interface By default this selection is Both to support one or two hard disks on the Primary Channel and a single CF Card on...

Page 56: ...5 Enabled Base IO Address 338 Interrupt 6 This selection enables or disables COM5 a front panel modular connector not assigned to a particular device Serial port 6 Enabled Base IO Address 238 Interru...

Page 57: ...yboard and or Mouse Default is Enabled Summary Screen Disabled The selections for this field are Enabled and Disabled When enabled the BIOS displays the Phoenix BIOS Setup Utility summary screen just...

Page 58: ...nly if performance is required will the processor return to its rated clock speed Under normal operating conditions the processor temperature should never rise to the value defined in this field Therm...

Page 59: ...e steps are programmed in a processor MSR Model Specific Register by the BIOS The processor runs at the lower frequency voltage for a fixed amount of time If the temperature drops to an acceptable lev...

Page 60: ...ied Memory Architecture a method of allocating video memory from the main system memory The selections are 1MB 8MB 16MB and 32MB The default setting of 16MB is adequate for displaying the BIOS splash...

Page 61: ...9 F2 Only Enabled Enables or Disables the ICH4 USB UHCI Controller 3 only USB Device 29 Function 7 Enabled Enables or Disables the USB 2 0 support Setting this field to Disabled enables USB 1 1 suppor...

Page 62: ...nitiated when the ICH4 asserts the STPCLK signal The processor performs a stop grant cycle stops executing instructions similar to the ACPI C2 state and remains in this state until STPCLK goes inactiv...

Page 63: ...PM Cx States Enabled To save power in the Working G0 state the Operating System can place the Processor into various low power states C1 C2 and C3 during idle times In these low power states the CPU d...

Page 64: ...s the current User password if enabled Set Supervisor Password Enter Pressing Enter displays the Set Password dialog box which requires you to enter then confirm the password Setting a Supervisor pass...

Page 65: ...the message on the first boot after Sunday and the Monthly setting displays the message on the first boot of the month System backup reminder Disabled Settings are Enabled or Disabled If enabled a mes...

Page 66: ...um Performance This selection conserves less power but allows the workstation to return to an operational state in the least amount of time Maximum Power Savings This selection provides the greatest a...

Page 67: ...erties section of the Windows Control Panel When Suspend is enabled the PCWS 2010 saves the system context to RAM and enters a low power mode This mode saves a minimal amount of energy but allows the...

Page 68: ...t agent and two types of USB devices In the configuration shown above the PCWS 2010 will boot from IDE Hard Disk 0 Note that when an IDE or USB device is physically installed and detected by the BIOS...

Page 69: ...n Do this by using the up arrow or down arrow key to select the device then use the Shift key combination to move the device in front of other devices as necessary Figure 2 7 shown an example of this...

Page 70: ...xample of two identical 40 GB hard drives installed The Primary Master PM and Primary Slave PS designations correspond to the master slave jumper configurations on the hard disk Figure 2 9 Dual Hard D...

Page 71: ...any fields other than the system time date and password a warning box appears Select No to exit discard changes and restart the workstation Changes to the system time date and password fields are reta...

Page 72: ...2 26 PC Workstation 2010 Setup Guide BIOS Setup Utility Exit Menu...

Page 73: ...chapter Disassembling the PCWS 2010 3 2 What s Inside 3 7 Installing the Rear 2x20 VFD Customer Display 3 16 Remove Replace Power Supply 3 18 Remove Replace the Hard Disk s 3 19 Remove Replace DIMMs 3...

Page 74: ...MCR Cover Thumbscrews Figure 3 1 Figure 3 1 Removing the MCR Cover Thumbscrews 2 Figure 3 2 shows how to release the MCR Cover Place yourself directly in front of the unit reach under the chassis and...

Page 75: ...LCD Touchscreen Head while attached to the plastic base proceed to page 3 5 Removing the 12 1 LCD Touchscreen Head 6 Rotate the LCD head to the position shown in Figure 3 3 and remove the thumbscrews...

Page 76: ...n the system unit cover to the chassis by turning them in the direction shown in Figure 3 4 below Figure 3 4 Remove the System Unit Cover Thumbscrews 10 Remove the system unit cover Lift the front of...

Page 77: ...1 Refer to Figure 3 4 on page 3 4 and remove the System Unit thumbscrews 12 Remove the system unit base plastic with the 15 LCD Touchscreen head attached 13 Place the 15 LCD Touchscreen and pedestal a...

Page 78: ...emove a latch push on the upper section while at the same time lifting the lower section Figure 3 7 Removing the System Unit Cover Latches 16 Open the cover placing it to the left of the chassis Figur...

Page 79: ...ng pages provide a brief overview of the system board devices connectors and jumpers System Board Devices Figure 3 9 points out the major components on the PCWS 2010 System Board Each device is descri...

Page 80: ...ws a block diagram of the PCWS 2010 system board including the Intel chipset and most peripheral devices The three devices comprising the chipset are interconnected via the Hub Interface a private 66M...

Page 81: ...l Pentium or Celeron M obile socket and vice versa Intel Chipset The PCWS 2010 system board is based on the Intel i855GME chipset consisting of three devices These are the 82855GME Graphics and Memory...

Page 82: ...terface with support for 6 USB 2 0 ports o Audio Codec 97 Revision 2 3 specification complaint o Low Pin Count LPC Interface to Super IO Devices o Integrated LAN controller o System Management Bus SMB...

Page 83: ...U125 Super I O 2 This device is attached to the ICH4 through the Low Pin Count LPC interface It performs the following functions on the 2010 System Board COM6 Front panel DB9 COM port COM7 Front panel...

Page 84: ...e to MAC layer controller in the ICH4 10BASE T auto polarity support Advanced Configuration and Power Management ACPI Operating System Directed Power Management OSPM Wake on LAN support Automatically...

Page 85: ...that accepts the M Systems USB Disk On Chip uDOC The device is housed on a small circuit board that mounts horizontally to a 2x5 header Currently no PCWS 2010 configurations have been defined for the...

Page 86: ...uration What s Inside System Board Connectors Figure 3 11 below displays the PCWS 2010 System Board connectors Figure 3 11 2010 System Board Revision E and F Connectors Procedures for removing and rep...

Page 87: ...the left side of Figure 3 12 determines the cash drawer solenoid voltage The default setting of 12V supports MICROS Cash Drawers To use cash drawers with 24V solenoids move the jumper to pins 1 2 J5 c...

Page 88: ...er Display Interface cable is factory installed in the PCWS 2010 chassis 2 The pre installed cable projects from a rectangular hole in the rear of the chassis Remove the tape from the cable and orient...

Page 89: ...the bracket to line it up with the holes in the top of the chassis Figure 3 16 Attaching the Customer Display Bracket to the Chassis 6 To remove the Customer Display bracket from the chassis refer to...

Page 90: ...rs 3 To remove the power supply assembly from the sheet metal cover remove the two screws from the right side of the assembly 4 When installing a power supply be sure to feed the cables through the cu...

Page 91: ...ou have not done so already 2 Refer to Figure 3 19 and remove the thumbscrew that holds the hard disk bracket in place Figure 3 19 Removing the Hard Disk and Cable 3 Gently remove the ribbon cable fro...

Page 92: ...cable shown above To add a second hard disk see the procedure below 1 Refer to page 3 2 to disassemble the System Unit if you have not done so already 2 Remove ATX power connector if necessary then r...

Page 93: ...rmation o The drives shown are part of the Seagate Momentus family of 2 5 Notebook Hard Drives The Master and Slave jumper configurations are printed on the drive label To configure master slave jumpe...

Page 94: ...ists MICROS approved DIMMs for the PCWS 2010 Figure 3 23 Approved DIMMs for the PCWS 2010 The Intel 855 Memory Controller Hub MCH supports ECC Error Correcting Code DIMMs As shown in the upper half of...

Page 95: ...same time the system will disable support for ECC and revert to the standard memory type CN15 CN16 Total 256MB 256MB 256MB 256MB 512MB 512MB 512MB 512MB 256MB 768MB 512MB 512MB 1GB 1GB 1GB 1GB 256MB 1...

Page 96: ...serial EEPROM located on the DIMM to determine the device size and optimal memory bus timing parameters 1 Refer to page 3 2 to disassemble the System Unit if you have not done so already 2 If you must...

Page 97: ...he DIMM in place Figure 3 27 Lining up the DIMM with the Socket Remove a DIMM 1 Rotate each retaining clip away from the DIMM As you remove each end the DIMM will lift out of the socket Figure 3 28 Fi...

Page 98: ...tel Pentium M 745 are approved for use in the PCWS 2010 across its stated operating temperature range The 855GME chipset front bus speed is 400Mhz Processors that require a 533Mhz or 800Mhz front side...

Page 99: ...hreaded holes that project through corresponding holes in the system board Captive screws on the heatsink attach to the holes in the heatsink plate The processor socket uses a standard laptop style re...

Page 100: ...cket Place the processor in a protective carrier to prevent bending the pins 6 Before installing a new processor make sure the socket remains in the unlocked position Refer to Figure 3 32 to ensure Pi...

Page 101: ...rside of the heatsink and apply a new pad or apply thermal grease 9 Reattach the heatsink and fan assembly to the processor Apply equal force to each screw until snug 10 Reconnect the fan power cable...

Page 102: ...4 Refer to Figure 3 34 to install the modem card o 1 Begin by inserting the card into the socket at the angle shown Be sure the keying notch on the card lines up with the protrusion on the socket bod...

Page 103: ...t click the My Computer icon and select Properties from the menu that appears Select the Hardware Tab then click the Device Manager Button 2 In the device list locate Modems then click the symbol to d...

Page 104: ...t of Figure 3 35 below Figure 3 35 Installing the Front Panel Wireless Antenna Connector 4 Install the antenna The lower half of Figure 3 35 show a suggested orientation 5 To install the wireless card...

Page 105: ...de 3 33 PCWS 2010 Hardware Configuration Installing the 802 11b g a Wireless Card Figure 3 36 Installing the PCWS 2010 Wireless Card 6 To close the System Unit cover see page 3 38 To install drivers p...

Page 106: ...search Click the Browse button to navigate to C B MINI PCI LAN Drivers and click Next 5 Ensure the PRISM 802 11 Adapter selection is highlighted 6 Click OK then Continue Anyway to get past the warning...

Page 107: ...isk bracket must be removed Refer to Figure 3 37 Remove the Hard Disk Bracket thumbscrew and set the assembly to the side Figure 3 37 Removing the Power Cable and Hard Disk Bracket o The USB Disk On C...

Page 108: ...close the System Unit Cover see page 3 38 7 Configure the Disk On Chip USB Disk On Chip Setup and Configuration In BIOS Setup the USB Disk On Chip appears as removable mass storage device M Systems pr...

Page 109: ...the bracket The color of the extension cable may vary from that shown in the illustration The receptacle should be oriented as shown on the bottom left side of Figure 3 39 2 Install the bracket on th...

Page 110: ...escribes how to reassemble the PCWS 2010 1 Close the chassis cover 2 Once the lid is closed secure it to the base by hooking the latches on the cover to the base as shown in Figure 3 41 Figure 3 41 Cl...

Page 111: ...he rear of the chassis then slide forward When the cover is in the position shown in the illustration grasp the power supply and pull the cover forward to lock it into place Figure 3 42 Installing the...

Page 112: ...n front of the pedestal place the LCD Head onto the pedestal then let it slide down to lock in place Figure 3 44 Attaching the 12 1 LCD Touchscreen Head to the Pedestal 6 Fasten the LCD Touchscreen He...

Page 113: ...like the upper half of Figure 3 46 o Pull the base forward and down until it fits over the power supply as shown in lower half Figure 3 46 Figure 3 46 Installing the 15 LCD Touchscreen Head 2 Install...

Page 114: ...any additional cables through the cut outs in the tray and connect them as required 2 Attach the modular plug from the mag card reader to COM3 the modular connector shown in Figure 3 47 Be sure to pu...

Page 115: ...MCR Cover as shown in Figure 3 48 The smaller tabs are inserted into the slots on the chassis while the larger tabs fit under the chassis Figure 3 48 Attaching the MCR Cover 4 Fasten the MCR cover to...

Page 116: ...3 44 PC Workstation 2010 Setup Guide PCWS 2010 Hardware Configuration Re assembling the PCWS 2010...

Page 117: ...nd shows how to disassemble and identify each component In this chapter Disassembling the 12 1 LCD Touchscreen Head 4 2 The LCD Touchscreen Interface Board 4 4 VB12 Board LCD Interface Description 4 6...

Page 118: ...the LCD Touchscreen Controller board The LCD Touchscreen Interface Board is described along with supported LCD panel and jumpers settings Removing the Rear Cover and Interface Board Shield 1 Place th...

Page 119: ...g the 12 1 LCD Touchscreen Head 3 Refer to Figure 4 2 With the shield in place remove the two backlight cables the video cable and the touchscreen cable Figure 4 2 Removing Cables from the Interface B...

Page 120: ...2010 LCD Touchscreen Head the VB12 or 003 LCD Touchscreen Interface Board This board is also used on LCD Touchscreen Heads that shipped with the PCWS Eclipse The VB12 Interface Board uses the Hampshir...

Page 121: ...nd Jumpers Figure 4 5 shows the connectors and LCD configuration jumpers located on the VB12 or 003 Board Figure 4 5 003 VB12 LCD Touchscreen Interface Board Connectors and Jumpers The VB12 Interface...

Page 122: ...ay Identification Data a data structure that defines the capabilities of the LCD panel to the BIOS video drivers and plug and play subsystem In addition any contrast and backlight brightness commands...

Page 123: ...es supplied with the PCWS 2010 load the Hampshire Touchscreen Drivers The 001 DSTN and 002 TFT Interface Boards produced for the Eclipse use a 3M Touchscreen Controller Either board can be used on the...

Page 124: ...l differential drive waveform to maximize current to light conversion in the lamp The Royer converter is self oscillating The transistors conduct out of phase switching each time the transformer satur...

Page 125: ...nstall the Interface Board shield Follow the numbered steps shown in Figure 4 7 below Figure 4 7 Installing the Interface Board Shield 2 Reinstall the backlight touchscreen and video cable Be sure to...

Page 126: ...4 10 PC Workstation 2010 Setup Guide LCD Touchscreen Head Configuration Installing the Interface Board Shield...

Page 127: ...ion 2010 Setup Guide 5 1 Chapter 5 PCWS 2010 Diagnostics This chapter includes diagnostics information on the PCWS 2010 In this chapter Basic Troubleshooting 5 2 POST Error Beep Codes 5 5 Diagnostics...

Page 128: ...light LCD Touchscreen head cable not connected or loose Defective LCD Touchscreen head Possible defective System Unit Check LCD Touchscreen head cable at Front IO panel and head Note The DVI Cable mus...

Page 129: ...les System Boots from Hard Disk Does not boot from Floppy Diskette USB Cable not connected Boot Sequence not set correctly Check USB cable to system unit Check Boot Sequence setting in BIOS Setup Util...

Page 130: ...in the LCD LCD Ribbon Cable between DG41 and VB12 Board is not properly seated Re seat ribbon cable at both connectors PCWS cannot read mag cards Mag card read head dirty or contaminated Mag card read...

Page 131: ...be executed in the order shown Beep Code POST Code Description 1 2 2 1 14 Error initalizing keyboard controller 1 2 2 3 16 BIOS ROM Checksum Error 1 4 1 1 29 Error Autosizing DRAM DIMM is possibly de...

Page 132: ...1 From the Desktop touch My Computer then the 2010 Hard Disk C 2 Double click the B folder 3 Double click the Diagnostics Utility 4 Click or touch the PCWSUTILTY EXE file to start A sample of the Sys...

Page 133: ...Appendix A Equipment Dimensions In this appendix PCWS 2010 w 12 1 LCD Touchscreen Head A 2 PCWS 2010 w 15 LCD Touchscreen Head A 3 Pole LCD Customer Display A 4 Pole VFD Customer Display A 5 Cash Dra...

Page 134: ...A 2 PC Workstation 2010 Setup Guide Equipment Dimensions PCWS 2010 w 12 1 LCD Touchscreen Head PCWS 2010 w 12 1 LCD Touchscreen Head...

Page 135: ...PC Workstation 2010 Setup Guide A 3 Equipment Dimensions PCWS 2010 w 15 LCD Touchscreen Head PCWS 2010 w 15 LCD Touchscreen Head...

Page 136: ...A 4 PC Workstation 2010 Setup Guide Equipment Dimensions Pole LCD Customer Display Pole LCD Customer Display...

Page 137: ...PC Workstation 2010 Setup Guide A 5 Equipment Dimensions Pole VFD Customer Display Pole VFD Customer Display...

Page 138: ...A 6 PC Workstation 2010 Setup Guide Equipment Dimensions Cash Drawer Cash Drawer...

Page 139: ...PC Workstation 2010 Setup Guide A 7 Equipment Dimensions Cash Drawer Low Profile Cash Drawer Low Profile...

Page 140: ...A 8 PC Workstation 2010 Setup Guide Equipment Dimensions Cash Drawer Low Profile This Page is Blank...

Page 141: ...es that follow you will find diagrams of the PCWS 2010 Front Panel connectors system board connectors and hook up cable schematics A description of how each cable or connector is used is provided In t...

Page 142: ...located on the PCWS 2010 IO Panel This includes three serial connectors and a single Ethernet port COM4 IDN RS422 The most popular configuration of this port is the RS422 IDN mode Configured as COM4 t...

Page 143: ...terface This configuration is shown in below Figure B 2 COM4 IDN Connector Configured for RS232 Modular COM Ports The PCWS 2010 IO Panel includes a pair of modular RS232 connectors labeled COM3 and CO...

Page 144: ...Connector The pin out for the 10 100 Ethernet port is shown in Figure B 4 below Figure B 4 10 100 Ethernet Connector Diagram DB9 RS232 Connectors The PCWS 2010 includes a total of three DB9F RS232 por...

Page 145: ...tor and Cable Diagrams Front Panel Connectors Digital Visual Interface DVI Connector Identical to the Eclipse the 2010 includes a modified DVI connector to drive the combination LCD Touchscreen Head F...

Page 146: ...nd Cable Diagrams Front Panel Connectors Cash Drawer 1 and 2 Connectors Figure B 7 Cash Drawer Connector Diagram Customer Display Connector This port drives the pole mounted LCD or VFD Customer Displa...

Page 147: ...on 2010 Setup Guide B 7 Connector and Cable Diagrams Front Panel Connectors Printer Power Connector Figure B 9 shows the how the 24V Printer Power Connector is wired Figure B 9 Front Panel Printer Pow...

Page 148: ...ATX Power Connector Figure B 10 shows a view of CN11 the ATX style power supply connector located on the system board The PCWS 2010 Power Supply does not provide 12V or 5V these voltages are generated...

Page 149: ...ded two for the COM4 IDN port and two others for the modular COM5 port COM 4 IDN Port Figure B 11 shows a cable diagram that adapts the modular COM4 IDN connector to a DB9M connector This cable is ava...

Page 150: ...s a cable diagram that adapts the modular COM5 connector to a DB9M connector This cable is available from MICROS by ordering P N 300319 103 Figure B 13 Modular COM5 to DB9M Connector Figure B 14 shows...

Page 151: ...iagrams Hook up Cables 8 Pin to 6 Pin Hook up RS422 Cable 300319 001 This cable connects the modular 8 pin LCC connector to a 6 pin wall plate or directly to the 6 pin connector located on the IDN dev...

Page 152: ...B 12 PC Workstation 2010 Setup Guide Connector and Cable Diagrams Hook up Cables Cash Drawer Extension Cable...

Page 153: ...the limits for a Class A computing device pursuant to Subpart J of Part 15 of FCC Rules which are designed to provide reasonable protection against such interference when operated in a commercial envi...

Page 154: ...io lectriques d passant les limites applicables aux appareils num riques de Classe A de Classe B selon le cas prescrites dans Le R glement sur le Brouillage Radio lectrique Idict par le Minist re des...

Reviews: