© Microhard Systems Inc.
180
Appendix C: IP-Passthrough
By completing the Quick Start process, a user should have been able to log in and set up the IPn3G to
work with their cellular carrier. By completing this, the modem is ready to be used to access the internet
and provide mobile connectivity. However, one of the main applications of the IPn3G is to access
connected devices remotely. In order to do this, the IPn3G must be told how to deal with incoming traffic,
where to send it to. To accomplish this there are three options :
- IP-Passthrough
- Port Forwarding
- DMZ (a type of Port Forwarding)
In this section we will talk about IP-Passthrough and how to configure the IPn3G and the connected
device/PC to work with IP-Passthrough. IP-Passthrough means that the IPn3G is transparent, and all
outside (WAN) traffic is simply sent directly to the device connected to the physical RJ-45 port on the back
of the IPn3G (With exception of port 80, which is retained for remote configuration (configurable). Also, any
traffic that is sent to the RJ45 port is sent directly out the WAN port and is not processed by the IPn3G.
IP-Passthrough is ideal for applications where only a single device is connected to the IPn3G, and other
features of the IPn3G are not required. When in passthrough mode, most features of the IPn3G are
bypassed, this includes the serial ports, the GPS features, VPN, the Firewall, and much more. The
advantage of IP-Passthrough is that the configuration is very simple.
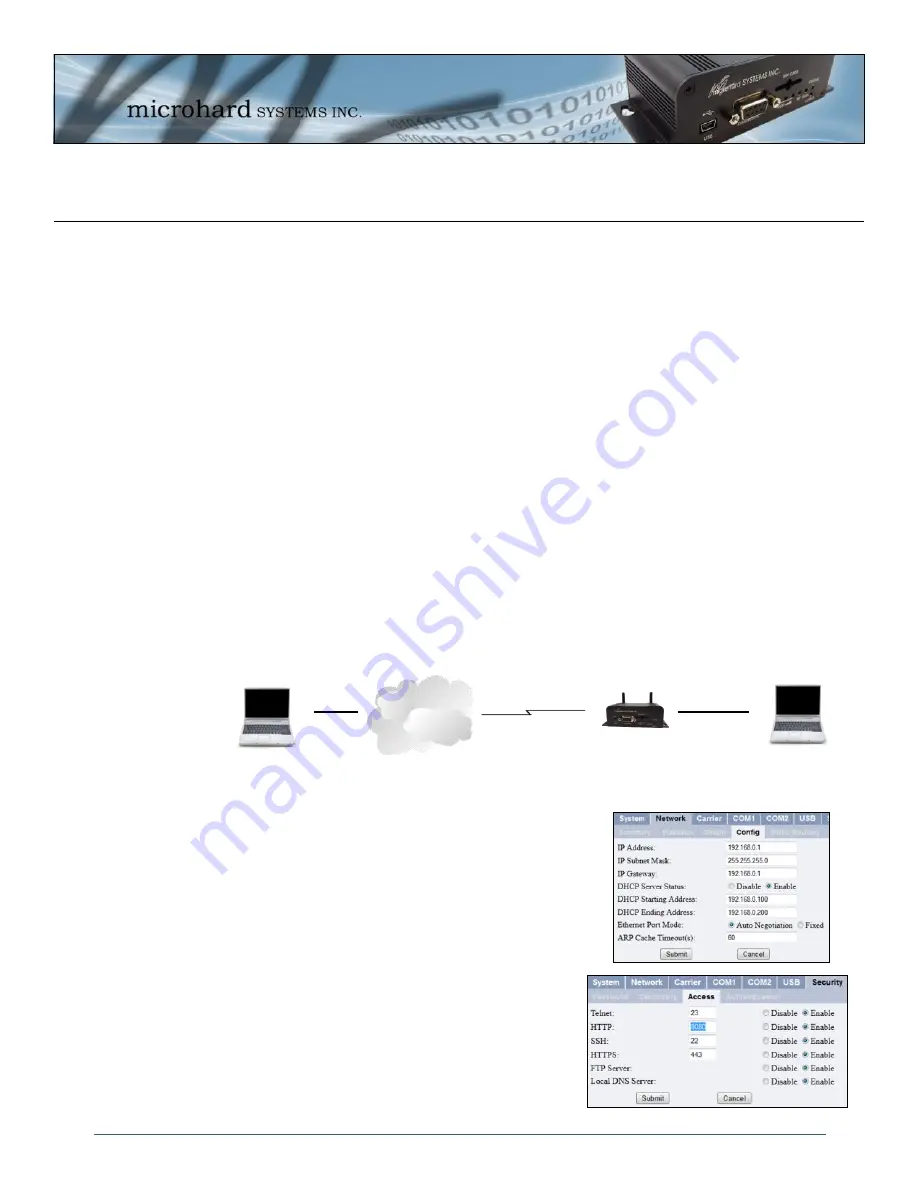
In the example below we have a IPn3G connected to a PC (PC2). The application requires that PC1 be
able to access several services on PC2. Using Port Forwarding this would require a new rule created for
each port, and some applications or services may require several ports so this would require several rules,
and the rules may be different for each installation, making future maintenance difficult. For IP-
Passthrough, PC1 only needs to know the Public Static IP Address of the IPn3G, the IPn3G would then
automatically assign, via DHCP, the WAN IP to the attached PC2, creating a transparent connection.
Step 1
Log into the IPn3G (Refer to Quick Start), and ensure that DHCP is
enabled on the
Network > Config
page.
Step 2
Since PC2 requires port 80 to be used as its Web server port, port
80 cannot be used on the IPn3G, by default it retains this port for
remote configuration. To change the port used by the IPn3G,
navigate to the
Security > Access
page as seen below. For this
example we are going to change it to port 8080. When changing
port numbers on the IPn3G, it is recommended to reboot the unit
before continuing, remember the new WebUI port is now 8080 when
you log back into the IPn3G. (e.g. 192.168.0.1:8080).
Cellular Network/
Internet
WAN IP: 74.198.186.193
(Cellular Carrier)
LAN IP: 74.198.186.1 (Used
for WebUI from LAN)
PC2: (DHCP)
WebServer running on port 80
Connected to RJ45
Ethernet Port.
Wireless Cellular
Connection
PC1: Connected to
internet.


