background image

G715

D

 May 05

2

Important safety instructions for 
installation

WARNING

 Incorrect installation can lead to severe injury. Follow all installation 

instructions.  Merlin  Garage  Openers  Limited  does  not  accept  responsibility  for 
damage or injury resulting from installing this opener.

Prepare the gate for safe automation

Before  installing  the  drive  remove  or  disable  any  equipment,  such  as  locks,  that  is  not 
needed for powered operation. 
Check that the gate is in good mechanical condition and that it opens and closes properly. 
Do  not  use  force  sensitivity  adjustments  to  compensate  for  a  binding  or  sticking  gate. 
Excessive force may damage the gate.

Avoid possible entrapment points

Ensure that entrapment between the driven part and the surrounding fixed parts due to the 
movement of the driven part is avoided.
Gaps are considered safe as follows (IEC60335-2-103): finger gaps above 25 mm; foot 
gaps above 50 mm; head gaps above 300 mm; and whole body gaps above 500 mm.

Add over-ride switch if wicket gate is present

If a wicket gate is present in a gate leaf, it must be fitted with a switch that prevents the 
drive from operating when the wicket is open. (Connect a Normally Closed switch to the 
STP and GND terminals of the controller board.)

Locate controls carefully

Install any fixed control, wired or wireless, within sight of the gate but away from moving 
parts and at a height of more than 1.5 m.

Fit non-contact safety beams

Where they are not already explicitly required to comply with regulations, Merlin strongly 
recommends fitting non-contact safety beam sensors.

Locate the entrapment warning sign correctly

After installing the drive, the included entrapment warning sign must be fitted within sight 
of anyone that may stand in the path of the moving gate.

Inspect and test the installation

After  installation,  ensure  that  the  mechanism  is  properly  adjusted  and  that  and  the 
protection system and manual release function correctly.

Educate the owner

Before handing controls to the user, alert them to the potential dangers, and routine checks 
they’re required to perform.

Complete the commissioning check sheet

The  commissioning  check  sheet  at  the  end  of  this  manual  must  be  completed,  signed 
by  the  installer  and  client,  and  kept  on  record  by  the  installing  company.  It  contains  a 
declaration that all safety related procedures have been complied with.

Summary of Contents for G715D

Page 1: ...ase have your serial number and model name available before calling Australia 1800 638 234 New Zealand 0800 653 667 United Kingdom 0800 073 0112 www merlingo com G715D remote control openers security...

Page 2: ...a switch that prevents the drive from operating when the wicket is open Connect a Normally Closed switch to the STP and GND terminals of the controller board Locate controls carefully Install any xed...

Page 3: ...power supply from the drive before cleaning or maintaining the gate or drive The drive or gate may operate unexpectedly due to other users with remote controls or due to automatic closing if enabled B...

Page 4: ...The gate and its moving parts may sustain damage or wear presenting additional load to the opener Frequently examine the installation for signs of wear or damage Do not use if repair or adjustment is...

Page 5: ...D will blink during learning The controller is ready for another wireless control when the red LED is steadily lit 4 Press P2 RADIO to exit learning mode NOTE The learning procedure will time out afte...

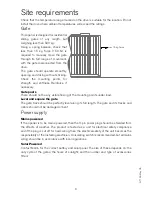
Page 6: ...isible exing of the mounting points under load Level and square the gate The gate track should be perfectly level along its full length The gate and its tracks and rollers should not be damaged or ben...

Page 7: ...t waterproof and are only rated for interior use The Merlin KWF1 keyed switch is not intended for use fully exposed to weather in gate installations Merlin does not warranty any items used outside the...

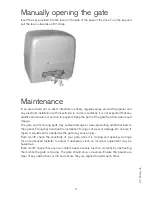
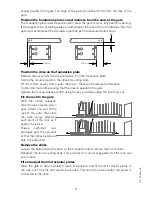
Page 8: ...g that the drive is parallel to the gate Operate the manual release clutch using the key provided pulling the lever fully out Fix the rack to the gate With the clutch released slide the rack over the...

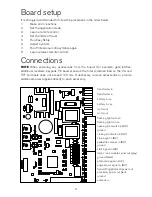
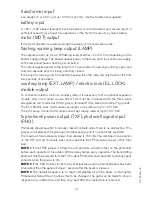
Page 9: ...ads PE beams ensure the total combined load on the VA and TXF terminals does not exceed 150 mA If necessary remove accessories or provide additional power supplies directly to each accessory transform...

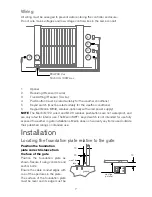
Page 10: ...arranged as red to terminal 3 VA grey to terminal 8 EL black to terminal 7 ground The ELU Electric Lock Unit module can accept a lock rated at up to 12V 15W The LCU Lamp Control Unit module can accept...

Page 11: ...en using the Professional Setup routine The gate will close automatically if auto close is enabled otherwise another manual command is required Normal opening and closing commands take priority over P...

Page 12: ...RADIO until the red LED is lit 2 Press P1 SET and observe the number of ashes of the yellow LED 2 ashes are required 3 Press P1 SET again until 2 yellow LED ashes occur 4 Press P2 RADIO to exit progr...

Page 13: ...13...

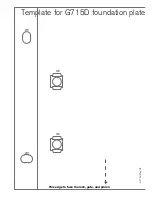
Page 14: ...G715D May 05 Template for G715D foundation plate M8 8 8 M8 This edge to face the rack gate and pinion...

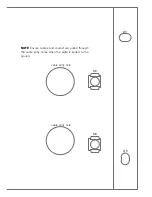
Page 15: ...cable entry hole NOTE Ensure cables and conduit are pulled through the cable entry holes when the plate is bolted to the ground 8 8 M8 M8 cable entry hole...

Page 16: ...G715D May 05 16...
Page 17: ...D is ashing press P1 SET again for 1 second The following steps are performed automatically 1 Checks for presence of a motor photocells or a jumper on PHO terminal e stop or a jumper on STP terminal 2...

Page 18: ...LED stops ashing Press within 5 seconds of applying power to the board or while the yellow LED is ashing to enter the Easy Setup routine Also used in conjunction with P2 RADIO to set the Application M...

Page 19: ...mum allowable motor current The OBS setting alters the time that power is applied to an obstruction So safety is determined by a combination of the settings for FOR OBS and Application Mode Turn FOR c...

Page 20: ...ec after the interruption is removed the gate will close Gate closing stop if the beam is interrupted then open fully when the beam is clear pause for 1 second and begin to close PAU in all other posi...

Page 21: ...one button for P2 learn the button with the CH RADIO jumper tted The following steps are performed automatically 1 Checks for presence of a motor photocells or a jumper on PHO terminal e stop or a ju...

Page 22: ...12 If Pedestrian Access is not required press P1 SET and P2 RADIO simultaneously NOTE The professional setup procedure will time out after four minutes if abandoned Testing the gate operation Test the...

Page 23: ...ing to which the Unit is attached G Faulty or at batteries in the remote control transmitter H Where the defect is due to conditions other than normal domestic use or dirt misuse neglect re accident e...

Page 24: ...iced if it is heavy to move by hand Transmitter range is less than normal Your transmitter battery may be going at If you have an external antenna then the wire may be damaged SOLUTION Replace the tra...

Page 25: ...max 40 W per motor Gate weight max 500 kg Operating speed typ 10 m min Replacement board fuse 2 A 5 x 20 Replacement motor fuse 10 A 5 x 20 Remote control battery Depends on model either 4LR44 6V or C...

Page 26: ...es or phone Merlin toll free New Zealand Auckland phone 09 415 4393 Phone toll free 0800 653 667 or 0800 MERLIN Fax toll free 0800 653 663 Australia NSW Vic Qld WA Phone toll free 1 800 638 234 Fax to...

Page 27: ...ose quick close after photocell OBS obstruction sensing delay 0 1 to 2 5 sec 0 1 sec delay 2 5 sec delay TEST delay all 0 2 sec RESET red P2 RADIO P1 SET P1 SET P2 RADIO red yellow yellow P2 RADIO P2...

Page 28: ...e speed voltage 50 100 cw max TEST jumper ON OFF Gates New or existing Leaf width x height Construction type coverage Load measured at gate bracket without opener connected Contact details Signed by i...

Reviews: