29
SETUP MENU (CONTINUED)
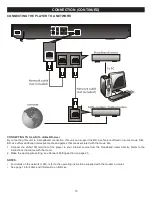
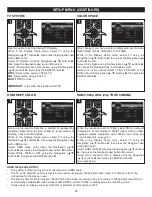
Use this option to set the TV picture settings.
While in the Display Setup menu, select Video Processing
using the Navigation (
π
,
†
) buttons
1
, then press the
Navigation (
®
) button
2
to enter.
Select Video Adjust using the Navigation (
π
,
†
) buttons
1
,
then press the Navigation (
®
) button
2
to select.
Select Brightness, Contrast, Hue and Saturation using the
Navigation (
π
,
†
) buttons
1
, then use the Navigation
(
√
,
®
) buttons
2
to adjust. Press the RETURN button
3
to
return to the previous menu.
1
1
2
3
1
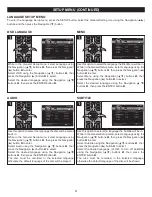
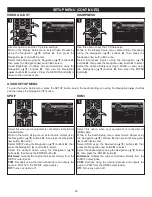
Use this option to set the TV Sharpness.
While in the Display Setup menu, select Video Processing
using the Navigation (
π
,
†
) buttons
1
, then press the
Navigation (
®
) button
2
to enter.
Select Sharpness Adjust using the Navigation (
π
,
†
)
buttons
1
, then press the Navigation (
®
) button
2
to select.
Select the desired Sharpness (High, Middle or Low) using
the Navigation (
π
,
†
) buttons
1
, then press the ENTER
button
3
.
3
1
1
2
1
VIDEO ADJUST
SHARPNESS
SETUP
Exit
--- Display Setting ---
Setup Menu
Use cursor keys to move focus, use
“ENTER” key to select
TV
Video Process...
TV Screen
Resolution
TV System
Color Space
HDMI Deep Color
16:9 Full
Auto
Multi
RGB
Off
SETUP
Exit
--- Display Setting ---
Setup Menu
Use cursor keys to move focus, use
“ENTER” key to select
TV
Video Processin
Video Adjust
Sharpness
More...
High
SETUP
Exit
--- Display Setting ---
Setup Menu
Use cursor keys to move focus, use
“ENTER” key to select
TV
Video Process...
TV Screen
Resolution
TV System
Color Space
HDMI Deep Color
16:9 Full
Auto
Multi
RGB
Off
SETUP
Exit
--- Display Setting ---
Setup Menu
Use cursor keys to move focus, use
“ENTER” key to select
TV
Video Processin
Video Adjust
Sharpness
More...
High
AUDIO SETUP MENU:
To enter the Audio Setup menu, press the SETUP button, select the Audio Setting icon using the Navigation (
√
,
®
) buttons
and then press the Navigation (
†
) button.
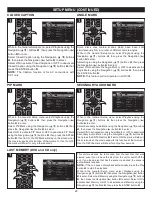
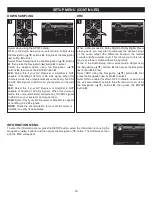
Select this when your equipment is connected via Optical or
Coaxial cable.
While in the Audio Setup menu, select Audio Output using
the Navigation (
π
,
†
) buttons
1
, then press the Navigation
(
®
) button
2
to enter.
Select SPDIF using the Navigation (
π
,
†
) buttons
1
, then
press the Navigation (
®
) button
2
to select.
Select the desired option using the Navigation (
π
,
†
)
buttons
1
, then press the ENTER button
3
.
Bitstream:
Outputs the original bit stream directly from the
S/PDIF output jacks.
PCM:
Decodes using the internal decoder and outputs the
audio in PCM from the S/PDIF output jack(s).
Off:
Turns any option off.
3
1
1
2
1
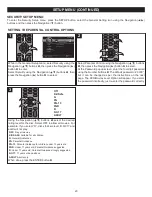
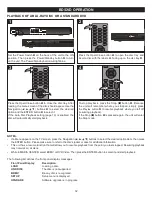
Select this option when your equipment is connected via
HDMI cable.
While in the Audio Setup menu, select Audio Output using
the Navigation (
π
,
†
) buttons
1
, then press the Navigation
(
®
) button
2
to enter.
Select HDMI using the Navigation (
π
,
†
) buttons
1
, then
press the Navigation (
®
) button
2
to select.
Select the desired option using the Navigation (
π
,
†
) buttons
1
, then press the ENTER button
3
.
Bitstream:
Outputs the original bit stream directly from the
S/PDIF output jacks.
PCM:
Decodes using the internal decoder and outputs the
audio in PCM from the HDMI output jack(s).
Off:
Turns any option off.
3
1
1
2
1
SPDIF
HDMI
SETUP
Exit
--- Audio Setting ---
Setup Menu
Use cursor keys to move focus, use
“ENTER” key to select
Audio Output
SPDIF
HDMI
Down Sampling
DRC
Bitstream
PCM
48K
On
SETUP
Exit
--- Audio Setting ---
Setup Menu
Use cursor keys to move focus, use
“ENTER” key to select
Audio Output
Speaker Setting
Configuration
SETUP
Exit
--- Audio Setting ---
Setup Menu
Use cursor keys to move focus, use
“ENTER” key to select
Audio Output
SPDIF
HDMI
Down Sampling
DRC
Bitstream
PCM
48K
On
SETUP
Exit
--- Audio Setting ---
Setup Menu
Use cursor keys to move focus, use
“ENTER” key to select
Audio Output
Speaker Setting
Configuration

