background image

OPERATION (CONTINUED)

14

2

1

Press the Power button

1

to turn the

unit on. Rotate the Mode control

2

to

the Picture Taking position.

1

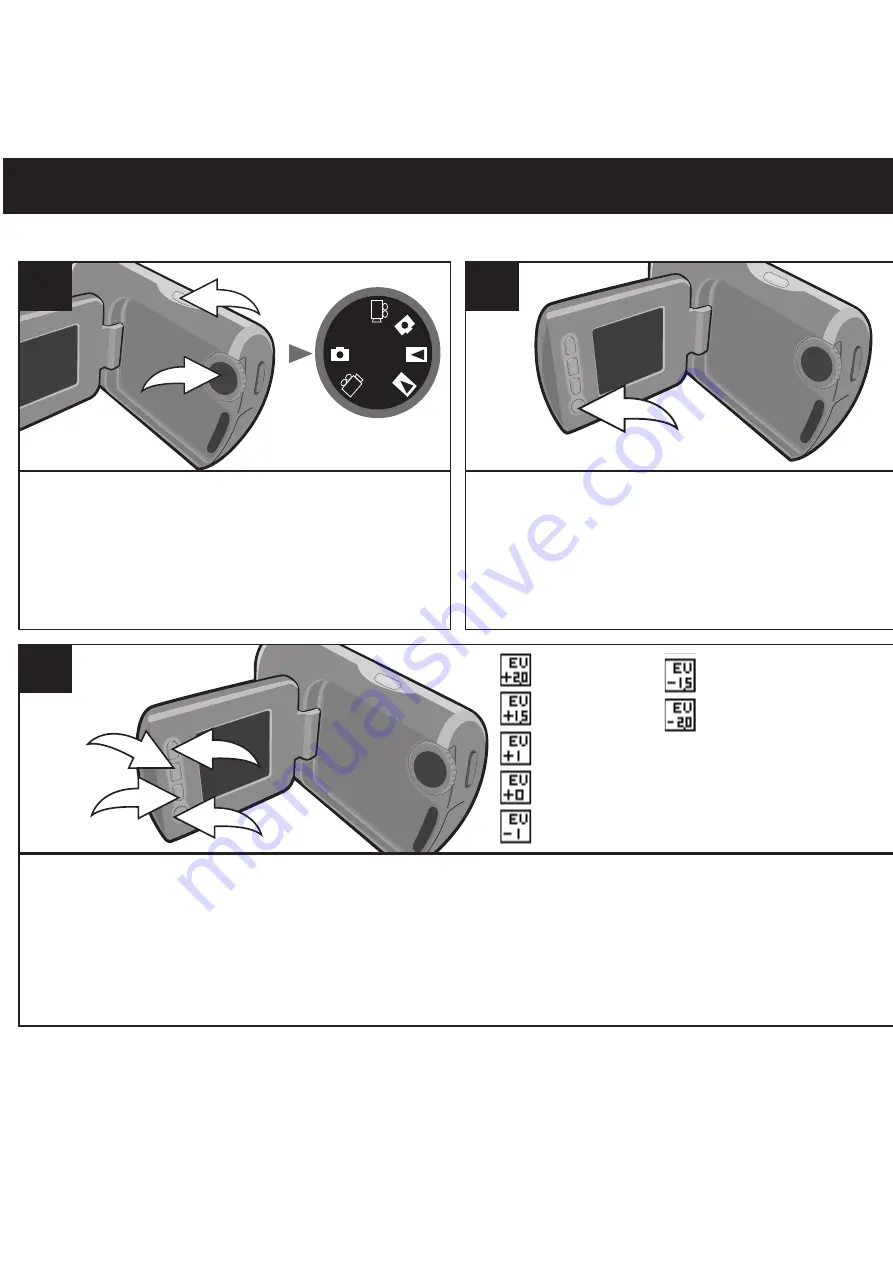
CHANGING THE EV COMPENSATION

P

V

SET

SET

Press the MENU button and the

settings will appear.

2

Press the Up

π

button

1

or the Down

button

2

to select the EV

Compensation setting (see above). Press the MENU button

3

to select the

desired EV Compensation, and then press the OK button

4

to confirm and exit.

2

4

1

3

3

EV+2
EV+1.5
EV+1
EV+0
EV-1

EV-1.5
EV-2.0

All manuals and user guides at all-guides.com

Summary of Contents for MCC215

Page 1: ...ronics com MCC215 User Guide Please read these instructions completely before operating this product Video Camera Digital Let s Make Memories All manuals and user guides at all guides com a l l g u i...

Page 2: ...etting the Date Time Stamp 22 Formatting the SD MMC Card 23 Setting the Light Frequency 24 Setting the PC Camera Mass Storage 25 Viewing the Version 26 Setting the Icon 27 Turning the Audio Recording...

Page 3: ...led and used in accordance with the instructions may cause harmful interference to radio communications However there is no guarantee that interference will not occur in a particular installation If t...

Page 4: ...r local authorized service center Physical damage and malfunction of the unit can cause the image data stored in its memory to be deleted Be sure to always keep backup copies of data by transferring t...

Page 5: ...n Button 5 MENU Button 6 Power Button 7 Mode Control 8 SHUTTER Button 9 USB TV OUT Jacks Under Compartment AV CABLE PART NO E532R4POLAR0001 USB CABLE PART NO E531RAMTOMIN008 Consumer Replaceable Part...

Page 6: ...NO P337RBDV096C011 2 Speaker 3 Lens 4 SD MMC Card Slot Bottom of Unit 5 Microphone 6 Strap Holders HANDSTRAP PART NO K910RDV096C0001 CD PART NO K539RCD096C0001 Consumer Replaceable Part See page 46 to...

Page 7: ...d connect as shown Adjust as desired to fit your hand Insert the Velcro straps into each of the Strap Holders 1 3 Press the velcro ends onto the straps to adjust the length of the straps as desired 2...

Page 8: ...device 3 Do not mix different types of batteries together e g Alkaline and Carbon zinc or old batteries with fresh ones 4 If the device is not to be used for a long period of time remove the batterie...

Page 9: ...splay TURNING THE POWER ON AND OFF Press and hold the Power button until Goodbye appears in the display approximately one second NOTE To save the battery power the unit will automatically turn off aft...

Page 10: ...en TO REMOVE To remove the card from the camera push down on the card to initiate the self eject mechanism MEMORY FULL When the SD MMC card memory is full FULL will blink in the display when you attem...

Page 11: ...s desired This zoom function works only for resolutions of 640 x 480 and 1280 x 1024 2 1 2 Press the Shutter button to take a picture the picture s counter in the display will increase by one 3 NOTES...

Page 12: ...own button 2 to select the Picture Mode setting see above Press the MENU button 3 to select the desired Picture Mode and then press the OK button 4 to confirm and exit The selected mode will be used f...

Page 13: ...MENU button and the settings will appear 2 Press the Up button 1 or the Down button 2 to select the Resolution setting see above Press the MENU button 3 to select the desired Resolution and then pres...

Page 14: ...n and the settings will appear 2 Press the Up button 1 or the Down button 2 to select the White Balance setting see above Press the MENU button 3 to select the desired White Balance and then press the...

Page 15: ...SET SET Press the MENU button and the settings will appear 2 Press the Up button 1 or the Down button 2 to select the EV Compensation setting see above Press the MENU button 3 to select the desired E...

Page 16: ...ENU button 1 Press it again to select 1 then press the OK button 2 Y and N will appear in the display Select Y to delete the last picture taken or select N to exit To delete all pictures press the MEN...

Page 17: ...ss the Shutter button and then the unit will start recording the video and the counter will start counting Press the Shutter button again to stop recording 2 NOTES Keep the object in the center of the...

Page 18: ...UTION P V SET SET Press the MENU button and the settings will appear 2 Press the Up button 1 or the Down button 2 to select the Resolution setting see above Press the MENU button 3 to select the desir...

Page 19: ...on and the settings will appear 2 Press the Up button 1 or the Down button 2 to select the White Balance setting see above Press the MENU button 3 to select the desired White Balance and then press th...

Page 20: ...V SET SET Press the MENU button and the settings will appear 2 Press the Up button 1 or the Down button 2 to select the EV Compensation setting see above Press the MENU button 3 to select the desired...

Page 21: ...the selected video press the MENU button 1 Press it again to select 1 then press the OK button 2 Y and N will appear in the display Select Y to to delete the last video recorded or select N to exit To...

Page 22: ...o select the Time Set option Press the OK button 3 the Time Set screen will appear 2 3 1 2 Set the first digit of the year using the Up button 1 or the Down button 2 then press the Menu button 3 and t...

Page 23: ...ton 1 or the Down button 2 to select the Date Stamp option 2 1 2 Press the MENU button 1 to select the desired Date Time Stamp see above and then press the OK button 2 to confirm The selected Stamp wi...

Page 24: ...ING THE SD MMC CARD P V SET S E T Press the Up button 1 or the Down button 2 to select the Format setting 2 1 2 Press the OK button Y and N will appear Select Y to format or N to not format the card u...

Page 25: ...T FREQUENCY P V SET S E T Press the Up button 1 or the Down button 2 to select the Frequency setting 2 1 2 Press the MENU button 1 to select the desired Light Frequency see above and then press the OK...

Page 26: ...r the Down button 2 to select the PC Camera Mass Storage setting 2 1 2 Press the MENU button 1 to select the desired mode see above and then press the OK button 2 to confirm 2 1 3 Select to use this c...

Page 27: ...nit on Rotate the Mode control 2 to the SET position 1 VIEWING THE VERSION P V SET S E T Press the Up button 1 or the Down button 2 to select the Version 2 1 2 Press the OK button to view the current...

Page 28: ...Up button 1 or the Down button 2 to select the Icon setting 2 1 2 Press the MENU button 1 to select the desired mode see above and then press the OK button 2 to confirm 2 1 3 Select to view the icons...

Page 29: ...CK P V SET S E T Press the Up button 1 or the Down button 2 to select the Audio On or Off setting 2 1 2 Press the MENU button 1 to select the desired setting see above and then press the OK button 2 t...

Page 30: ...p button 1 or the Down button 2 to select the TV System setting 2 1 2 This is used when connecting the AV cable to your TV Press the MENU button 1 to select the desired TV System see above and then pr...

Page 31: ...NG P V SET S E T Press the Up button 1 or the Down button 2 to select the Default setting 2 1 2 Press the OK button Y and N will appear in the display Select Y to change all the options to their defau...

Page 32: ...esponding to your TV color system as shown on page 28 then connect as follows 1 Power on the unit and connect the single plug to the unit s TV OUT jack and the other to the television s AV IN jacks 2...

Page 33: ...and set it to Mass Storage as described on page 24 3 Connect the smaller end of the cable to the USB jack on the unit and the larger end of the cable to your USB port on your PC 4 A Removable Disk win...

Page 34: ...ersely affect the installation process and will cause installation to fail INSTALLING THE PC CAMERA DRIVER 1 Insert the CD into your CD Rom Drive 2 The Main Installation screen will appear 3 Click Dri...

Page 35: ...the VideoImpression software 3 Click Photo Impression and follow the on screen instructions to install the PhotoImpression software NOTE You may be prompted to install the DirectX software also It is...

Page 36: ...the cable to your USB port on your PC 4 Simply drag and drop the JPG photo or AVI video files from the DCIM folder inside the Removable Disk to the desired folder on your hard drive 5 After you have f...

Page 37: ...Get Photo at the top left The options will appear at the bottom of the window Click the desired media From Folder etc and double click on one of the pictures to select 3 Click the icons on the right t...

Page 38: ...uble click the VideoImpression shortcut on your desktop the application will open 2 Click New to create a new video or Edit to edit an existing video 3 The VideoImpression software has many features T...

Page 39: ...ktop the screen at the right will appear 4 Click the icon and then click to start the image capture 5 To set the Video Formatting click OPTION VIDEO FORMAT and set as desired Note Capture Audio under...

Page 40: ...name the file Click OPEN and then set the file size as desired Click OK 9 Click CAPTURE START CAPTURE FILE then click OK to start recording the live video sequence 10 Click STOP when finished USING TH...

Page 41: ...wn at right select USB Mass Storage Device and click the Stop button The Stop a Hardware Device window will pop up Click OK When the Safe to Remove Hardware window is displayed you may remove the unit...

Page 42: ...e picture in better lighting and or adjust the Brightness setting Lens is dirty Clean lens with a soft cloth Subject too close Move further away from subject Subject or unit moved as picture was taken...

Page 43: ...the Power button for one second to turn on When connected to a TV picture is poor Options are set incorrectly Set TV System to PAL or NTSC No sound during playback The recorded audio is not selected f...

Page 44: ...ick on Format 3 At the Format window click OK to confirm and the player will start to format see figure to the right When finished click OK to close the Format window NOTE Make sure you have selected...

Page 45: ...ADE Please visit our Web site at www memorexelectronics com to check if there is new firmware available IMPORTANT NOTE Before upgrading the firmware please backup all of your media files on your compu...

Page 46: ...up to 2 MB Resolution 640 x 480 to 2048 x 1536 Interpolation Video Clip High VGA 15 20 fps Low QVGA 20 25 fps File Format JPEG Photo AVI Video External Connector USB Power Source 4 5V AAA size x 3 bat...

Page 47: ...S COM FOR CONSUMER REPLACEABLE PART S SEE PART NUMBER S ON PAGES 4 AND 5 AND THEN CONTACT FOX INTERNATIONAL AT 1 800 321 6993 FOR FIRMWARE UPGRADE PLEASE VISIT OUR WEBSITE AT WWW MEMOREXELECTRONICS CO...

Page 48: ...is it Memorex are trademarks of the affiliates of Memorex Products Inc Imation Electronic Products A Division of Imation Enterprises Corp Weston Florida Printed in China www memorexelectronics com All...

Reviews: