background image


MEDIAIMAGER – Users’ Guide, Version 1.7 

Page 28 of 63 

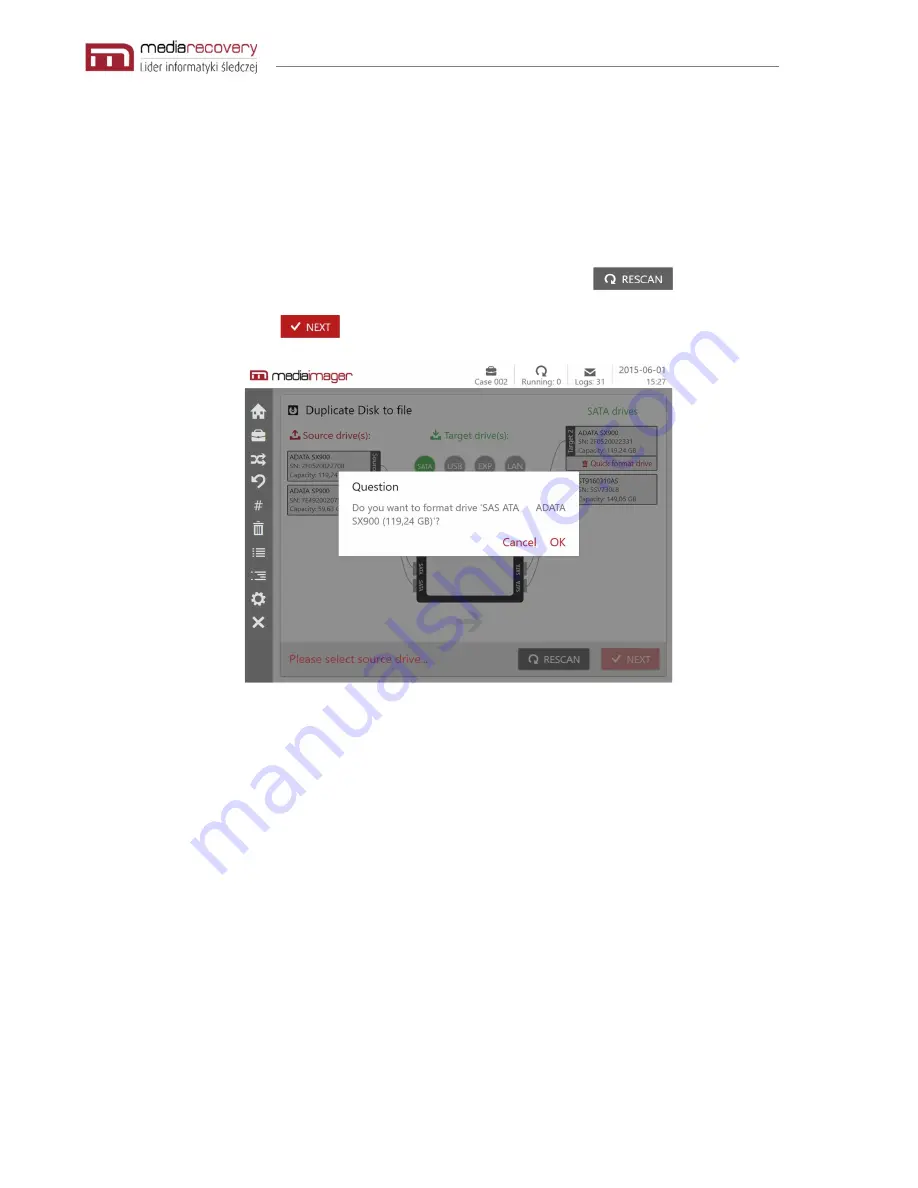
After  selecting  a  desired  target  drive  a  list  of  available  partitions  will  appear.  At  this  step,  select 
partition as a destination for the new disk image. If no partition is available, for example for new 
media, the formatting process should be performed (picture below). 

In case of insufficient target disk space system alert will appear.  

It  is  possible  to  plug  and  unplug  drives  anytime  at  this  point.  Application  will  rescan  devices 

automatically. Scanning can be also performed manually by clicking the 

button.  

When ready, click the 

  button to proceed. 


In order to perform formatting of the target drive press the Quick Format Button. The selected drive 
will  be  formatted  whether  it  contains  any  data  or  not.  Press  OK  to  proceed  with  the  formatting 
process or use Cancel button to abandon. 

Proceed with caution, formatting the drive will erase all data! 

Summary of Contents for GM4 Pro

Page 1: ...e Version 1 7 Mediarecovery Nowogrodzka 56A 00 695 Warszawa Poland 48 22 719 97 00 office mediaimager com Technical Support Phone 48 22 719 97 00 E Mail office Mediaimager com Home Page http www media...

Page 2: ...ting up the Mediaimager 14 Using the Mediaimager 18 Home Screen 18 New Case 20 Open Case 21 Connecting drives 21 Duplication 22 Mediaimager allows to create multiple type of a disk images such as 22 D...

Page 3: ...sh value from the SSD drive and it is different from the original one Have I done something wrong 62 Are there any software updates for MI If so how could I know there is one 63 Is the set of adapters...

Page 4: ...s been a manufacturer of equipment for irreversible data erasure Mediaeraser At the beginning of 2015 Mediarecovery launched another model of degausser Mediaeraser MD 205 Business partners Mediarecove...

Page 5: ...members of association are forensic experts IT security experts and lawyers who specialize in new technologies About this Guide This guide is designed to assist users when working on the Mediaimager d...

Page 6: ...ng specialists High speed operation data transfers up to 25 GB min High numbers of parallel captures o 1 1 x4 o 1 2 x4 o 1 3 x3 o 1 4 x2 Expansion cable extending device capabilities with another 4 po...

Page 7: ...be done to a file in DD or E01 formats or can be mirrored cloned 1 1 disk to disk Restore function created images can be restored to another drive Erase function data can be erased in a irreversibly w...

Page 8: ...7 Page 8 of 63 Kit contents Mediaimager SuperKIT is the highest of all three duplicator versions and it comes together with Mediaimager duplicator Power supply power cord SATA SAS cable x 4 Case pack...

Page 9: ...Network Storage 6 source locations 2x SAS SATA 2x USB 3 0 2x SAS SATA on extension cable 12 destination locations o 4 dedicated 2x SAS SATA 2x USB 3 0 o 6 additional 6x USB 3 0 o 2 additional by exten...

Page 10: ...DVI HDMI DisplayPort Operating system Windows 8 Embedded or Windows 10 Embedded Gigabit Ethernet Case pack Adapters and accessories listed below pictorial images the supplied adapters may look a bit...

Page 11: ...MAGER Users Guide Version 1 7 Page 11 of 63 ATA 2 5 to SATA adapter ATA 3 5 to SATA adapter 1 8 ATA Adapter SATA 29P Male to Male Cable z bezpiecznymi rubkami LIF HDD to SATA adapter ZIF HDD to SATA a...

Page 12: ...MEDIAIMAGER Users Guide Version 1 7 Page 12 of 63 Adapter M 2 NGFF to SATA Lenovo Yoga to SATA Adapter mSATA to SATA Adapter USB HUB Adapter SATA to USB 3 0 Multi Card Reader USB 3 0...

Page 13: ...AGER Users Guide Version 1 7 Page 13 of 63 USB 3 0 to eSATA Adapter Technical specifications Voltage 12V 15A Output voltage 5V 5A 12V 4A Dimensions 276 x 202 x 103 mm Weight 4 kg Operating Temperature...

Page 14: ...ice has been designed to give users as much capability as possible yet be very simple to use The only hardware button on the devices is a power button located on the front side of the device All other...

Page 15: ...OURCE USB 3 0 ports Source 3 and Source 4 Source ports are used for connecting Original drives to be hashed imaged Drive with an image to restore Drive with hidden HPA DCO areas SATA only These has be...

Page 16: ...rts Target 3 and Target 4 Target ports are used for connecting destination drives for an image copy drives with an image to be hashed drives for data erase destination drives in case of restoring an i...

Page 17: ...right side of described interfaces there is Expansion area In the red bordered area there is a mini SAS socket with dedicated external power socket Using expansion cable and power adapter will give o...

Page 18: ...r In order to perform any task on the device a new case must be created or existing case must be opened Home Screen Upon successful login Home screen will be displayed to the user Main screen is divid...

Page 19: ...rs Guide Version 1 7 Page 19 of 63 Tiles allow quick access to all functions of the Mediaimager directly from the Home screen Top taskbar contains information like time and date logs running processes...

Page 20: ...top left corner When creating a new case a user can enter details such as Case ID Case Examiner Case Notes The above details will appear in logs and reports of created cases Virtual keyboard will appe...

Page 21: ...TARGET ports USB 3 0 and or SATA SAS cords must be used Drives can be connected when the device is operational except for SAS carriers with speeds of 10K or 15K such disks should be connected to expa...

Page 22: ...disk images such as Disk to disk cloning 1 1 Created copy is a mirror of the original drive the target drive will be formatted in the same way as the source drive and will be an exact copy of the orig...

Page 23: ...media is correct Starting the process will overwrite it Press the middle buttons to switch between different interfaces of connected target drives SATA USB or LAN Lower section of this screen contains...

Page 24: ...eed The following screen contains information about chosen devices It is possible to choose which hash algorithms will be used during the process Application supports basic hashing such as MD5 SHA1 as...

Page 25: ...nd messages about data transfer speed At any time it is possible to stop the process by clicking button After the operation begins user can switch to processes list or any other screen The application...

Page 26: ...er This means that after making a copy a marker will be placed on the source media This tag is used to ensure that the process of calculating checksums ends on this tag In this operation the checksums...

Page 27: ...binary copy file formats chosen by specialists acquiring electronic evidence In order to begin the disk to file copy operation use the tiles in the Home screen or press duplicate from the left panel S...

Page 28: ...disk space system alert will appear It is possible to plug and unplug drives anytime at this point Application will rescan devices automatically Scanning can be also performed manually by clicking th...

Page 29: ...l settings for image naming In order to rename manually click the underlined target path File format settings allow to choose type of image formatting Hash options can be modified by simply selecting...

Page 30: ...ess begins detailed task information will appear on the screen Elapsed and remaining times are available at the bottom Bottom progress bar provides progress percentage and data transfer speed informat...

Page 31: ...o several targets This applies if the target medium does not have enough free copy space In the next step additional settings may be displayed In this option only the EnCase format is available the ot...

Page 32: ...ed image files straight to lab s storage In order to do so the Mediaimager duplicator shall be connected to the network where storage is available and choose LAN as Target destination When choosing a...

Page 33: ...allows to create binary data images of only the allocated disk space In order to do so select duplicate menu as described above page 24 On the Duplicate Disk to file screen press the DD image allocat...

Page 34: ...s and folders presented on the drive Disk to file image data manual Mediaimager functionality allows its users to create binary copies of selected disk structures only such as specific files or folder...

Page 35: ...e given by a user In order to select desired folders and files click the button A detailed list of all existing partitions folders and files will be presented to a user Easy to use file tree allows to...

Page 36: ...MEDIAIMAGER Users Guide Version 1 7 Page 36 of 63 The process of adding selected structures to a previously made file container will begin...

Page 37: ...rce drives on the left are marked in red On the opposite side target devices are marked in green Press the middle buttons to switch between different interfaces of connected target drives SATA USB or...

Page 38: ...ile was encrypted with the password in the past remember to fill the dialog window with exactly the same password in order to proceed If the image file was not encrypted you may proceed by simply leav...

Page 39: ...peration can be stopped anytime by a user by clicking button When restoring the image it is possible to use all the functionalities available in the device The process will run in the background When...

Page 40: ...ed in computer forensics algorithms to calculate checksums in order to determine whether or not the data is corrupted Disk hashing Disk hashing function allows users to calculate and verify drives che...

Page 41: ...nually press button The selected drive will be marked in green colour Top section of this screen allows to choose which hashing algorithms should be used Lower left part of the screen informs users wh...

Page 42: ...iaimager functionality provides methods to hash data stored in an image This operation is useful in verifying data integrity and completeness To hash an image devices must be connected as a target dri...

Page 43: ...ll scan automatically for any changes To scan manually press the button The selected image as well as the drive will be marked in green colour Default hashing methods are chosen by the application bas...

Page 44: ...this manual The difference is that in case of calculating a checksum a copy of a disk with the tag will be calculated to the marker that was set during the coping process After calculating the checksu...

Page 45: ...up the device network features In order to connect to the device by remote desktop protocol a user needs to Connect the unit to a network LAN or internet Setup the network details DHCP or Static IP Co...

Page 46: ...ome Screen or use the panel on the left side of the screen The Erase window provides a list of available erasing algorithms along with a short description of a pattern being written on the target devi...

Page 47: ...s status and other useful information including the disk being currently erased estimated time and more The process can be stopped at any time by clicking button When erasing media it is possible to u...

Page 48: ...From this screen it s possible to view and export processes reports easily This screen contains a list of all the processes performed in selected case in this example Case 002 The application provides...

Page 49: ...al device press in the lower left corner On the right side of the screen an additional panel will appear The application will scan for any devices connected as a target drive and present them to a use...

Page 50: ...ng PDF format In order to choose a desired file format simply mark the checkbox in the lower section of the screen The application will inform about a successful export operation on the screen and sav...

Page 51: ...other information as well as calculated checksums Since the process is already finished button is replaced with button which allows to see details about the performed process This window allows a use...

Page 52: ...ontain details related to whole device usage This include case creation logs processes started drives connected and much more Case logs are related to currently selected case This window provides a us...

Page 53: ...t s also possible to export all the log files to an external device In order to do so click in the lower left corner of this window An additional panel will appear providing a list of available drives...

Page 54: ...ut a performed report export will be globally noted as well Mediaimager stores the global logs registered since the device was started It s an easy and fast way to review information about the device...

Page 55: ...der to start diagnostics press the Diagnostics tile in the main menu or click the Wrench Icon from any place in the application using the shortcut panel on the left side of the screen The Diagnostics...

Page 56: ...tionality Settings are accessible both using Home Screen tiles and the left panel This window provides a list of settings that can be modified It includes default file and directory naming hashing alg...

Page 57: ...of sectors in the event of a reading drive error Read Step copying buffer size in sectors Scroll down to see other options Lower section of the Settings window contains a simple tool allowing a user...

Page 58: ...oftware versions are displayed Calibrate touchscreen It is possible to calibrate the screen manually if there are touch problems The Calibrate touchscreen option is available in the device settings Af...

Page 59: ...is point select the port to which the media has been connected First choose the device side expansion left back or right then confirm with the OK button Then the application will ask you to indicate a...

Page 60: ...menu allows a user to Shutdown Restart and Hibernate the machine Shutdown operation stops all the processes and turns off the device Restart option stops any active processes and reboots the machine H...

Page 61: ...es 128 bit long checksums SHA1 Secure Hash Algorithm a popular hashing function designed by the NSA U S National Security Agency For any dataset not bigger than 264 bits a 160 bits long checksum is ge...

Page 62: ...itionally the software version number and possible error information displayed on the screen It is not recommended to perform any advanced repairs without consulting our support engineer Frequently as...

Page 63: ...does Mediaimager use Mediaimager is using the Microsoft Windows Embedded 8 Standard system Newer devices have been equipped with the Windows Embedded 10 OS What file system does Mediaimager use when...

Reviews: