background image


DMR200 

User’s Guide


V1.1  


42


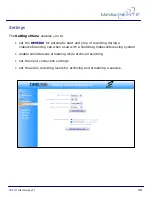
To view the live broadcast, select the 

Play

 button to launch your Windows

®

 Media 

Viewer to watch the live broadcast.  The broadcast will be shown to you via the template 

selected by the user prior to beginning the broadcast. 


Video1 Video Connection 

The 

Video1 Video Connection

 pull-down menu selects which input is used on the 

DMR300

 for the Video1 connection.  There are two choices, 

S-Video

 or 

Composite


video as there are two connectors on the rear of the unit.  Select which input your video 

source is connected to and press 

Save Settings

.   


Video2 Video Connection 

The 

Video2 Video Connection

 pull-down menu selects which input is used on the 

DMR300

 for the Video1 connection.  There are two choices, 

S-Video

 or 

Composite


video as there are two connectors on the rear of the unit.  Select which input your video 
source is connected to and press 

Save Settings

.   


Note: your menu may not show a 

Video1

 or 

Video2

 Connection on this menu.  

These choices vary depending on the selected Template.  If you select a template 

that does not include any input from 

Video1 

or 

Video2

, then you will not see any 

reference to that connection on this menu page. 


Summary of Contents for DMR300

Page 1: ...D DM MR R3 30 00 0 D DI IG GI IT TA AL L V VI ID DE EO O C CO ON NF FE ER RE EN NC CE E M ME ED DI IA A R RE EC CO OR RD DE ER R U Us se er r s s G Gu ui id de e V Ve er rs si io on n 1 1 0 0 ...

Page 2: ...DMR200 User s Guide V1 1 2 ...

Page 3: ...itten permission of Advanced Media Design Inc Nationally and internationally recognized trademarks and trade names are the property of their respective holders and are hereby acknowledged MediaPOINTE is a registered trademark of Advanced Media Design Inc Disclaimer The information in this document is furnished for informational purposes only is subject to change without prior notice and should not...

Page 4: ...the plug Do not attempt to defeat the polarization or grounding protection on the plug under any circumstances Do not overload wall outlets extension cords or integral convenience receptacles Unplug the unit from the wall before cleaning Do not use liquid or aerosol cleaners For proper ventilation do not block the slots and openings in the case Do not install the unit in a location where the venti...

Page 5: ...quirements 11 Introduction 12 Front Panel 12 Record Start Stop Push Button 13 Yellow LED Indicator 13 RESET Button 13 Power Indicator 13 USB Port 14 Uses Features 14 Overview 15 How It Works 15 Requirements 16 Video Monitor Requirements 16 Network Requirements 16 Optional Requirements 16 Chapter 2 Setup 17 Connecting the DMR300 18 The Rear Panel 18 Auxiliary Connections 19 Network Setup 20 How to ...

Page 6: ... All Content 29 System Information 30 Sys Info 30 Shutdown 31 Reboot 31 Chapter 4 Archiving and Streaming 33 Recordings 34 Recording Start Stop 35 Playback on DMR300 35 Refresh Delete Delete all 36 Recording Information and Playback Window 37 Settings 40 Recording Mode 41 Live Playback While Recording 41 Video1 Video Connection 42 Video2 Video Connection 42 Set Recording Gain 43 Appendix A Front P...

Page 7: ...ital videoconference media recorder This user s guide describes how to set up and use the DMR300 to record and transport graphic video and audio content over IP networks Topics in This Section Reliability of Information 8 Service Support and Training 8 Document Conventions 9 Contents of This Package 9 ...

Page 8: ...on of this document Please use the contact information below for all correspondence Development Department Advanced Media Design Inc 667 Rancho Conejo Blvd Newbury Park CA 91320 USA support MediaPOINTE com Service Support and Training MediaPOINTE Inc is committed to providing the service support and training needed to install manage and maintain you MediaPOINTE equipment All MediaPOINTE products a...

Page 9: ...ing equipment may expose you to dangerous voltages or other hazards and will void your warranty Refer all servicing to your MediaPOINTE representative The lightning flash with an arrowhead symbol within a triangle is intended to alert the user to the presence of un insulated dangerous voltages Contents of This Package MediaPOINTE DMR300 Digital Video Conference Media Recorder 2 RCA Video Cables 2 ...

Page 10: ...DMR200 User s Guide V1 1 10 ...

Page 11: ...ts A brief list of requirements is also shown Topics in This Chapter Chapter 1 Introduction Overview and Requirements 11 Introduction 12 Front Panel 12 Record Start Stop Push Button 13 Yellow LED Indicator 13 RESET Button 13 Power Indicator 13 USB Port 14 Uses Features 14 Overview 15 How It Works 15 Requirements 16 Video Monitor Requirements 16 Network Requirements 16 Optional Requirements 16 ...

Page 12: ...or archiving and streaming of your teleconference session As with almost all of MediaPOINTE s AV over IP products you can control the DMR300 via many different methods Some of these methods include web interface contact closure RS 232 serial port XML API or by the ultra convenient one button control on the front panel One push of the BLUE button will start archiving and streaming if desired your t...

Page 13: ...e indexing procedure indicating that the unit is busy and cannot archive or stream until the process is complete Depending on the length of the archived material this could be from several seconds up to 30 minutes to complete the indexing process The LED also serves as an internal error indicator In the unlikely event that an error occurs the LED will blink See Appendix A for an explanation of the...

Page 14: ...nd accurate record of each event Share visual information designs and concepts with dispersed groups of people to gather input during a video conference Stream important videoconferences to other locations such as overflow rooms or remote conference locations along your corporate network Conduct customer and employee training across vast geographical areas Discuss research engineering architecture...

Page 15: ...ocations around the display The user can select where each image works best for their own playback requirements Each of the three separate archived streams is recorded in their native resolution for maximum video quality The DMR300 combines all three recorded streams into a single file that is stored on board locally on a hard drive The recorded file can then be viewed locally on your videoconfere...

Page 16: ... or higher resolution monitor Network Requirements 10 100 Mb Ethernet Connection 100 Kbps to 5 Mbps network bandwidth Web browser for administration and Internet functions Optional Requirements Graphics input device laptop desktop computer document camera Line In Out RCA input ...

Page 17: ... application or remote configuration software If you know how to browse the internet then you already know how to access and control the DMR300 simply via a web browser Topics in This Chapter Connecting the DMR300 18 The Rear Panel 18 Auxiliary Connections 19 Network Setup 20 How to Assign an IP Address 20 Logging In 21 Administrator Setup 22 Guest User Setup 22 IP Settings 23 ...

Page 18: ... Power Cable insert the IEC cable to the AC power input plug Make sure the on off switch is in the off position before plugging in the power cable Video Inputs insert the two video inputs from the videoconferencing system These connections can be either standard video via composite connectors or S Video cables The video inputs on the DMR300 have both composite and S Video connections High resoluti...

Page 19: ... Auxiliary Connections Video Output use this connection to use a local monitor to view the files on the hard drive This output can also be sent back to your videoconferencing system and be displayed on the main display Stereo Audio Output use this connection for the audio portion of the recorded material on the display These can be routed to local speakers or back into the main videoconferencing a...

Page 20: ...rnet browser enter the IP address of the DMR300 3 Login to the DMR300 using the procedure shown below in the Logging In section 4 Navigate to the network settings page by selecting Config IP This selection will take you to the Network settings page that lists the current network settings and also has a section you can use to change these settings 5 In order to change to a Fixed or Static IP addres...

Page 21: ...53 2 Once you have navigated to the site you will be presented with the default menu page Anyone who logs into the DMR300 is considered a Guest User until they complete the Admin login Admin logins are required to make changes to the system settings under the Manage section of the menu If all you want to do is start or stop the DMR300 you will not need administrator rights The Guest User can start...

Page 22: ...at the login id and the password are case sensitive Guest User Setup The Guest User maintains several rights to the DMR300 3 Using the IP address displayed on the graphics monitor enter this address into the URL of your Internet Browser The Guest User can start and stop the DMR300 select a template to configure the record and playback layout and change the video and audio settings for recording 4 ...

Page 23: ...ck on the Config IP under the Manage section of the menu 3 Verify that the IP Address subnet mask and Gateway are correct 4 Once the setting changes are complete click on the Apply Changes button 5 The screen should refresh and display your new settings 6 See the Figure 2 Network Configuration Table for a more in depth description of all fields Figure 1 Network Configuration ...

Page 24: ...rieval from the network IP Address Assign a specific address to the DMR300 This will also display the current address assigned IP Subnet Mask The Netmask ID A range of IP addresses defined so that only machines with IP addresses within the range are allowed access to an Internet service 192 168 is a good example Default Gateway Gateway address connecting disparate networks ...

Page 25: ... on the DMR300 Topics in This Chapter Security Settings 26 Enable User Security 26 User Password Confirm User Password 27 Changing the Administrator Password 27 Update Section 28 Upgrade System Firmware 28 Reset Configuration 29 Delete All Content 29 System Information 30 Sys Info 30 Shutdown 31 Reboot 31 ...

Page 26: ...e 3 Security Settings From the Security menu an administrator can enable user security set the user password as well as change the administrator s password Enable User Security By default user security is turned off Anyone can log in to the DMR300 without being asked for a login ID or password Checking the Enable user security checkbox will enable security for the user This will require all users ...

Page 27: ...n the main menu These sections include Config IP Security Update and System Information By default the Administrator ID and password are set to admin and MediaPOINTE respectively It is not possible to change the Administrator ID It will always be admin To change the Administrator password perform the following steps Enter a new password in the New admin Password field and confirm it in the Confirm...

Page 28: ...de the features on the DMR300 to lead technological advances in the archiving and streaming marketplace In order to keep the DMR300 up to date with all of the latest firmware updates you may have to update the system firmware from time to time Follow the following steps to upgrade the DMR300 firmware 1 Download the latest firmware edition from the MediaPOINTE website Note if none is available call...

Page 29: ... in place Reset Configuration Selecting the Reset Configuration button will reset all settings in the DMR300 back to the factory settings This will not delete any of your recorded files only the system configuration settings You can find a list of the factory settings in Appendix B in this user guide Delete All Content Selecting the Delete all content button in the Update section of the DMR300 wil...

Page 30: ...rmation about the DMR300 The information contained on this page is Product Name Series Installed version of software and firmware Manufacturer Available disk space Copyright information Also on this page are two options to allow the user to shutdown or reboot the DMR300 See Figure 3 for an explanation of these items ...

Page 31: ...opyright Copyright date of the DMR300 product Shutdown Select this button to remotely power down shut off the DMR300 Any access to the unit will be lost as the unit is powered down In order to power up the unit the user must physically turn on the switch on the rear of the unit as well as the small power switch on the front of the unit No communication is possible when the DMR300 is in a powered d...

Page 32: ...DMR200 User s Guide V1 1 32 ...

Page 33: ...change audio and video settings for each recording Also discussed are layout templates Topics in This Chapter Recordings 34 Recording Start Stop 35 Playback on DMR300 35 Refresh Delete Delete all 36 Recording Information and Playback Window 37 Settings 40 Recording Mode 41 Live Playback While Recording 41 Video1 Video Connection 42 Video2 Video Connection 42 Set Recording Gain 43 ...

Page 34: ...or delete selected recordings or all recordings on the hard drive This screen also shows a list of all current recordings and information about them The directory path of each stream is shown along with the duration of the recording If you select a recording from the list a brief screen preview of the recording is shown in the window provided See below for an explanation of each option on this pag...

Page 35: ...the archived file press the Stop button with the square in the center The number of recordings currently on the hard drive is noted on the lower left of the screen as shown by the red circle on the previous page Note the Start Stop buttons have the same effect as hitting the BLUE button on the front of the DMR300 Playback on DMR300 Selecting the Playback on DMR300 button requires an external monit...

Page 36: ...tton was not selected in error Caution deleted files cannot be retrieved The Delete all button will delete ALL the current recordings on the hard drive After the Delete all is selected a pop up window asking for confirmation is presented to ensure this button was not selected in error Caution deleted files cannot be retrieved The recordings number is not reset during this process For example if yo...

Page 37: ...tory path for each recorded stream are two buttons Play and Download These buttons allow users to either play the recorded stream locally on a PC using a Windows Media File compatible viewer or download the file for later viewing on the PC The Play button will open the Windows Media File viewer currently installed on the PC and play the file In order to play the file a Windows Media File viewer ap...

Page 38: ...connector then selecting the Video1 and Video2 template will show both camera views side by side on the display If you are in a video only conference and only have one camera image on screen you would select the Video1 template that captures the input of the Video1 input on the rear of the DMR300 If you have a full videoconference with both near and far end video camera views as well as high resol...

Page 39: ...eriment with each template to see the layout of each and how it is recorded for playback Once you become familiar with the different layouts you can easily decide which one will work best for each of your different archiving and playback requirements ...

Page 40: ...0 for automatic start and stop of recording during a videoconferencing call when used with a Tandberg Videoconferencing system enable simultaneous streaming while archival recording set the input connection settings set the audio recording levels for archiving and streaming a session ...

Page 41: ...dress of the Tandberg codec or the serial port used to control the codec The password of the Tandberg codec is also required Enter the IP Address and Password of the Tandberg codec and the DMR300 will automatically start when a videoconference call is detected or initiated and will automatically stop when the call is terminated Live Playback While Recording This option turns on and off simultaneou...

Page 42: ... the unit Select which input your video source is connected to and press Save Settings Video2 Video Connection The Video2 Video Connection pull down menu selects which input is used on the DMR300 for the Video1 connection There are two choices S Video or Composite video as there are two connectors on the rear of the unit Select which input your video source is connected to and press Save Settings ...

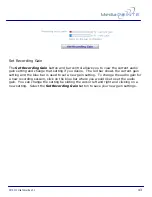
Page 43: ...sire The red bar shows the current gain setting and the blue bar is used to set a new gain setting To change the audio gain for a new recording session click on the blue bar where you would like to set the audio gain You can change the setting be sliding the cursor left and right and clicking on a new setting Select the Set Recording Gain button to save your new gain settings ...

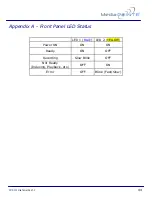
Page 44: ...MR200 User s Guide V1 1 44 Appendix A Front Panel LED Status LED 1 BLUE LED 2 YELLOW Power ON ON ON Ready ON OFF Recording Slow Blink OFF Not Ready Indexing Playback etc OFF ON Error OFF Blink Fast Slow ...

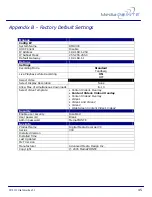
Page 45: ...Select Display Resolution None Allow Max of simultaneous downloads 1 10 Select Video Template Content Video1 Overlay Content Video1 Video2 Overlay Content Video2 Overlay Video1 Video1 And Video2 Video2 WideScreen Content Video1 Video2 Security Enable user security Disabled User password Blank Admin password MediaPOINTE Sys Info Product Name Digital Media Recorder VC Series 300 Installed Version In...

Reviews: