ELECTRICAL
ELECTRICAL CONTROL CENTER
The adjustable safety controls are separated from the
starting controls by means of a partition dividing the
control cabinet and individual access doors. The con-
trol box is further arranged with a dead-front panel
which covers all
e x p o s e d
electrical contacts and
terminals, to provide absolute safety for the operator.
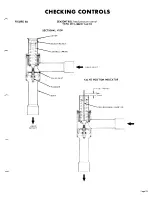
Figure 6, Page 10, shows dead-front panel removed to
show internal controls and wiring.
FIELD WIRING
A.
B.
C.
D.
E.
F.
G.
Wiring should be done in accordance with all ap-
plicable codes and ordinances.
Three main power leads must be hooked up to the
unit power terminal block. Table 8, Page 16, gives
the recommended lead wire sizes for three conduc-
tors in a raceway for a normal installation.
Maximum voltage variation equals 10% of nameplate
value. Phase voltage unbalance must not exceed 2%.
A flow switch (FC) is provided with the unit and
must be field wired across terminals as shown on
Diagrams 2 and 3, Pages 12 thru 15.
Refer to wiring diagrams provided with units for
specific wiring recommendations for each model.
Wiring Diagrams 2 and 3, Pages 12 thru 15, show
basic wiring and accessory circuits.
Always ground unit for safety.
FUSES AND CIRCUIT BREAKERS
The fuses and circuit breakers for the compressor,
condenser fan motor circuit and control circuit are
located in the control box. In addition, there are small
fuses for the compressor control circuit located in the
end of the compressor terminal box. Most local elec-
trical codes also require a disconnect switch in the
power supply, located within reach of the unit. In
many areas, the circuit breaker can be used in place
of a disconnect switch.
Check
on local ordinances
covering specific rcquircments.
CRANKCASE HEATERS
The compressors are equipped with crankcase heaters.
Some models have heaters installed externally below
the crankcase and others have heaters inserted into
the crankcase.
When the system is to be started up initially, the
crankcase heater power should be turned on before
starting the system for a time sufficient for all rcfrig-
erant in the crankcase to be evaporated. This should
be a minimum of 4 hours, and preferably over night.
The crankcase should be up to approximately 80 F.
before the system is started, to minimize the possibil-
ity of lubrication problems or valve damage on start up.
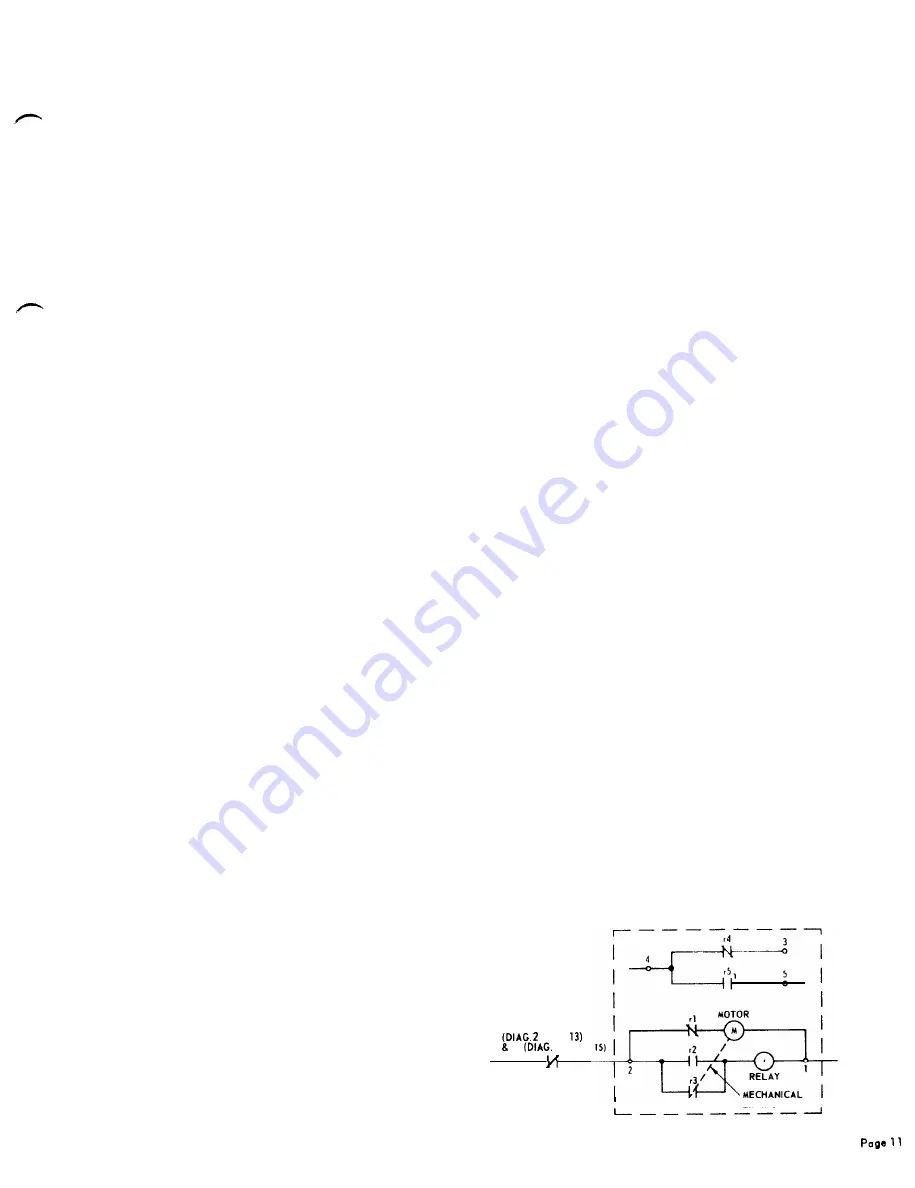
LOCKOUT-TIMER OPERATION
( O p t i o n a l )
(Refer to Diagram 1)
A.
B.
C.
D.
E.
F.
G.
The desired time delay period is set by loosening
the nut at the actuator arm and adjusting the arm
in relation to the calibrated dial. The nut is
tightened.
The sustained contact switch is closed. (Normally
closed R2 in Diagram 2, Page 13).
The clutch motor is energized through the closed
r1 contact. (The relay remains unenergized).
The motor drives the actuator arm and winds up
the reset spring during the timed delay period.
At the end of the delay period, the actuator arm
closes the r3 contact, energizing the r relay.
1. The r2 contact closes and holds the r relay in.
2. The r5 contact closes, energizing the load.
3. The r1 contact opens, de-energizing the motor.
The motor and actuator are reset by the reset
spring. The r3 contact opens up again since it
is actuated only by the actuator arm and is in-
dependent of the relay coil.
When the sustained contact switch is opened, the
r relay coil becomes deenergized. The r5 contact
opens up, de-energizing the load.
The timer is now ready for the next closing of the
sustained contact switch and timed delay period.
DIAGRAM 1 LOCKOUT-TIMER
(INTERNAL WIRING)
R 2
P A G E
R3 R4
3 PAGE
L I N K A G E


