background image

EXTender 6000 Quick Installation Guide


17


• 

If you type “Yes ”, the wizard asks a series of configuration questions. (See page 31.) 

• 

If you type “No”, the PC displays the following message: 

Press “Enter” to start the EXTender shell….. 


Note: If the EXTender is powered up prior to opening the terminal program, this message does not 
appear. 

 
Go to 

Basic Configuration 

on the next page. 

Basic Configuration 

Press 

Ente

r. The MI 

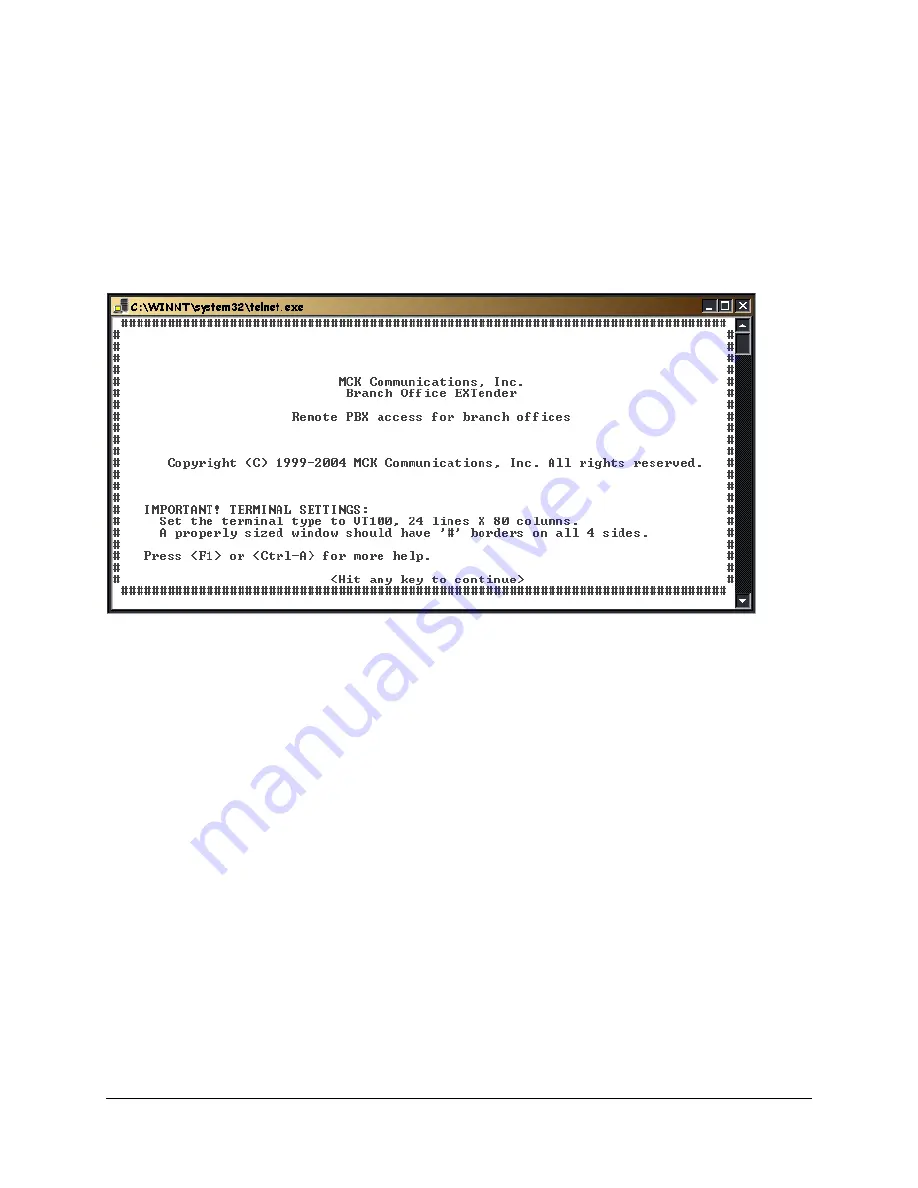
Welcome Screen 

is displayed. 


Figure 6:  

Welcome Screen 

IMPORTANT TERMINAL SETTINGS 

The MI requires a screen size of 24 lines X 80 columns. Make sure the 

Welcome Scr

een is bordered on 

all four sides with a # symbol, as shown in the figure above. 


To enlarge the screen 

(within the VT-100 application) 

1.  Click any corner of the screen. 
2.  Drag the screen to enlarge. 
3.  Check that the screen is bordered by “#” symbols. 
 
Press any key to continue. The 

Main Menu 

is displayed. 

 
If you already familiar with using the MI, proceed to page 18 for information on setting the parameters for 
the different Network Environments.  
 

Or

…….. 

 
Press 

F1 

for the MI 

Help Screen, 

which provides basic information for navigating through the interface. 

Summary of Contents for EXTender 6000

Page 1: ...Quality is our job Customer satisfaction is our mission G 6000 RXM Rev AI May 20 2005 EXTenderTM 6000 Quick Installation Guide ...

Page 2: ...ents applications trademarks copyrights or other intellectual property rights covering subject matter in this publication The furnishing of this document does not give you license to these patents trademarks copyrights or other intellectual property Trademarks 2004 Citel Technologies All rights reserved MCK the MCK logo PBXgateway I PBXgateway II MCK EXTender 1000 MCK EXTender 3000 MCK EXTender 40...

Page 3: ...Tender 11 Installation Considerations 11 Typical Installation 12 Mounting the EXTender 6000 12 Connections to the EXTender 6000 13 Telephony Wiring RJ 21 14 VT 100 Setup 15 Power Up 16 LED States 16 Basic Configuration 17 Installation Environment 18 Synchronous Serial RVP_Direct 19 Prerequisites for Configuration 19 Connect Parameters 20 Procedure 20 WAN Port Set up 21 Settings 21 Procedure 21 Set...

Page 4: ...rocedure 32 Using the analog line connected to the EXTender 32 Procedure 32 Lifeline or 911 Phone Notice 33 Remote Telephone Messages 34 Optional Configuration 35 2 to 1 Configuration RVP_Direct 36 Procedure 36 Setting up the Analog Port 38 Procedure 38 Setting the Make Set Busy Key Meridian Only 39 Procedure 39 Setting up Call Suspend 39 Procedure 40 Fax Support on the Second B Ch 2 Channel 42 Us...

Page 5: ...asement location Do not overload wall outlets as this can result in the risk of fire or electrical shock Do not attach the power supply cord to building surfaces Do not allow anything to rest on the power cord Do not place this product where anyone can step on the cord Do not operate the system if chemical gas leakage is suspected in the area Use a telephone located in another safe area to report ...

Page 6: ... High level Data Link Control HDLC Interfaces Ethernet Single 10Base T RJ 45 Serial WAN EIA TIA 232 EIA TIA 530 EIA TIA V35 Management Serial RS 232 DB9 PBX KSU Up to 12 digital line interfaces over a 25 pair RJ 21 cable Voice Voice compression G 729a G 711 G 726 ADPCM 32 and ADPCM 24 Protocols and Services LAN RVP over Internet Protocol IP WAN Remote Voice Protocol RVP proprietary over HDLC Elect...

Page 7: ...s of the release date of this document Refer to the MCK s Web site http www mck com for the most recent list of recommended ISDN TAs If using a synchronous connection please see page 19 for more information Table 1 ISDN TAs Manufacturer Model 3Com 3Com U S Robotics Adtran ISU 2X64 ISU 128 Express NTU Express 3000 Motorola Bitsurfr Pro rev 1M Bitsurfr Pro EZ Bitsurfr Pro for Europe MANUAL_SETUP_1 M...

Page 8: ...alls must be set up as data Note Confirm this with your long distance provider when you order your ISDN Line A call is defined as voice or data in the setup message Information for the System Administrator When your ISDN BRI line is installed you receive two Service Profile Identifiers SPIDs and two Directory Numbers DNs Provide these numbers to the System Administrator Record the SPID and DN info...

Page 9: ...display speakerphone VB 44230 34 key standard phone VB 44233 34 key small display speakerphone VB 44310 EM24 24 Button Expansion Module VB 44320 DSS72 72 Button DSS BLF Module Iwatsu ADIX Digital Telephones Magix Digital Telephones Nitsuko i Series Digital Telephones The EXTender will support many of the ADIX digital telephones It is recommended that each telephone connected to the EXTender have a...

Page 10: ...lay 92783 24 Line 34 Button with Display 92760 18 Line 28 Button no Display 92763 18 Line 28 Button with Display 92773 24 Line 34 Button Super Display Meridian M2006 M2008 M2216 M2317 M2616 M2616CT M3903 M3904 M3905 Norstar M7100 M7208 M7310 M7324 M7410 ATA2 T7208 T7316 T7316E This digital display telephone is NOT recommended for administrative purposes DKT 2004 DKT 2010 SD DKT 2020 SD ...

Page 11: ...ale RJ 21 connectors to interface between the punchdown block and the EXTender See Pin Out Assignments on page 14 Analog telephone line for local use if you purchased an analog line card Note The analog line card is not available outside North America Installation Considerations The system operates from 100 240 VAC 50 60 Hz Do not apply power to the unit until instructed to in the installation pro...

Page 12: ...e Punch Block EXTender 6000 Punch Block PBX Corporate Office PBXgateway DSU CSU DSU CSU Analog Phone Line Figure 1 Typical 6000 Installation Mounting the EXTender 6000 You can mount the EXTender in a standard 19 inch communication rack using the brackets provided or simply place it on a shelf within the rack Figure 2 Securing the Unit to a Rack ...

Page 13: ...y none Stopbits 1 Software flow control Xon Xoff B Power Connect to a 120 VAC outlet C Telephony Interface RJ 21 Wire to a punchdown block and then to the PBX See Pin Out Assignments on page 14 D WAN1 DB 25 serial straight through Connects the EXTender to a synchronous or asynchronous serial device CSU DSU or other network device Note Use an RS 530 type cable or DB 25 to M34 cable should for high ...

Page 14: ...L BL WH 1 38 13 BK GN GN BK 7 28 3 WH GN GN WH 2 40 15 BK SL SL BK 8 30 5 WH SL SL WH 3 42 17 YL OR OR YL 9 32 7 RD OR OR RD 4 44 19 YL BR BR YL 10 34 9 RD BR BR RD 5 46 21 VI BL BL VI 11 36 11 BK BL BL BK 6 48 23 VI GN GN VI 12 Wire Color Abbreviations BK Black BR Brown RD Red OR Orange SL Slate YL Yellow GN Breen BL Blue VI Violet WH White ...

Page 15: ... HyperTerminal folder HyperTerminal icon B When prompted for a name type gateway and click OK C Determine what port n you will connect to on your pxc At the Telephone Number dialog select Connect using Direct to COMn ignore other settings and click OK D At the COMn 1 Properties dialog set the parameters to 9600 8 none 1 and Xon Xoff and click OK E When the HyperTerminal window appears it is blank ...

Page 16: ...ernet port on the Remote Unit operates on 10 megabit Ethernet networks only It does not sup port 100 megabits Once the power up sequence is finished the state of the following LEDs should be Green LED States PWR Solid Green WAN1 Solid Green Ready if a synchronous device is connected to WAN 1 Solid Orange Ready if an asynchronous ISDN TA is connected and accepting commands but there is no link up i...

Page 17: ...een IMPORTANT TERMINAL SETTINGS The MI requires a screen size of 24 lines X 80 columns Make sure the Welcome Screen is bordered on all four sides with a symbol as shown in the figure above To enlarge the screen within the VT 100 application 1 Click any corner of the screen 2 Drag the screen to enlarge 3 Check that the screen is bordered by symbols Press any key to continue The Main Menu is display...

Page 18: ...onfiguration Table 5 Network Devices To configure the EXTender with See a Synchronous serial device via WAN Port s 1 or 2 RVP_Direct using one of the following protocols V 3 5 RS 232 RS 530 Page 19 an Asynchronous serial device via WAN Port s 1 or 2 RVP_Direct using RS 232 Protocol page 24 an IP device via Ethernet port RVP_IP MCK s IP based products utilize VOIP technology to deliver remote voice...

Page 19: ... Gateway at the corporate site and the EXTender at the branch office must be installed properly and the network link between both devices must be operational The network administrator must assign an IP address for both units if you plan to configure and test them over a LAN or WAN Table 6 Configuration Steps You must To Default Setting Refer to Set Connect Parameters Select network type RVP_Direct...

Page 20: ...onfiguration Connect RVP_Direct The following menu appears Figure 8 RVP_Direct Menu 2 Press the Æ key and È key to the Primary Interface parameter This is the main WAN port that connects the Remote Unit to the network device 3 Press theÆ key to scroll through the choices 4 Press the È key to the Secondary Interface parameter This identifies the secondary WAN port This parameter is normally set to ...

Page 21: ... rate syn chronous serial port transfer speed of the network device CSU DSU refer to page 22 Setting the Interface Mode Choose the interface signaling type used to communicate with the network device refer to page 23 Procedure 1 Access the WAN 1 or WAN 2 Menu using the following path Path Gateway Configuration WAN 1 or 2 The following menu appears Figure 9 WAN Menu 2 Press the Æ key to access the ...

Page 22: ...e Æ key to the Sync Rate parameter and type in the correct Sync rate This parameter sets the synchronous data transfer speed of the WAN port and must match the network device speed Note This Sync Rate information displayed in bytes must be obtained through the network device documentation 3 Press the Åkey to accept changes and go back to the Configuration Menu 4 Press the Èkey to the Save paramete...

Page 23: ...Figure 11 Mode 2 Press the Ækey to access the parameters 3 Press the Èkey to the Mode parameter This parameter must match the protocol used by the network device connected to the WAN port Press the key to scroll through the available protocols 4 Press the Å key to accept changes and go back to the Configuration Menu 5 Press the Èkey to the Save parameter 6 Press Enter to save changes to the active...

Page 24: ...quisites for Configuration The Gateway at the corporate site and the EXTender at the branch office must be installed properly and the network link between both devices must be operational The network administrator must assign an IP address for both units in order to configure and test them over a LAN or WAN Table 7 Basic Configuration You must To Default Setting Refer to Set the Primary Dial Numbe...

Page 25: ...procedure ensure you have set the Connect Type to RVP_Direct This item is located on the Connect menu 1 Access the Connect Menu from the Main Menu using the following path Path Remote Configuration Connect RVP_Direct Primary Dial Nums The following menu appears Figure 13 Primary Dial Number 2 Press the Æ key to the Primary Dial Num 1 parameter Enter the DN number assigned to the first B Channel at...

Page 26: ...wing path Path Remote Configuration WAN WAN 1 or WAN 2 The WAN 1 menu appears Figure 14 WAN Menu 2 Press the Æ key È key to the Mode parameter This sets the WAN port to the async protocol required 3 Press the Æ key to select the Async RS 232 Dial value 4 Press the Å key to accept changes and go back to the Configuration Menu Press the key to the Save option Press Enter Setting the Async Parameters...

Page 27: ... menu appears Figure 16 Phone Numbers Menu Note Press the Æ key to enter the appropriate information provided by the system administrator Local Dialing Num1 parameter Enter the DN 1 number assigned to the ISDN line which was provided when the ISDN line was installed Example 2881918 ISDN SPID 1 parameter Enter SPID 1 assigned to the first ISDN B channel Example 40328819180101 Local Dialing Num2 par...

Page 28: ...al The network administrator must assign IP address information for both units TCP UDP Requirements Ensure that the correct TCP UDP ports have been opened to allow the EXTender to connect to the Gateway through your company firewall The following TCP UDP port requirements must be met The EXTender 6000 uses even numbered ports 12 288 to 12 544 The port numbers start at 12 288 and increment by 2 to ...

Page 29: ...g path Path Remote Configuration Connect 2 Set the Type parameter to RVP_Over_IP 3 Press È and Ækey to access the RVP Over IP menu The following menu appears Figure 18 RVP_IP Menu Note The Default setting connects all ports to the same Gateway unit You can set ports individually by simply selecting the port 4 Press the Æ key to access the Default Port menu 5 Press the Æ key to the IP Destination p...

Page 30: ...N Default Router The address of a device used to reach IP hosts not on this IP sub network Procedure 1 Access the IP Menu using the following path Path Configuration IP Address The following menu appears Figure 20 IP Address Menu 2 Press the Æ key to access the parameters 3 Press the Ækey to the Address parameter Enter the IP Address of the EXTender and press Enter 4 Press the È key to the Subnet ...

Page 31: ...sh the initial configuration programming You can use the MI to configure parameters that are not configurable through the wizard Standard Console User Interface vs the Setup Wizard When a unit is first powered up it checks a Setup Wizard flag If the flag is set the standard console UI is displayed If the flag is not set the system prompts you to run the Setup Wizard After this initial Setup Wizard...

Page 32: ...llowing message Press 1 to connect Press 1 on the keypad to connect the telephone to the corporate PBX Place a test call and check for clear reception Note If the connection is noisy or non existent refer to the System Administrator s Guide for trouble shooting steps Using the analog line connected to the EXTender Note This procedure applies only to the single analog telephone line connected to th...

Page 33: ...is connected to the Branch unit and linked to the Gateway you will reach the 911 facility that serves the location of the corporate facility and not the location of your Remote unit To ensure that you reach the correct 911 service for your area use a telephone connected locally Note EXTender units that are equipped with an analog card provide an analog port for local dialing ...

Page 34: ...ure the Connect Password is correct Check network links Attempt to reconnect Connect Timeout The EXTender cannot connect to the PBXgateway Check WAN connection on the unit Network disabled The network device is not connected being used or is not active Check network link and device Network down The network device has a problem Check network link and device Network in use The network device is bein...

Page 35: ...display telephones since you cannot see the Press 1 to Connect message Admin Password If configured this option restricts access to the EXTender MI by requiring a pass word for entry You must enter the Admin Password before you change any configuration parameters Note The Gateway and EXTender units have their own separate Admin Passwords Connect Password This option provides a secure WAN link betw...

Page 36: ...s Remote Number This number 1 or 2 identifies the Gateway WAN port connected to the EXTender Gateway Port Offset This parameter is used to allow the lower port numbers on Remote 2 access to the Gateway unit Example If the Gateway port offset is set to 4 when port 1 on the Remote connects it connects to port 5 on the Gateway Procedure 1 Access the Connect menu using the following path Path Remote C...

Page 37: ...her 1 or 2 This will differentiate the 2 remotes to the PBXgateway in the 2 to 1 configuration Figure 23 Remote 1 Figure 24 Remote 2 IMPORTANT NOTE The Remote Unit connected to WAN 1 of the Gateway MUST be Remote 1 5 Press the Å and È key to the Save option Press Enter to save changes to the active config rem ...

Page 38: ... user can dial out at any one time IMPORTANT NOTE If power to the remote unit fails the Analog port is not available to the digital telephones If another telephone tries to use the analog line while it is busy it hears a Busy tone Procedure 1 Select Analog command using the following path Path Remote Configuration Analog Card The following menu appears Figure 25 Analog Port Setup 2 Press the Æ key...

Page 39: ... the key to accept changes and go back to the Configuration Menu 5 Press the key to the Save option Press Enter Setting up Call Suspend The Call Suspend feature allows the telecom manager to reduce communication costs by bringing down the ISDN IP connection when all phones are inactive for a configurable period of time When the line is disconnected the phones indicate that they are in the Call Sus...

Page 40: ...Suspend Menu using the following path Path Remote Configuration Connect RVP_Direct Call_Suspend Path Remote Configuration Connect RVP_over_IP Default_Port Or for individual ports Path Remote Configuration Connect RVP_Direct Port_x y Port_x The following menu appears Figure 28 RVP_Direct Call Suspend 2 Press the key to access the parameters Figure 29 RVP_Over_IP Call Suspend 3 Press theÆ key to the...

Page 41: ...ices are Ring or Lamp Note Use Ring mode for non ACD sets and use Lamp for ACD sets 7 If you have selected Lamp mode for any ports press the È and Ækey to the Indicators parameter This parameter sets the Lamp indicators that you want to monitor on the telephone Note Normally you should select call appearance Lamps 8 If the Remote has ACD sets with Headsets press the È and Ækey to the ACD Tone para...

Page 42: ...e telephone type used Table 10 Fax Support by Protocol Protocol Telephone Name of Analog Port Avaya 6400 Series 100A Analog Interface Module Avaya 8411D Analog Adjunct Meridian M2006 M2008 M2008HF M2616 M2216ACD ATA Analog Terminal Adapter Using an MCA Adapter with a Meridian Telephone Note This information applies to Meridian protocols only Because of an error in the way the Meridian PBX sets up ...

Page 43: ...sole Port 2 Access the Web Server parameter using the following path Configuration IP LAN Web Server 3 Select Yes for Enabled Set the Timeout to 30 4 Save the settings and Log out of the MI 5 Open any web browser from your PC Example Windows Internet Explorer version 5 X or higher 6 At the http prompt type in the IP Address of the Gateway 7 Double click the Start Managing the Device link The Main ...

Reviews: