background image

4.

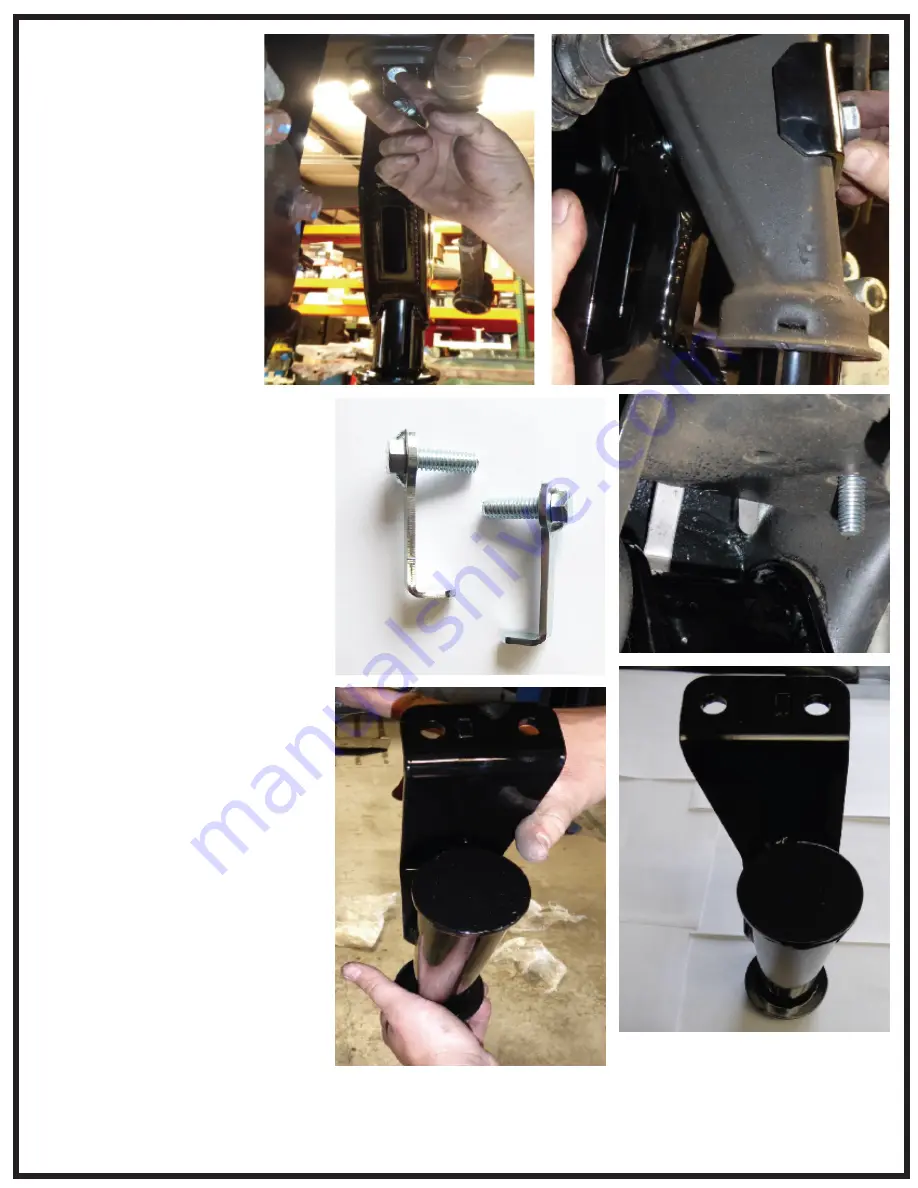
34. Install the front side

front bump stop brackets.

The upper bolt will only

titghen up against the 

frame, to hold bracket in 

place. (pic 14)

35. The lower bolt hole

will need to be drilled out

to 1/2”. After drilling, use

provided 1/2”-13 x 4” bolt, 

washer, and top lock nut.

Be sure to use retainer

bracket on opposite side

of bump stop bracket.

(pic 15)

36. Now install rear side front 

bump stop extender brackets. Use

the provided bolts with welded 

tabs in the factory location. 

(pics 16 / 17)

37. Use the provided 7/16” washers

and top lock nuts to install driver

side bracket (pic 18) and the 

passenger side bracket (pic 19).

38. Now reinstall the factory bump

stops into the newly installed

drop brackets.

39. Install the new provided lift

spindles. Use the factory ball joint

nuts on the upper and lower.

Torque to factory specs.

40. Make sure to remove the 

factory O-ring on the original

spindles and reinstall on the new

lift spindles. Next, install the hub

using the factory hardware and

provided loctite. Torque to factory

specs.

15.

14.

16.

17.

18.

19.

Summary of Contents for 52370

Page 1: ...pictured 13 Compression Struts 2 3 Lower A Frame Support Rods 2 5 Front Brake Lines 2 5 Rear Brake Lines 3 8 Torsion Bar Drop Brackets 2 15 Front Front Bump Stop Brackets 2 16 Diff Drop Brackets 2 9 R...

Page 2: ...s will be null and void NO welding is required to install any part of this lift kit Do not weld any components Over sized tires and heavier wheels can cause premature wear on factory and aftermarket c...

Page 3: ...rilling painting chroming etc There are NO WARRANTIES neither espressed nor implied for powder coating on any McGaughy s products McGaughy s is not responsible for damages and or warranty of other veh...

Page 4: ...les 13 Compression Strut Bars 14 CV Axle Spacers 15 Front Front Bump Stop Brackets 16 Diff Drop Brackets 17 Compression Strut Brackets 18 Front Crossmember 19 Rear Crossmember 20 U Bolts 21 Sway Bar E...

Page 5: ...his goes for the torsion keys as well Torsion bars must not be installed on opposite side or backwards So mark front and back on each bar too 8 Before removing the bolt going through the block be sure...

Page 6: ...and remove differential housing and rear crossmember from vehicle 23 Use a die grinder or sawzall to cut the inside of the driver side lower control arm pocket Measure 4 25 from the inside and make a...

Page 7: ...ards the front Now install the new rear cross member the same way Using factory hardware and the bolt heads towards back of vehicle 31 Now reinstall the factory lower control arms using the provided 1...

Page 8: ...rovided bolts with welded tabs in the factory location pics 16 17 37 Use the provided 7 16 washers and top lock nuts to install driver side bracket pic 18 and the passenger side bracket pic 19 38 Now...

Page 9: ...ts pic 21 into the transmission crossmember so the nuts line up with the holes pic 22 43 Now swing the compression strut bars up and bolt into place using the provided 1 2 13 x 4 hardware torque to 75...

Page 10: ...27 28 29 30 48 Use the provided 9 16 x 3 1 2 hardware to install the new torsion bar drop brackets into the factory mounts pic 27 49 Install the factory torsion bar crossmember into the new drop brack...

Page 11: ...spring from the vehicle You will need to use C clamps on the factory leaf pack to remove the center pin and u bolt retainer plate The factory retainer plate must be reinstalled onto the new provided...

Page 12: ...e the single brake line 69 Disconnect and remove fitting rubber and steel at both ends of factory brake lines 70 Install new braided lines at each end connecting to steel fitting at frame and at rear...

Reviews: