McAfee NTBA T-200 Quick Start Manual Download Page 2

Install the NTBA Appliance in the mounting rails

1

With help from another person, lift the NTBA Appliance so that the side rails at the back of the NTBA

Appliance are aligned with the mounting rails in the rack, then push the NTBA Appliance into the

mounting rails until it stops.

Lifting the NTBA Appliance and attaching it to the rack is a two-person job.

2

Use a screwdriver to fix a screw through the front and back rack holes to secure the system to the rack.

3

Attach the provided cable management arm if required.

4

Attach the lockable bezel to protect the front panel if required.

2

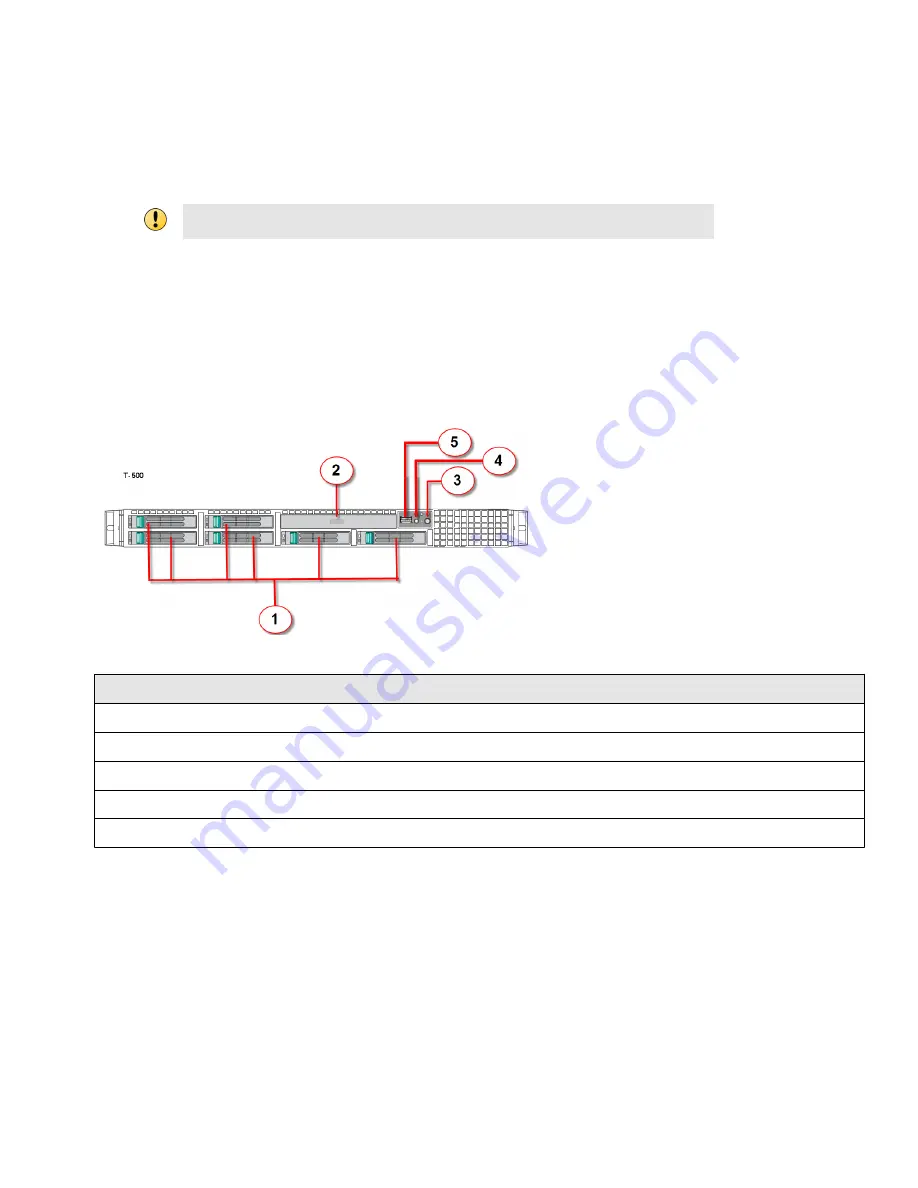
Front panel features and indicators T-500 and T-200

The front panel features and indicators of NTBA Appliance T-500 and T-200 are as follows:

Figure 2  Front panel — T-500 and T-200

Item

Description

1

Hard drives

2

Optical drive

3

Power-on indicator (on the Mini Control Panel)

4

System identification indicator light (on the Mini Control Panel)

5

USB connector (on the Mini Control Panel)

2

Summary of Contents for NTBA T-200

Page 1: ...with the required rack holes c Clip the rail to the rack and secure it d Repeat these steps to secure the second mounting rail to the rack e Make sure that the mounting rails are at the same level on...

Page 2: ...screw through the front and back rack holes to secure the system to the rack 3 Attach the provided cable management arm if required 4 Attach the lockable bezel to protect the front panel if required 2...

Page 3: ...ts 4 5 Management port 6 Remote management module NIC 7 Collection ports 2 copper 8 Power supply 1 9 Power supply 2 10 Collection ports 2 fiber 11 Power supply 1 status indicator light 12 Power supply...

Page 4: ...69 43 mm 1 69 43 mm Maximum weight 17 2 kg 38 1 lbs 17 2 kg 38 1 lbs Redundant power supply 650W 650W Quiescent power utilization 170W 225W Estimated inlet power utilization worst case scenario 426W 5...

Page 5: ...test specification System Cooling Requirement in BTU Hr 2250 BTU hour 7 Cabling the T 500 NTBA Appliance The T 500 NTBA Appliance has four collection ports and one management port The collection port...

Page 6: ...hat in turn connects to the Manager The NTBA Appliance is managed through the Manager Ports for cabling in the back panel Figure 6 T 200 back panel ports Item Description 1 Console port 2 Management p...

Page 7: ...tion unit PDU When you connect power to the appliance the appliance will immediately turn on and boot up 11 Install the Manager software a Prepare the system according to the requirements outlined in...

Page 8: ...displayed c Enter the device name The name must begin with a letter and can contain alphanumeric characters hyphens underscores and periods The length of the name is not configurable d Select the Dev...

Page 9: ...If you wish modify the DNS server details Click Next The Exporters page is displayed n Add a router exporter that will forward records to the NBA Sensor for processing and click Next To add a IPS expo...

Page 10: ...to the one entered against Device Name in the Add New Device page of the Manager g At the Please enter the sensor IP A B C D prompt type the management port IP address of the NTBA Appliance Specify a...

Page 11: ...hoose a password with a combination of characters that is easy for you to remember but difficult for someone else to guess 14 Verify successful NTBA Appliance configuration You can check whether the N...

Page 12: ...the Manager a Select Devices Admin Domain Name Devices NTBA Appliance Maintenance Deploy Device Software The Deploy Device Software page is displayed b Select the latest software listed under Softwar...

Reviews: