background image

2202G1JE-DA-M-N_2010.01.


5 Maintenance


Reciprocating Compressor M Series


5.5 Disassembly/Assembly


5-38


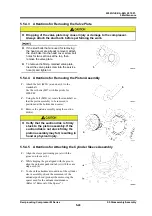
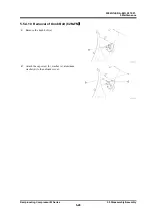
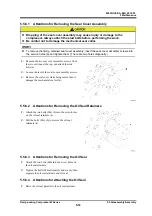
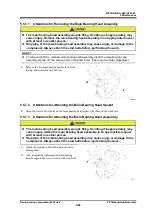
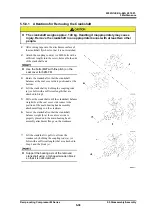
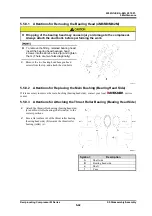
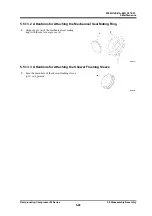
5.5.8.1  Attentions for Removing the Crankshaft


The crankshaft weighs approx. 140 kg. Handling it inappropriately may cause 
injury. Remove the crankshaft in an appropriate manner with at least two other 
people.


1.


Affix curing tape onto the attachment surface of 
the crankshaft flywheel so that it is not scratched.


2.


Attach the coupling rods (a) (or M20 bolts with a 
sufficient length) into the screw holes at both ends 
of the crankshaft axis. 


  Use the bolts (M27 with fine pitch) on the 

seal cover for 62M-FM.


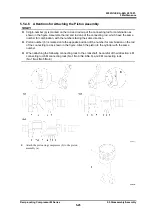
3.


Rotate the crankshaft so that the crankshaft 
balancer at the seal cover side is positioned at the 
bottom. 

4.


Lift the crankshaft by holding the coupling rods 
(a) (or bolts with a sufficient length) that are 
attached in Step 2. 

5.


Pull out the crankshaft until the crankshaft balance 
weight (b) at the seal cover side comes to the 
position of the main bearing head assembly 
attachment flange on the crankcase. 

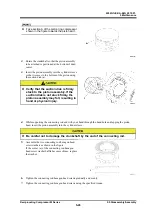
6.


Lower the crankshaft so that the crankshaft 
balance weight (b) at the seal cover side is 
properly placed onto the main bearing head 
assembly attachment flange on the crankcase. 

7.


Lift the crankshaft to pull it out from the 
crankcase by holding the coupling rods (a) (or 
bolts with a sufficient length) that are attached in 
Step 2 and the block (c). 


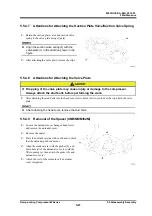
  Support the bearing axis of the removed 

crankshaft using a V-shaped wooden block 
so that it is not scratched.


Summary of Contents for 4M

Page 1: ...procating Compressor M Series Operation Manual 4M 6M 8M 62M 62M FM CAUTION Before operating inspecting or servicing the compressor read this manual thoroughly to fully understand the contents Keep this operation manual in a safe designated place for future reference whenever the manual is needed ...

Page 2: ......

Page 3: ...after indicated as this machine This operation manual hereinafter indicated as this manual describes safety information operational and maintenance procedures in detail for safe and effective use of this product Before installing or using this product make sure you read this manual Keep this manual in a safe place near the product for quick reference ...

Page 4: ... disaster or other accidental forces such as fire thunderbolt windstorm intense rainfall flood tidal wave earthquake land subsidence e t c Malfunction or damage caused by misusage described below Malfunction damage or defect of this product due to abnormal or improper use such as storing this product for middle to long term outside the building or in locations subject to high temperatures and high...

Page 5: ...d by qualified personnel educated about the fundamentals of the product and trained about hazards involved and measures to avoid danger Do not allow any person other than those educated on the fundamental expertise of the product and trained about hazards involved and measures to avoid dangers to approach the product while it is operating or during maintenance Observe all related federal national ...

Page 6: ...ls Preface Describes the outline of this manual and how to read this manual Warranty and Disclaimer Describes clauses and coverage of warranty Exclusion of warranty clauses is described as disclaimer Important Information Describes important information related to the machine and this manual 1 Safety Describes safety information for the worker safety rules for this machine and management details r...

Page 7: ... 3307 FAX 052 218 3308 Kansai office 553 0001 1 4 27 Ebie Fukushima ku Osaka shi Osaka TEL 06 4795 6000 FAX 06 4795 6033 Chugoku office 739 2117 2 3 40 Takayadai Higashihiroshima shi Hiroshima pref TEL 082 491 1830 FAX 082 491 1838 Shikoku office 761 8074 410 1 Otakamimachi Takamatsu shi Kagawa pref TEL 087 868 3400 FAX 087 868 3399 Kyushu office 810 0802 Fukuoka fujiland build 10F 2 3 Nakajima ch...

Page 8: ...788 MAYEKAWA U S A INC CHEMICAL PROCESS DIVISION 19475 GRAMERCY PLACE TORRANCE CA 90501 U S A TEL 1 310 328 6279 FAX 1 310 328 8487 MAYEKAWA U S A INC CHEMICAL PROCESS DIVISION HUSTON OFFICE 3222 PASADENA FREEWAY PASADENA TX 77503 U S A TEL 1 281 447 2599 FAX 1 281 447 6623 EUROPE N V MAYEKAWA EUROPE S A HEAD OFFICE FACTORY LEUVENSESTEENWEG 605 1930 ZAVENTEM BELGIUM TEL 32 2 757 9075 FAX 32 2 757 ...

Page 9: ...X 886 7 821 9019 MYCOM INDUSTRY CO LTD TAIPEI BRANCH 10F 4 NO 421 SONG SHAN ROAD TAIPEI TAIWAN 11083 REP OF CHINA TEL 886 2 2727 9711 FAX 886 2 2759 8484 MYCOM INDUSTRY CO LTD TAICHUNG BRANCH NO 19 SEC 3 HUANJUNG RD TAICHUNG TAIWAN REP OF CHINA TEL 886 4 2251 4128 FAX 886 4 2251 4129 MAYEKAWA CHINA INDUSTRIES CO LTD ROOM 705 WISE LOGIC INTERNATIONAL CENTER NO 66 NORTH SHANXI RD SHANGHAI 200041 CHI...

Page 10: ...0 MAYEKAWA CHILE S A C el CONCEPCION OFFICE ANIBAL PINTO No 215 OFICINA 403 CONCEPCION CHILE TEL 56 41 223547 FAX 56 41 212443 MAYEKAWA CHILE S A C el PUERTO MONTT OFFICE BERNARDINO 1057 MODULO 6 PARQUE INDUSTRIAL SAN ANDRES PUERTO MONTT CHILE TEL 56 65 257570 FAX 56 65 288073 ANREC LTDA TRANSVERSAL 93 NO 53 48 INTERIOR 37 PAQUE INDUSTRIAL EL DORADO BOGOTO COLOMBIA TEL 57 1 224 3028 FAX 57 1 224 3...

Page 11: ...8 243 269 3952 MYCOM VENEZUELA SALES SERVICE C A MARACAIBO OFFICE AV 17 SECTOR LOS HATICOS C C PARQUE INDUSTRIAL ANGELINI LOCAL 14 PLANTAALTA MARACAIBO EDO ZULIA VENEZUELA TEL 58 261 764 8055 FAX 58 261 765 0853 MYCOM CHEMICAL PROCESS CORP DE VENEZUELA S A AV 17 SECTOR LOS HATICOS C C PARQUE INDUSTRIAL ANGELINI LOCAL 14 PLANTAALTA MARACAIBO EDO ZULIA VENEZUELA TEL 58 261 765 1059 FAX 58 261 765 21...

Page 12: ...008 4 1 Revision No Issuance Date Contents of revisions modified clause page and details Created approved by 2 2009 2 2 2 2 1 Specification 2 3 Selection of V belt 7 1 Development View and Configuration Table of the Parts Parts Configuration Table 7 7 Parts Inspection and Replacement Standards O ring List Yamamoto Yamada 3 2010 1 5 Parts drawing change due to design change addition of 62M 62M FM Y...

Page 13: ... 4 1 3 Remaining Hazard 1 6 1 4 Safety Devices 1 8 1 4 1 Emergency Stop Button 1 8 1 4 2 Breakers of Motor Main Power and Control Power with Lockout Tagout Devices 1 8 1 4 3 Safety Belt coupling Guard 1 9 1 4 4 Safety valve 1 10 1 4 5 Automatic Control and Protection Equipment M compressor 1 11 1 4 6 Compressor Cooling Fluid Temperature Failure Alarm 1 14 1 4 7 Oil Heater and Thermometer Switch 1 ...

Page 14: ...arging of Refrigerant Oil 3 14 3 2 6 Check after Installation 3 14 3 3 Documents Related to Installation 1 3 15 4 Operation of the Compressor and the System 4 1 Refrigerant Oil 4 1 4 1 1 Precautions for Selecting the Refrigerant Oil 4 1 4 1 2 Initial Charging Method 4 2 4 1 3 Replenishment of the Refrigerant Oil 4 2 4 1 4 Set Oil Pressure 4 2 4 1 5 Oil Quantity 4 3 4 2 Initial Operation 4 4 4 2 1 ...

Page 15: ... for Removing the Discharge Manifolds 5 14 5 5 2 4 Attentions for Attaching the Discharge Manifolds 5 15 5 5 3 Head Cover Hand Hole Cover 5 17 5 5 3 1 Attentions for Removing the Head Jacket Cover 5 18 5 5 3 2 Attentions for Removing the Head Cover 5 18 5 5 3 3 Attentions for Removing the Hand Hole Cover 5 19 5 5 3 4 Attentions for Attaching the Hand Hole Cover 5 20 5 5 3 5 Attentions for Attachin...

Page 16: ... 5 42 5 5 9 2 Attentions for Replacing the Main Bushing Bearing Head Side 5 42 5 5 9 3 Attentions for Attaching the Thrust Roller Bearing Bearing Head Side 5 42 5 5 9 4 Attentions for Attaching the Bearing Head 4M 6M 8M 62M 5 43 5 5 10Discharge Valve Cage Assembly 5 44 5 5 10 1 Attentions for Attaching the Discharge Valve Spring 5 44 5 5 11Piston Assembly 5 45 5 5 11 1 Attentions for Attaching the...

Page 17: ...Compressor M Series xv 7 4 Vibration and Sound Data 7 15 7 4 1 Vibration 7 15 7 4 2 Sound Data 7 16 7 5 Oil Cooler Heat Rejection OHR Head Jacket Heat Rejection JHR N4M N6M N8M 7 17 7 6 Starting Torque 7 27 7 7 Parts Inspection and Replacement Standards 7 31 ...

Page 18: ...2202G1JE DA M N_2010 01 Table of Contents Reciprocating Compressor M Series xvi ...

Page 19: ...ing during operation and before setup cleaning or maintenance and inspection of the compressor Always lock out tag out the fluid supply stop valve and the valves at downstream or upstream side of an opening part before troubleshooting during operation setup cleaning or maintenance and inspection of the compressor to prevent the valves from opening during work Some refrigerants in use generate bad ...

Page 20: ...ulations and post it on a safe place 1 1 1 7 Do s about Waste Oil Fluid and Materials Disposing of refrigerant and oil used for the compressor are subject to a number of regulations for the environmental protection purposes Follow the local state federal acts and regulations and your company s rules when disposing of such waste oil fluid and materials 1 1 1 8 Other Do s Keep the floor clean around...

Page 21: ...nings may cause accidents resulting in personal injury or even death Also the compressor or its auxiliary equipment may be heavily damaged Therefore be sure to always observe the instructions of the warnings Indicates an imminently hazardous situation which if not avoided will result in serous injury or death Indicates a potential hazardous situation which if not avoided could result in serous inj...

Page 22: ...nstructions of the safety labels Otherwise danger resulting in personal injury death or property damage may arise Do not smear cover or peel off the safety labels If the safety labels are damaged or missing purchase and affix new labels to their proper positions according to this manual Inform our service center of the product name and safety label No when placing a purchase order for safety label...

Page 23: ...1 5 Affixing Positions of Safety Labels The figure below shows the affixing positions of safety labels The numbers in the figure correspond to the ones in Table 1 1 Safety label Fig 1 1 Affixing positions of safety labels Ex 6M Fig 1 2 Affixing positions of safety labels Ex 62M FM ...

Page 24: ...rature of 40 C or less D Unloader solenoid valve Electric Shock Installation of guard Wearing protective devices Lockout tagout of control power E Heater Electric Shock Burns Installation of guard and cover Wearing protective devices Lockout tagout of the heater power Wearing protective devices Operation with a temperature of 40 C or less F Suction side shut off valve Contact with and inhale of to...

Page 25: ...2202G1JE DA M N_2010 01 1 Safety Reciprocating Compressor M Series 1 3 Remaining Hazard 1 7 Fig 1 3 Hazardous sources Ex 6M Fig 1 4 Hazardous sources Ex 62M FM ...

Page 26: ...ressor Installation Positions On the control board on the compressor and in the operation control room Stop Restoration Methods Specify the stop restoration methods of emergency stop button and make sure to provide users of this compressor with them Inspection Method Cycle The emergency stop button requires test to ensure compressor is shut down when pressed insure this is done before testing the ...

Page 27: ... the driving section of this compressor Installation Positions Driving section Fig 1 5 Attachment of driving section safety cover 6M No Description No Description 1 Driving section safety cover for belt 2 Driving section safety cover for coupling Inspection Method Cycle Specify the inspection methods cycle of the safety cover and make sure to provide users of this compressor with them ...

Page 28: ...according to the type of refrigerant following the local state federal acts and regulations If ammonia is discharged into the atmosphere it highly possibly causes health damage such as intoxication and bad smell And if it is discharged into enclosed space such as inside of the compressor it may cause serious accident such as deficiency of oxygen Fig 1 6 Attachment example of safety valve No Descri...

Page 29: ...pressure on compressor becomes abnormally high because the compressor is operated incorrectly or the water supply for condenser is cut HP switch shuts off the motor circuit automatically to stop the operation of compressor Prevents system ruptures and refrigerant leaks Control of the compressor capacity Low pressure control equipment LP The number of capacity control step in the compressor is dete...

Page 30: ...tions of low oil pressure failure protection equipment OP high pressure protection equipment HP low pressure control equipment LP No Description No Description 1 Low pressure gauge connection φ 6 LP OP 3 Oil pressure gauge connection φ 6 OP 2 High pressure gauge connection φ6 HP 4 Intermediate pressure gauge connection φ 6 OP ...

Page 31: ... to detect an error immediately Measure pressure electrically and generate an alarm by a control circuit to generate a pre alarm when the pressure is approaching the abnormal value Inspection Method Cycle Each compressor s protection equipment requires operational test and for function and accuracy Specify the inspection methods cycle of respective compressor protective equipment and make sure to ...

Page 32: ...mpletely immersed in oil before applying power If power is applied to heater damage to the heater will occur destroying the element from dry burn Pay constant attention to the oil level while applying power to the heater Overview Function Purpose The oil heater is a cartridge type covered heater It is pressure proof sealed type with heating wires wrapped with insulator and externally sealed with s...

Page 33: ...2202G1JE DA M N_2010 01 1 Safety Reciprocating Compressor M Series 1 5 Example of Material Safety Data Sheet MSDS 1 15 1 5 Example of Material Safety Data Sheet MSDS ...

Page 34: ...2202G1JE DA M N_2010 01 1 Safety Reciprocating Compressor M Series 1 5 Example of Material Safety Data Sheet MSDS 1 16 ...

Page 35: ...and Specification of Compressor Reciprocating Compressor M Series 2 1 Configuration of Compressor 2 1 2 Configuration and Specification of Compressor 2 1 Configuration of Compressor 2 1 1 Overall View of Compressor Fig 2 1 Overall view Ex 6M ...

Page 36: ...8 Base Optional 2 Suction shut off valve Optional 9 Belt cover Optional 3 Discharge shut off valve Optional 10 Motor Optional 4 Safety valve Optional 11 Motor pulley Optional 5 Flywheel Optional 12 V belt Optional 6 Oil cooler Optional 13 Control switch Control console Optional 7 Oil heater Optional 14 Unloader solenoid valve For names of each part refer to 7 1 Development View and Configuration T...

Page 37: ...uration and Specification of Compressor Reciprocating Compressor M Series 2 1 Configuration of Compressor 2 3 2 1 2 Cross Sectional View of Assembly Fig 2 3 Front view 4M Fig 2 4 Side view 4M Fig 2 5 Front view 6M Fig 2 6 Side view 6M ...

Page 38: ...N_2010 01 2 Configuration and Specification of Compressor Reciprocating Compressor M Series 2 1 Configuration of Compressor 2 4 Fig 2 7 Front view 8M Fig 2 8 Side view 8M Fig 2 9 Front view 62M Fig 2 10 Side view 62M ...

Page 39: ...refrigerant oil which passes the crankshaft h lubricates the crank pin i and passes the oil supply line in the con rod Then it lubricates and cools the cylinder j inner wall of the cylinder piston ring piston pin and bearing on the connecting rod small end 7 The refrigerant oil which passes through the main bushing on seal side g passes the shaft seal k capacity control mechanism unloader l and th...

Page 40: ...enter of these seats The top side of lift pin contacts the suction valve The bottom of lift pin is on the inclined surface of cam ring on the cylinder which rotates on the diameter of cylinder sleeve This cylinder cam ring is rotated by the rod which is moved by the unloader piston This rotation moves the lift pin upward and downward If the lift pin is moved downward to below the seats surface the...

Page 41: ...e of low pressure side MPaG 2 0 Minimum rotation rpm 800 3 Maximum rotation rpm 1500 3 V belt 4 6 Type 8V Optional Displacement at maximum rotation m3 h 639 958 1278 Low stage 958 High stage 320 Capacity control range 100 50 0 100 66 33 0 100 75 50 25 0 100 66 33 Refrigerant Oil Refer to 4 1 Refrigerant Oil Oil filling amount ℓ 32 38 44 44 kg 1300 1580 1830 2000 2700 4 Mass of the product Remarks ...

Page 42: ...oil supply temperature 60 C Minimum oil supply temperature 30 C 1500 rpm Refer to service range for A B ranges Maximum rotation 1200 rpm Refer to service range for C D ranges 800 rpm Refer to service range for A B ranges Minimum rotation 900 rpm Refer to service range for C D ranges Cooling water outlet temperature 50 C or less Allowable temperature of blade hose Cooling Water Clear water or brine...

Page 43: ...h shut off valve maximum discharge pressure is 20 kg cm2 The condensed temperature upper limit is 50 C in that case Fig 2 13 Service range of M series NH3 Table 2 4 Service limits of motor Item Range Remarks Installation positions Indoor Ambient temperature 0 to 45 C Ambient humidity 90 or below Altitude 1000 m or less 2 2 3 External Dimensions Fig 2 14 External dimensions 4M ...

Page 44: ...0 01 2 Configuration and Specification of Compressor Reciprocating Compressor M Series 2 2 Specification of Compressor 2 10 Fig 2 15 External dimensions 6M Fig 2 16 External dimensions 8M Fig 2 17 External dimensions 62M ...

Page 45: ...2202G1JE DA M N_2010 01 2 Configuration and Specification of Compressor Reciprocating Compressor M Series 2 2 Specification of Compressor 2 11 Fig 2 18 External dimensions 62M FM ...

Page 46: ...N_2010 01 2 Configuration and Specification of Compressor Reciprocating Compressor M Series 2 3 Selection of V belt 2 12 2 3 Selection of V belt 50 Hz 60 Hz Region Number of V belt Motor A 4 B 5 C 6 4P D 4 E 5 F 6 6P ...

Page 47: ... with your systems refer to this chapter and consider safety before operation If there are any questions please contact your local sales offices or service centers Insure that installation work is performed by a qualified personal or contracting company Make sure that the work is performed in compliance with local laws and ordinances Read this chapter and related documents and fully understand the...

Page 48: ...t lift until equipment has been confirmed safe 4 For lifting the compressor individually hook the wire rope on the lifting bolt of compressor 5 For lifting the compressor with base and motor hook the wire rope on the lifting bolt and the base of compressor Do not use the lifting bolt on the motor 6 Check path of compressor installation to make sure it is free of obstacles 7 Check that the hook is ...

Page 49: ...pressor onto the ground The compressor should not be tilted or unstable 17 Before lowering the compressor notify others 18 When lowering the compressor onto two or more blocks align the tops of blocks so that the compressor becomes stable horizontally on them 19 Lower the lifted compressor slowly so that it is not damaged by impact on the ground ...

Page 50: ...orks 3 4 3 2 4 Preparation for Installation Installation Space The figures below show the minimum necessary space for disassemble and reassemble of the compressor Referring to these figures secure space which allows easy operation cleaning maintenance and inspection Fig 3 1 Installation space ...

Page 51: ...lve 4 inch 5 inch 4 inch Without suction shut off valve ANSI 300 4 inch ANSI 300 5 inch ANSI 300 4 inch Intermediate gas With suction shut off valve 3 inch Without suction shut off valve ANSI 300 3 inch Discharge gas With suction shut off valve 4 inch 5 inch 2 inch Without suction shut off valve ANSI 300 4 inch ANSI 300 5 inch ANSI 300 2 inch High pressure gauge connection port φ6 Intermediate pre...

Page 52: ... normally 3 2 5 2 Position of the Oil Returning Point in the Oil Separator Procedure of Oil Returning Use the float valve Do not return oil from the receiver or chiller only from discharge oil separator 3 2 5 3 Protection Switch To protect the compressor and prevent accidents attach the protection equipment below For details refer to 1 4 5 Automatic Control and Protection Equipment of Refrigeratin...

Page 53: ...mal vibration V belt should be free from machine oil and lubrication oil If those oils adhere to V belt wipe them off V belts are set to proper tension on shipment of belt driven package during normal operation belts will stretch and should be tightened to ensure long life of all drive parts Centering and Attachment of V belt If the compressor is with common base centering is performed on the V be...

Page 54: ...nce 4 Span length Table 3 2 Amount of deflection mm Table 3 3 Amount of tension load N belt Note 1 Re tighten the belt for the first time after 2 3 hours from the starting the operation Note 2 Rotate the flywheel pulley to check the tension load of V belt Note 3 When the belt is under the minimum tension load make sure that the belt does not move excessively by operation because the load fluctuate...

Page 55: ... the tension load of V belt decreases drastically to less than the minimum If the V belt is continuously used in this condition the service life of V belt is shortened by slipping In addition to this defects may occur such as excessive movement of V belt overturn and deviation caused by wear of belt on one side Make sure to re tighten the V belt soon after operation If the belt is replaced with a ...

Page 56: ...ling Fig 3 5 Section view for the direct coupling Part Number Part name Material Remarks 1 Flywheel 2 Mechlock 3 Hub compressor side 4 Hub motor side 5 Spacer 6 Coupling insert 7 Bushing 8 Washer 9 Overload washer 10 Bolt M18 1 5 11 Hexagon nut M18 1 5 12 Bolt M12 P1 25 L60 13 Spring washer For M12 14 Sub ring 1 Common to B type 15 Sub ring 2 Common to B type 16 Sub ring fastening bolt M12 L80 8 8...

Page 57: ...3 6 Development view for the direct coupling parts To align the center cores correct the parallelism and deviation between left and right shafts 1 Retain the compressor on the frame with bolts and attach the flywheel a to the crankshaft with mechlock b 2 Set the dial indicator on the motor axle using a magnetic stand or others so that the probe contacts the external diameter and surface of the fly...

Page 58: ...orce in the axle direction thrust is applied Prevent this thrust from applying 10 Tighten the hub c on the motor side on the axle 11 Tighten all the nuts at the specified torque again 3 2 5 6 Piping Vibration generated from the compressor is transmitted to the building via two systems substruction and piping Take into consideration the piping support to prevent resonance in the building Refrigeran...

Page 59: ...ys flow cooling water during operation of compressor For compressor with water cooled type oil cooler and water cooling head cover observe the following when performing piping for cooling water For automatic operation attach solenoid valves so that cooling water does not flow while the motor is not in operation If cooling water flows while the motor is stopped refrigerant in the compressor is cond...

Page 60: ...erating cold storage and air conditioning systems you use based on their specification Automatic Control Connections Wiring between the control board and each switch Activation mode auto semi auto and rotational direction of motor Insulating resistance of motor Operation Test of Protection Equipment For details refer to 1 4 5 Automatic Control and Protection Equipment of Refrigerating Machine If o...

Page 61: ...uestions please contact your local sales offices or service centers Weight and Dimensions Fig 3 10 Weight and dimensions 4M 6M 8M 62M 62M F Dimensions mm H 1254 1269 1329 1185 1406 W 1211 1247 1283 1291 1713 D 1019 1147 1147 1220 1229 Mass 2 kg 1300 1580 1830 2000 2700 Note 2 The above values include the weight of water cooling head cover oil cooler and flywheel Lifting Positions Gravity Center Po...

Page 62: ...2202G1JE DA M N_2010 01 3 Installation Reciprocating Compressor M Series 3 3 Documents Related to Installation 1 3 16 ...

Page 63: ...lphaolefin PAO Naphthenic based mineral oil of ISO VG 46 68 is recommended The viscosity of the oil selected must stay 20 70 cSt under usage condition The circulation of the refrigerant oil for the overall equipment must be taken into consideration After the refrigerant oil lubricates cools each section of the compressor it returns to the oil tank of the crankcase However some of the oil is discha...

Page 64: ...ter When replenishing the refrigerant oil use clean oil with no foreign materials contained To prevent bubbling in the crankcase supply the oil gradually To avoid absorption of water vapor in the air store the refrigerant oil with it sealed until it is used Replenishment Method during Operation Example 1 Close the compressor suction shut off valve gradually until suction pressure becomes slightly ...

Page 65: ...nd the System Reciprocating Compressor M Series 4 1 Refrigerant Oil 4 3 4 1 5 Oil Quantity Quantity of refrigerant oil in the crankcase is judged by the oil level viewed through the oil sight glass Symbol Oil Quantity A Lower limit B Standard C Upper limit ...

Page 66: ...the filter and replacement of the oil Cleaning of the filter may not be required when inside of the refrigerant cycle in the refrigerating cold storage and air conditioning systems are clean Replace the oil filter elements if they are soiled The soiled elements cannot be reused even if they are cleaned Watch for any abnormal sound or temperature of the compressor Cleaning the oil and suction filte...

Page 67: ...Table 4 2 Loading rate 4M Cylinder No Unloader piston number 0 50 100 1 1 ON ON 2 2 OFF ON 3 1 ON ON 4 2 Stop OFF ON Fig 4 2 Operation order of the capacity control 6M Table 4 3 Loading rate 6M Cylinder No Unloader piston number 0 33 66 100 1 1 ON ON ON 2 2 OFF ON ON 3 3 OFF OFF ON 4 1 ON ON ON 5 2 OFF ON ON 6 3 Stop OFF OFF ON Fig 4 3 Operation order of the capacity control 8M Table 4 4 Loading r...

Page 68: ...ressor M Series 4 3 Operation Order of the Unloader 4 6 Fig 4 4 Operation order of the capacity control 62M Table 4 5 Loading rate 62M Cylinder No Unloader piston number 0 33 66 100 1 1 OFF OFF ON 2 ON ON ON 3 3 OFF ON ON 4 ON ON ON 5 1 OFF OFF ON 6 ON ON ON 7 3 OFF ON ON 8 Stop ON ON ON ...

Page 69: ...r sales offices or service centers 5 Oil level Oil sight glass10 90 6 Minimum oil supply temperature 30 C This should be higher than ambient temperature 7 Maximum oil supply temperature 60 C 8 Maximum oil pump differential pressure 0 4 MPa 9 Maximum discharge temperature 160 C 10 Minimum suction pressure 0 02 MPaA 11 Maximum high low differential pressure Pd Ps 2 0 MPaA 12 Degree of superheat 20 C...

Page 70: ...2202G1JE DA M N_2010 01 4 Operation of the Compressor and the System Reciprocating Compressor M Series 4 4 Operation Notices 4 8 ...

Page 71: ...essure inside the refrigerating machine is at atmospheric pressure before disassembling the machine for inspection After temperature of the hot sections such as head cover is decreased to normal perform the work When handling the heavy objects take a sufficient care and perform the work using an auxiliary tool such as a stud bolt Always handle the heavy objects with at least one other person Befor...

Page 72: ...spection every 2 3 hours and record the result in the operation log Item Remarks Compressor Suction pressure Discharge pressure Oil supply pressure Suction temperature Discharge temperature Fluid level of the receiver Oil level of the crankcase oil quantity Refer to 4 1 6 Oil Quantity Oil temperature Abnormal noise Abnormal vibration Cooling water hose For the specification with the oil cooler and...

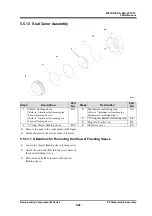
Page 73: ...the V belt Inspection of the protection switch operation Oil leakage from the shaft seal 8 cc h or less Normal 8 12 cc h or less To be monitored 12 cc h or more To be inspected Inspection and cleaning of the cooling systems The specification with the water cooled condenser A large amount of water stain and scale may be adhered to the condenser depending on the cooling water quality In such a case ...

Page 74: ... 1 The operation conditions are within the specified range of use 2 Number of start stop is within the specified range Table 5 1 Reference of the first maintenance period Rotation Speed N Range rpm First maintenance period Remarks 800 N 1000 Whichever comes first Operation time of 8000 hours or 1 years 1000 N 1200 Whichever comes first Operation time of 6000 hours or 1 years 1200 N 1500 Whichever ...

Page 75: ...laced if any abnormality is found Oil control ring 3rd Replacement Needle bearing for high grade connecting rod Replacement Gasket Replacement O ring Replacement Suction filter Cleaning Oil strainer Cleaning Oil filter Replacement Lubricant Replacement Motor Replenishment of grease Refer to the operation manual of electrical equipment If no particular description is provided it is recommended to r...

Page 76: ...ge must be within 15 of the new oil Water amount 2000 ppm or less 1 Degree of contamination Degree of contamination measured by mass method millipore value is 15 mg 100 m or less 2 1 This is a reference value because moisture may be included during sampling due to its high absorbability In the NH3 refrigerant NH3 may be detected as water If the amount is over this value by repeating the sampling f...

Page 77: ...rocating Compressor M Series 5 5 Disassembly Assembly 5 7 5 5 Disassembly Assembly 5 5 1 Exterior Equipment 1 Release the residual pressure and discharge the refrigerant oil from the crankcase 2 Discharge the refrigerant oil from the oil cooler ...

Page 78: ... 10 Motor end bearing assembly Refer to Attentions for Removing the Motor End Bearing Assembly Refer to Attentions for Removing the Oil Cooler Piping Water Cooled Type Oil Cooler Refer to Attentions for Attaching the Oil Cooler Piping Water Cooled Type Oil Cooler 4 Mechlock 4 11 Motor rotor Refer to Attentions for Removing the Motor Rotor Refer to Attentions for Attaching the Motor Rotor Refer to ...

Page 79: ...nuts a loosen the tightening nuts of the water cooled type oil cooler b 2 Remove the oil cooler piping 3 Remove the tightening nuts of the water cooled type oil cooler to remove the cooler 5 5 1 2 Attentions for Removing the Mechlock 1 Loosen all the mechlock retaining screws If all the mechanical lock retaining screws are removed the parts at the front and rear of the mechlock will be separated s...

Page 80: ... set bolts and remove the set screws together with the spring washer and the flat washer Attach the rotor extraction shaft a to the shaft instead 2 Attach the rotor extraction screw b to the rotor 3 Attach the rotor extraction arm c to the rotor extraction shaft and the rotor extraction screw 4 Attach the rotor extraction arm fastening nut 5 Evenly tighten the rotor extraction arm fastening nuts a...

Page 81: ...kshaft axis a with the flywheel b 2 Tighten the mechlock screws using a torque wrench Specified torque 78 5 N m 1 Tighten the mechlock screws in the diagonal order to approx quarter torque of the specified torque 2 Tighten the mechlock screws in the diagonal order to approx half torque of the specified torque 3 Tighten the mechlock screws in the circumferential order to the specified torque 5 5 1 ...

Page 82: ... 5 12 5 5 1 10 Attentions for Attaching the Oil Cooler Piping Water Cooled Type Oil Cooler 1 Attach the water cooled type oil cooler and temporarily tighten the tightening nuts b of the cooler 2 Attach the oil cooler piping 3 Fully tighten the tightening nuts b of the water cooled type oil cooler ...

Page 83: ... Discharge Shut off Valve 2 Gasket shut off valve suction flange 174 Refer to Attentions for Attaching the Discharge Manifolds 3 Shut off valve discharge side 182 8 Gasket discharge manifold 169 9 Suction filter cover 161 Refer to Attentions for Removing the Suction Discharge Shut off Valve 10 Gasket suction filter cover 162 11 Suction filter 154 Refer to Attentions for Attaching the Suction Disch...

Page 84: ...tion Discharge Shut off Valve The suction discharge shut off valve weighs 46 kg 31 kg Handling them inappropriately may cause injury Attach the suction discharge shut off valve in an appropriate manner with at least one other person 5 5 2 3 Attentions for Removing the Discharge Manifolds The discharge manifolds weigh 73 kg 8M 62M 62 kg 6M 50 kg 4M Handling them inappropriately may cause injury Rem...

Page 85: ... 6M 50 kg 4M Handling them inappropriately may cause injury Attach the discharge manifolds in an appropriate manner with at least one other person 1 There are four types of the discharge manifold hexagon head screw The attachment positions for each type are as shown in the figure For 6M attach the discharge manifold hexagon head screw D by passing it through the discharge side thermometer a attach...

Page 86: ...ty Symbol Description Size 4M 6M 8M A Hexagon head bolt No 1 discharge manifold M16 L200 0 3 0 B Hexagon head bolt No 2 discharge manifold M16 L170 8 10 20 C Hexagon head bolt No 3 discharge manifold M16 L120 4 4 4 D Hexagon socket head cap screw No 4 discharge manifold M16 L55 hexagon socket set screw 0 1 0 ...

Page 87: ...age 75 2 Refer to Attentions for Attaching the Head Jacket Cover Hand Hole Cover 8 Hand hole cover 46 2 Gasket head jacket cover 55 3 Head cover 50 Refer to Attentions for Removing the Jacket Cover Hand Hole Cover Refer to Attentions for Removing the Head Cover or 49 Refer to Attentions for Attaching the Jacket Cover Hand Hole Cover 9 Gasket hand hole cover 47 Refer to Attentions for Attaching the...

Page 88: ... the stud bolt a 5 5 3 2 Attentions for Removing the Head Cover The head cover weighs 31 kg Handling it inappropriately may cause injury Remove the head cover in an appropriate manner with at least one other person Dropping of the head cover may cause injury or damage to the compressor Always attach the stud bolts before performing the work At the removal of the head cover the cover may jump off d...

Page 89: ... for Removing the Hand Hole Cover Dropping of the hand hole cover may cause injury or damage to the compressor Always attach the stud bolts before performing the work Because the attachment surface of the hand hole cover is facing obliquely downward the cover may fall even when the stud bolts are used Be careful so as not to place any part of your body under the hand hole cover To remove the firml...

Page 90: ...ening the rest of the hand hole cover screws remove the stud bolts 5 5 3 5 Attentions for Attaching the Head Cover The head cover weighs 31 kg Handling it inappropriately may cause injury Attach the head cover in an appropriate manner with at least one other person Dropping of the head cover may cause injury or damage to the compressor Always attach the stud bolts before performing the work Always...

Page 91: ... the head jacket cover may cause injury or damage to the compressor Always attach the stud bolts before performing the work 1 After attaching the stud bolt a into the head jacket cover hexagon head screw hole for one section at the top attach the head jacket cover 2 After temporarily tightening the rest of the head jacket cover hexagon head screws remove the stud bolt ...

Page 92: ...pring Refer to Attentions for Removing the Piston Assembly or 77 L 3 Suction plate valve 71 4 Gasket valve plate 73 4 Refer to Attentions for Attaching the Piston Assembly Refer to Piston Assembly 7 Cylinder Sleeve Assembly Refer to Attentions for Attaching the Cylinder Sleeve Assembly Refer to Cylinder Sleeve Assembly For the attachment of the valve plate and cylinder sleeve insert a spacer betwe...

Page 93: ...d to remove the coil 2 Loosen the unloader cover hexagon head screw and remove the unloader cover a 3 With the spacer with thickness of 17 19 mm inserted between the unloader piston b and unloader cover a tighten the two unloader cover hexagon head screws manually 5 5 4 2 Attachment of Knob Bolt 62M FM 1 Remove the unloader cover cap screw a washer b and aluminum washer c 2 Attach the knob bolt d ...

Page 94: ...b to the crankshaft Use the set bolts M27 with fine pitch for 62M FM 2 Using the bolt M20 a rotate the crankshaft so that the piston assembly to be removed is positioned at the bottom dead center 3 Remove the piston assembly using the suction disk c Verify that the suction disk is firmly stuck to the piston assembly If the suction disk is not stuck firmly the piston assembly may fall resulting in ...

Page 95: ...e the same number for combination with the numbers facing the same direction Piston number b is marked onto the opposite position of the number for combination on the rod of the connecting rod as shown in the figure Attach the piston to the cylinder with the same number When attaching the following connecting rods to the crankshaft be careful of their direction 4 M connecting rod 6M connecting rod...

Page 96: ...on assembly If the suction disk is not stuck firmly the piston assembly may fall resulting in hand or physical injury 4 While supporting the connecting rod end with your hand through the hand hole and tapping the piston head insert the piston assembly into the cylinder sleeve Be careful not to damage the crankshaft by the end of the connecting rod 5 Assemble the two connecting rod hexagon head scr...

Page 97: ...njury or damage to the compressor Always attach the stud bolts before performing the work 1 After attaching the stud bolts into the head cover screw holes for two sections at the top attach the valve plate After attaching the head cover remove the stud bolts 5 5 4 9 Removal of the Spacer 4M 6M 8M 62M 1 Loosen the unloader cover hexagon head screw and remove the unloader cover 2 Remove the spacer 3...

Page 98: ...10 01 5 Maintenance Reciprocating Compressor M Series 5 5 Disassembly Assembly 5 28 5 5 4 10 Removal of Knob Bolt 62M FM 1 Remove the knob bolt a 2 Attach the cap screw b washer c aluminum washer d to the unloader cover ...

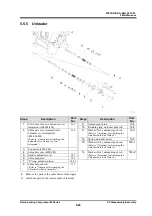
Page 99: ...der Push Rod Washer 12 Spring unloader device 142 Refer to Attentions for Attaching the Solenoid Valve Unloader Cover Integrated 3 Connector 62M FM 13 Washer No2 unloader push rod Refer to Attentions for Attaching the Unloader Push Rod Washer 143 1 4 Unloader cover 62M FM 5 Gasket unloader cover 147 6 Unloader piston 145 14 Washer No3 unloader push rod Refer to Attentions for Attaching the Unloade...

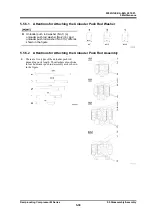
Page 100: ...asher Unloader push rod washer No 1 a unloader push rod washer No 2 b and unloader push rod washer No 3 c differ as shown in the figure 5 5 5 2 Attentions for Attaching the Unloader Push Rod Assembly 1 There are five types of the unloader push rod depending on its length The attachment positions for each unloader push rod assembly are as shown in the figure ...

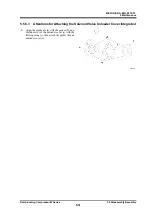
Page 101: ...eries 5 5 Disassembly Assembly 5 31 5 5 5 3 Attentions for Attaching the Solenoid Valve Unloader Cover Integrated 1 Align the crankcase a with the gasket b and drain hole d of the unloader cover c with the filler opening e then attach the gasket b and unloader cover c ...

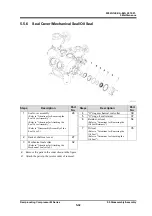
Page 102: ... Cover Assembly 6 Retainer oil seal 34 Refer to Attentions for Attaching the Seal Cover Assembly Refer to Attentions for Removing the Oil Seal Retainers 7 Oil seal 35 Refer to Disassembly Assembly of the Seal Cover Refer to Attentions for Removing the Oil Seal 2 Gasket shaft seal cover 27 Refer to Attentions for Attaching the Oil Seal 3 Mechanical seal collar 32 Refer to Attentions for Attaching t...

Page 103: ...eal cover assembly screws from the two sections at the top and attach the stud bolts a 2 Loosen the rest of the seal cover assembly screws 3 Remove the seal cover while being careful not to damage the mechanical seal collar 5 5 6 2 Attentions for Removing the Oil Seal Retainers 1 Attach the two bolts M6 b into the screw holes on the oil seal retainers a 2 Pull the bolts M6 b to remove the oil seal...

Page 104: ...ighten the set screws a at two sections on the mechanical seal collar to check that the seal rotates aligned with the hole 5 Tighten the set screws a at two sections on the mechanical seal collar 5 5 6 6 Attentions for Attaching the Seal Cover Assembly Dropping of the seal cover assembly may cause injury or damage to the compressor Always attach the stud bolts before performing the work Be careful...

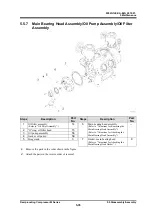
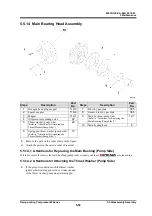
Page 105: ...earing head assembly Refer to Oil Filter Assembly 2 O ring oil filter head 15 Refer to Attentions for Removing the Main Bearing Head Assembly 3 Oil pump assembly 56 4 Gasket oil pump 59 Refer to Attentions for Attaching the Main Bearing Head Assembly 5 Drag crank 3 7 Gasket main bearing head 9 Refer to Attentions for Attaching the Main Bearing Head Gasket 1 Remove the parts in the order shown in t...

Page 106: ...hten them There are two holes diagonally 1 Remove the two main bearing head screws from the top and attach the stud bolts a 5 5 7 2 Attentions for Attaching the Main Bearing Head Gasket 1 Align the screw and oil holes on the main bearing head gasket with those on the crankcase 5 5 7 3 Attentions for Attaching the Main Bearing Head Assembly The main bearing head assembly weighs 50 kg Handling it in...

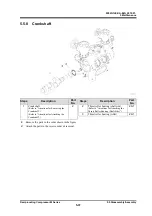
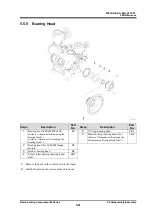
Page 107: ...rt No 1 Crankshaft 2 2 Thrust roller bearing shaft side 29 1 Refer to Attentions for Removing the Crankshaft Refer to Attentions for Attaching the Thrust Roller Bearing Shaft Side 3 Thrust roller bearing roller 29 1 Refer to Attentions for Attaching the Crankshaft 1 Remove the parts in the order shown in the figure 2 Attach the parts in the reverse order of removal ...

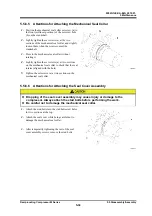
Page 108: ...o that the crankshaft balancer at the seal cover side is positioned at the bottom 4 Lift the crankshaft by holding the coupling rods a or bolts with a sufficient length that are attached in Step 2 5 Pull out the crankshaft until the crankshaft balance weight b at the seal cover side comes to the position of the main bearing head assembly attachment flange on the crankcase 6 Lower the crankshaft so...

Page 109: ...ng the Thrust Roller Bearing Shaft Side 1 Attach the thrust roller bearing shaft side a and thrust roller bearing bearing head side b to the correct positions 2 Face a flat surface d of the thrust roller bearing shaft side a towards the thrust roller bearing roller c Symbol Description A Shaft side B Bearing head side e Shaft f Case ...

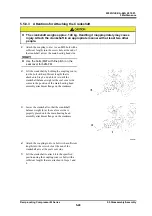
Page 110: ...crankshaft by holding the coupling rod a or the bolt with a sufficient length that is attached in Step 1 and a block c until the crankshaft balance weight at the seal cover side comes to the position of the main bearing head assembly attachment flange on the crankcase 3 Lower the crankshaft so that the crankshaft balance weight b at the seal cover side is properly placed onto the main bearing head...

Page 111: ...4 1 6 Main bushing bearing head side 12 2 Refer to Attentions for Removing the Bearing Head Refer to Attentions for Attaching the Bearing Head Refer to Attentions for Replacing the Main Bushing Bearing Head Side 2 Bearing head for 62M FM flange motor 24 3 Gasket bearing head 24 4 Thrust roller bearing bearing head side 29 1 1 Remove the parts in the order shown in the figure 2 Attach the parts in ...

Page 112: ...diagonally 1 Remove the two bearing head hexagon head screws from the top and attach the stud bolts 5 5 9 2 Attentions for Replacing the Main Bushing Bearing Head Side If it is necessary to remove the main bushing bearing head side contact your local service center 5 5 9 3 Attentions for Attaching the Thrust Roller Bearing Bearing Head Side 1 Attach the thrust roller bearing bearing head side b an...

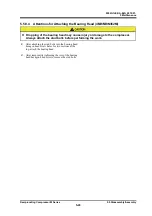
Page 113: ...M Dropping of the bearing head may cause injury or damage to the compressor Always attach the stud bolts before performing the work 1 After attaching the stud bolts into the bearing head hexagon head screw holes for two sections at the top attach the bearing head 2 After temporarily tightening the rest of the bearing head hexagon head screws remove the stud bolts ...

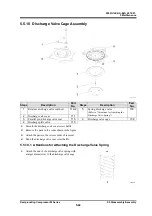
Page 114: ...ttentions for Attaching the Discharge Valve Spring 3 Parallel pin discharge valve seat 115 6 Discharge valve cage 109 4 Discharge plate valve 110 1 Smooth the discharge valve seat screw baffle 2 Remove the parts in the order shown in the figure 3 Attach the parts in the reverse order of removal 4 Bend the discharge valve seat screw baffle 5 5 10 1 Attentions for Attaching the Discharge Valve Sprin...

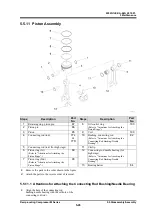
Page 115: ...hing Needle Bearing 5 Connecting rod rod for high stage 11 Circlip 6 Piston ring 1st 89 Refer to Attentions for Attaching the Piston Rings 7 Piston ring 2nd 90 12 Connecting rod needle bearing for high stage Refer to Attentions for Attaching the Connecting Rod Bushing Needle Bearing Refer to Attentions for Attaching the Piston Rings 13 Bearing halves 84 1 Remove the parts in the order shown in the...

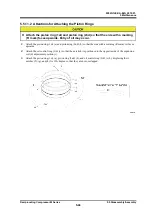
Page 116: ...aces upwards Entry of oil may occur 1 Attach the piston ring 1st a and piston ring 2nd b so that the side with a marking R mark e faces upwards 2 Attach the oil control ring 3rd c so that the notch h is positioned to the opposite side of the expansion coil d adjustment position i 3 Attach the piston ring 1st a piston ring 2nd b and oil control ring 3rd c by displacing their notches f g and h for 1...

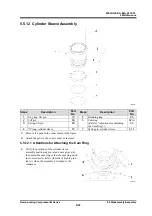
Page 117: ...ttentions for Attaching the Cam Ring 63 4 O ring cylinder sleeve 67 7 Spring pin cylinder sleeve 61 1 1 Remove the parts in the order shown in the figure 2 Attach the parts in the reverse order of removal 5 5 12 1 Attentions for Attaching the Cam Ring 1 Verify the positions of the cylinder sleeve assembly positioning pin a and case groove b then adjust the cam ring so that the cam ring notch d com...

Page 118: ...Seal Mating Ring 4 O ring mechanical seal mating ring 42 Refer to Attentions for Attaching the Shower Flushing Sleeve 5 Plug R1 4 orifice φ3 P 1 2 O ring shower flushing sleeve 41 2 6 Shaft seal cover 26 1 Remove the parts in the order shown in the figure 2 Attach the parts in the reverse order of removal 5 5 13 1 Attentions for Removing the Shower Flushing Sleeve 1 Loosen the shower flushing slee...

Page 119: ... Assembly 5 49 5 5 13 2 Attentions for Attaching the Mechanical Seal Mating Ring 1 Align the pin a of the mechanical seal mating ring with the seal cover groove b 5 5 13 3 Attentions for Attaching the Shower Flushing Sleeve 1 Face the drain hole of the shower flushing sleeve φ11 a upwards ...

Page 120: ...g Pump Side 10 Main bearing head 8 Refer to Attentions for Attaching the Thrust Washer Pump Side 6 Spring pin thrust washer pump side 13 Refer to Attentions for Attaching the Thrust Washer Pump Side 1 Remove the parts in the order shown in the figure 2 Attach the parts in the reverse order of removal 5 5 14 1 Attentions for Replacing the Main Bushing Pump Side If it is necessary to remove the main...

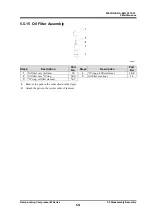
Page 121: ...lter Assembly Steps Description Part No Steps Description Part No 1 Oil filter case bottom 14 4 O ring oil filter element 14 2 2 Oil filter case O ring 14 3 5 Oil filter case top 14 3 O ring oil filter element 14 1 1 Remove the parts in the order shown in the figure 2 Attach the parts in the reverse order of removal ...

Page 122: ...2202G1JE DA M N_2010 01 5 Maintenance Reciprocating Compressor M Series 5 5 Disassembly Assembly 5 52 ...

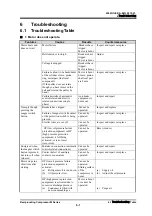
Page 123: ...Failure of magnet switch contact or the protection switch is being pressed Cannot be operated Inspect and repair or replace Electric wires are cut off Cannot be operated Inspect and repair or replace No reply though pressing the magnet switch button OP low oil pressure failure protection equipment or HP high pressure protection equipment is left being activated or is not reset recovered Cannot be ...

Page 124: ...ature is excessively high HP is activated or the safety valve is opened resulting in large consumption of electricity Increase the volume of cooling water Or lower the cooling water temperature Head cover is overheated Cooling water distribution is insufficient Or cooling pipe is dirty HP is activated or the safety valve is opened resulting in large consumption of electricity Distribute water even...

Page 125: ...expansion valve during operation Suction pressure is low and there is a leak sound from the expansion valve Refrigerant shortage Does not become cold Fill with refrigerant High suction pressure Gas leakage due to wear of the suction valve discharge valve or ring Ability decreased and sleeve is burnt Inspect and repair or replace the valve part and ring 4 Excessive suction pressure Features Causes ...

Page 126: ...ing of operation b Gas strainers in the refrigerator and suction pipe are blocked by rust or dust Does not become cold b Cleaning 6 Abnormal noise during operation Features Causes Results Countermeasures a Foreign material is stuck in between the cylinder head and piston a Disassemble maintain and replace Continuous metal sound occurs b Discharge valve suction valve and piston ring are damaged Dis...

Page 127: ...nspect and replace Head cover is overheated High discharge pressure High suction pressure d Gas leakage from safety valve Cooling ability has decreased Lower the discharge pressure adjust the safety valve Rise of oil temperature Pump is heated due to oil cooler failure refrigerant oil shortage comtaminated oil or oil filter blockage Carbon has adhered and burnt Clean and increase cooling water vol...

Page 128: ...efrigerant oil is burnt out due to abnormal high pressure Carbon is accumulated Lower the discharge pressure Value on the ammeter increased current consumption in the case when the refrigerating load is normal Cylinder sleeve is damaged is about to be burnt or score due to wear on the ring Sleeve and piston are burnt Inspect and adjust or replace Excessive oil pressure Oil pressure is excessive in...

Page 129: ...Inspect and repair Heat operation Expansion valve is narrowed too much Adjust the expansion valve open Cooling pipe is small in length Expansion Cooling pipe is frosted too much Defrost Cooling pipe is filled with refrigerant oil Drain the oil Low suction pressure Suction pipe is not frosted liquid back tends to occur Suction line is narrowed Readjust the piping Cooling water shortage or cooling w...

Page 130: ...2202G1JE DA M N_2010 01 6 Troubleshooting Reciprocating Compressor M Series 6 1 Troubleshooting Table 6 8 ...

Page 131: ...d Document Reciprocating Compressor M Series 7 1 Development View and Configuration Table of the Parts 7 1 7 Related Document 7 1 Development View and Configuration Table of the Parts Fig 7 1 Development view of M series cylinder part ...

Page 132: ... M N_2010 01 7 Related Document Reciprocating Compressor M Series 7 1 Development View and Configuration Table of the Parts 7 2 Fig 7 2 Development view of parts around the 6M case and parts common with others 1 2 ...

Page 133: ... M N_2010 01 7 Related Document Reciprocating Compressor M Series 7 1 Development View and Configuration Table of the Parts 7 3 Fig 7 3 Development view of parts around the 6M case and parts common with others 2 2 ...

Page 134: ...2202G1JE DA M N_2010 01 7 Related Document Reciprocating Compressor M Series 7 1 Development View and Configuration Table of the Parts 7 4 Fig 7 4 Development view of parts around the 4M case ...

Page 135: ...2202G1JE DA M N_2010 01 7 Related Document Reciprocating Compressor M Series 7 1 Development View and Configuration Table of the Parts 7 5 Fig 7 5 Development view of parts around the 8M case ...

Page 136: ...2202G1JE DA M N_2010 01 7 Related Document Reciprocating Compressor M Series 7 1 Development View and Configuration Table of the Parts 7 6 Fig 7 6 Development view of parts around the 62M case ...

Page 137: ...Hexagon head bolt bearing head SCM435 10 M16 L65 10 9 26 Shaft seal cover FC 1 27 Gasket shaft seal cover Asbestos free 1 28 Hexagon head bolt shaft seal cover SCM435 8 M12 L75 10 9 29 Thrust washer pump side Steel Aluminum alloy 1 29 1 Thrust roller bearing 1 32 Mechanical seal assembly 1 BBSφ110 34 Retainer oil seal FC 1 35 Oil seal NBR SPCC 1 NOK AB4399A0 36 Spring pin seal retainer SK5 1 Sprin...

Page 138: ...y Connecting rod No 2 AC 4 4 4 4 W46 L310 bushing 77 HAssy Connecting rod High grade AC 2 W36 L310 Needle bearing 78 Hexagon head bolt connecting rod SCM 8 12 16 16 M12 L80 79 Disk Lock Washer connecting rod S45C 8 12 16 16 NL12 82 Bushing connecting rod Steel LBC 4 6 8 6 φ45 L56 t2 5 83 Connecting rod needle bearing 2 φ45 φ59 L52 83 1 Circlip SWRH 4 φ59 84 Bearing halves Steel Aluminum alloy 8 12...

Page 139: ...ter cover Asbestos free 1 2 2 2 163 Hexagon head bolt suction filter cover SCM 6 12 12 12 M16 L55 10 9 164 Oil sight glass 1 165 O ring oil sight glass NBR 1 AS568 137 167 Hexagon head bolt oil sight glass SCM435 4 M6 L20 10 9 168 Discharge manifold FC 1 1 1 1 169 Gasket discharge manifold Asbestos free 2 3 4 4 170L Hexagon head bolt No 1 discharge manifold SCM435 3 M16 L200 10 9 170M Hexagon head...

Page 140: ...4 S45C 9 5 8 7 For unloader internal oil line and oil supply P 7 Plug R1 S45C 5 6 5 5 For heater MBH pressure equalizer P 8 Plug R1 1 4 S45C 1 For safety valve HT 1 Bushing R1 2 Rc3 8 S45C 1 For oil drain HT 2 Bushing R3 4 Rc1 2 1 For thermometer at discharge HT 3 Bushing R3 4 Rc3 8 1 For initial oil charge HT 4 Bushing Rc5 4 R3 4 2 For OC piping HT 5 Street elbow High pressure R3 4 Rc3 4 1 For OC...

Page 141: ...Part Number Part name Material 4M 6M 8M 62M std Remarks HT 20 Nipple STPG 1 R5 4 L100 1 1 R1 L100 1 1 R3 4 L100 HT 21 Nipple Special STPG 1 NPT5 4 R5 4 L100 1 1 NPT1 R1 L100 1 1 NPT3 4 R3 4 L100 HT 22 Elbow High pressure 1 Rc5 4 Rc5 4 1 1 Rc1 Rc1 1 1 Rc3 4 Rc3 4 P 24 Thermometer plug SS400 1 1 1 4 R1 2 L50 P 25 Thermometer plug 1 1 1 R1 2 L100 ...

Page 142: ...d bolt hand hole cover SCM435 32 M16 L75 10 9 120 1200 73 5 Hexagon head bolt valve plate SCM435 6 9 12 M16 L45 10 9 120 1200 112 Hexagon head bolt discharge valve seat SCM435 12 18 24 M10 L40 10 9 60 600 52 Hexagon head bolt head cover SCM435 44 66 88 M16 L115 10 9 120 1200 54 Hexagon head bolt head jacket cover SUS304 28 42 56 M10 L35 SUS Water cooling head cover specification 78 Hexagon head bo...

Page 143: ...ize Qty Remarks Socket wrench 1 10 mm 13 mm 17 mm 19 mm 24 mm 1 1 1 1 1 12 7 square drive Spinner handle 1 300 mm 1 12 7 square drive Torque wrench 1 50 N m 100 N m 200 N m 1 1 1 12 7 square drive Hexagon wrench 1 3 mm 5 mm 6 mm 8 mm 10 mm 14 mm 1 1 1 1 1 1 Spanner 1 10 13 mm 17 19 mm 1 1 Ratchet handle 1 1 4 1 Adjustable wrench 1 250 mm 1 Needle nose pliers 1 165 mm For E ring External snap ring ...

Page 144: ...bly Clip 3 4 Suction valve retainer Stud bolt 3 M16 150 mm 2 Retain the covers Coupling rod M20 550 mm 2 For removing attaching crankshaft Spacer φ30 46 mm t30 19 mm 3 For pressing unloader pin Sponge 1 20 100 100 mm 1 For cleaning Hose 1 3 8 1 For supplying draining refrigerant oil The tools in the above tool list are used for maintaining this compressor 3 are tools which will be attached to this...

Page 145: ...he motor connected to the compressor Applies to belt driven and direct driven motors When indicating the vibration severity by displacement D µm P P calculate using the following conversion equation D 30000 2 πN Vrms N rotation speed rpm Vrms vibration severity of the vibration speed mm s rms If the value is within the zone of A or B there is no problem If the value is within the zone of C related...

Page 146: ...uction pressure MpaA 0 237 0 054 Discharge pressure MpaA 1 35 Rotation speed rpm 800 1000 1200 1500 800 1000 1200 1500 800 1000 1200 1500 800 1000 1200 1500 Sound pressure level dB L 85 88 88 92 85 88 92 92 85 88 92 93 89 90 88 90 Noise level dB A 84 86 87 90 84 86 90 89 85 87 91 90 88 89 87 89 Sound data Acousti c power level dB A 92 94 95 98 92 94 98 97 93 95 99 98 96 97 95 97 The description ab...

Page 147: ...2202G1JE DA M N_2010 01 7 Related Document Reciprocating Compressor M Series 7 5 OHR JHR N4M N6M N8M 7 17 7 5 Oil Cooler Heat Rejection OHR Head Jacket Heat Rejection JHR N4M N6M N8M ...

Page 148: ...2202G1JE DA M N_2010 01 7 Related Document Reciprocating Compressor M Series 7 5 OHR JHR N4M N6M N8M 7 18 ...

Page 149: ...2202G1JE DA M N_2010 01 7 Related Document Reciprocating Compressor M Series 7 5 OHR JHR N4M N6M N8M 7 19 ...

Page 150: ...2202G1JE DA M N_2010 01 7 Related Document Reciprocating Compressor M Series 7 5 OHR JHR N4M N6M N8M 7 20 ...

Page 151: ...2202G1JE DA M N_2010 01 7 Related Document Reciprocating Compressor M Series 7 5 OHR JHR N4M N6M N8M 7 21 ...

Page 152: ...2202G1JE DA M N_2010 01 7 Related Document Reciprocating Compressor M Series 7 5 OHR JHR N4M N6M N8M 7 22 ...

Page 153: ...2202G1JE DA M N_2010 01 7 Related Document Reciprocating Compressor M Series 7 5 OHR JHR N4M N6M N8M 7 23 ...

Page 154: ...2202G1JE DA M N_2010 01 7 Related Document Reciprocating Compressor M Series 7 5 OHR JHR N4M N6M N8M 7 24 ...

Page 155: ...2202G1JE DA M N_2010 01 7 Related Document Reciprocating Compressor M Series 7 5 OHR JHR N4M N6M N8M 7 25 ...

Page 156: ...2202G1JE DA M N_2010 01 7 Related Document Reciprocating Compressor M Series 7 5 OHR JHR N4M N6M N8M 7 26 ...

Page 157: ...alue increases by approx 50 Characteristics of Starting Torque Characteristics of Starting Torque 4M 0 50 100 150 200 250 300 350 400 0 500 1000 1500 Rotation Speed rpm Torque N m 0 8MPaG 0 6MPaG 0 4MPaG 0 2MPaG 0 MPaG Suction pressure when starting Fig 7 8 Characteristics of starting torque 4M Table7 6 Characteristics of starting torque 4M Suction pressure when starting MpaG 0 0 2 0 4 0 6 0 8 Rot...

Page 158: ...acteristics of Starting Torque 6M 0 50 100 150 200 250 300 350 400 0 500 1000 1500 0 8MPaG 0 6MPaG 0 4MPaG 0 2MPaG 0 MPaG Fig 7 9 Characteristics of starting torque 6M Table 7 7 Characteristics of starting torque 6M Suction pressure when starting MpaG 0 0 2 0 4 0 6 0 8 Rotation speed rpm Torque N m Tb 0 60 60 60 60 60 Tbl 200 35 35 35 35 35 Tu 1500 97 141 195 240 284 ...

Page 159: ...ing Torque 8M Rotation Speed rpm 0 50 100 150 200 250 300 350 400 0 500 1000 1500 0 8MPaG 0 6MPaG 0 4MPaG 0 2MPaG 0 MPaG Fig 7 10 Characteristics of starting torque 8M Table 7 8 Characteristics of starting torque 8M Suction pressure when starting MpaG 0 0 2 0 4 0 6 0 8 Rotation speed rpm Torque N m Tb 0 80 80 80 80 80 Tbl 200 35 35 35 35 35 Tu 1500 118 176 248 308 367 ...

Page 160: ...Speed rpm Torque N m 0 4MPaG 0 2MPaG 0 MPaG Suction pressure when starting Fig 7 11 Characteristics of starting torque 62M Table 7 9 Characteristics of starting torque 62M Suction pressure when starting MpaG 0 0 2 0 4 Rotation speed rpm Torque N m Tb 0 446 495 500 Tbl 200 401 450 455 Tu 1500 484 612 668 The starting torque will be 1 1 times the one of 8M when starting with starting pressure equali...

Page 161: ...109 88 Diameter of thrust bearing 125 124 86 Diameter of crank pin 107 106 85 2 Inspect each sliding section of the crankshaft for scratches If scratches are found repair it by using sandpaper 800 or more or a grinding stone 3 Remove all the plugs attached to the crankshaft and clean the oil holes After cleaning the oil holes check that the oil flows properly Reattach the plugs immediately after c...

Page 162: ...ion plate valve and valve spring periodically The endurance time depends on the use condition Measure the depth of the wear at the contact surface to valve seat Refer to Fig 7 12 If the contact surface to valve seat is worn for 0 15 mm or more replace the discharge plate valve suction plate valve and valve spring Measurement point Standard dimensions mm Wear limit mm Depth of the wear at the conta...

Page 163: ...d replace the mechanical seal as an assembly 3 Replace the O ring when disassembling and inspecting Piston Piston Pin Piston Ring 1 Inspect the piston for scratches If scratches are found repair it by using a grinding stone If scratches are found in the outer surface repair it by grinding the surface at a right angle of the sliding direction using a grinding stone 2 Measure the outer diameter of t...

Page 164: ... mm 1st 2 5 2 6 2nd 2 0 2 1 Width of the piston ring groove of the piston 3rd 3 0 3 1 Oil Pump If the oil pressure is low though the oil pressure adjustment valve is closed during the operation and if the cause is not the clogging of the oil filter there may be wear on the gears metals and shafts of the oil pump 1 Remove the pump from the compressor hold the shaft of the pump and inspect the shaft...

Page 165: ...ole cover Asbestos free 2 51 Gasket head cover Asbestos free 2 3 4 4 59 Gasket oil pump Asbestos free 1 73 4 Gasket valve plate Asbestos free 2 3 4 4 147 Gasket unloader cover Asbestos free 2 3 4 2 Same as K and L series 162 Gasket suction filter cover Asbestos free 1 2 2 2 169 Gasket discharge manifold Asbestos free 2 3 4 4 172 Gasket Shut off valve Asbestos free 1 2 125A ANSI 300 t1 5 184 Gasket...

Page 166: ...5 O ring Oil filter head NBR 2 JISB2401 G25 3 1 24 4 30 6 24 1 O ring bearing head NBR 1 JISB2401 G200 5 7 199 3 210 7 37 O ring oil seal retainer NBR 1 JISB2401 G160 5 7 159 3 170 7 39 O ring mechanical seal collar NBR 1 AS568 245 3 53 110 72 117 78 41 2 O ring shower flushing sleeve NBR 2 AS568 257 3 53 148 82 155 88 42 O ring mechanical seal mating ring NBR 1 JISB2401 P130 5 7 129 6 141 67 O ri...

Reviews: