


6
Carefully unpack all parts of the delivery. Two people are required because some parts of your exercise ma-
chine are bulky and heavy. Before starting, check the completeness of the fastenings (screws, nuts, etc.) and
the components in the parts and assembly materials listed on the previous pages of this manual.
Carefully carry out the installation, as damage or defects that have arisen due to assembly errors are under
not covered by the warranty under any circumstances. Read the instructions carefully before starting, follow
the sequence of the installation steps exactly and follow the instructions for each individual assembly step. The
installation of the training device must be carried out by responsible adults.
Carry out the assembly of your exercise equipment in a location that is level, clean and free from obstructions.
Carry out the assembly with 2 people. Only after the installation of your training device has been completed can
training be started.
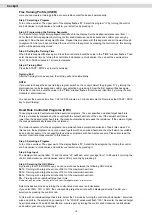
Step 1: Assembling the Stand
To make it easier for you to assemble the stand (A09), slide a support (eg a Styrofoam block from the packag-
ing) under the main frame – see picture below.
Then attach stand (A09) to the front of the main frame (A01). To do this use two hexagonal screws 3/8”x64mm
(1), four washers 3/8”x20 (5) and two cap nuts 3/8” (13).
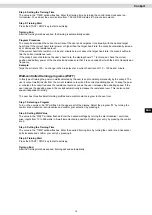
Step 2: Assembling the Slide Frame
Attach the two stand feet with floor level adjustment (C05) to the rear end of the slide frame (A12).
Before you assemble the slide frame (A12) please loosen and remove the four Allen screws M8 (B13) and the
four curved washers M8 (B30) which are pre-assembled on the rear mount of the main frame (A01). Then fix
the slide frame (A12) to the rear mount on the main frame (A01) using the four Allen screws M8 (B13) and four
curved washers M8 (B30) just removed.
Assembly