Introduction
-4-
Maverick MK2 Spot User Manual Rev. 4
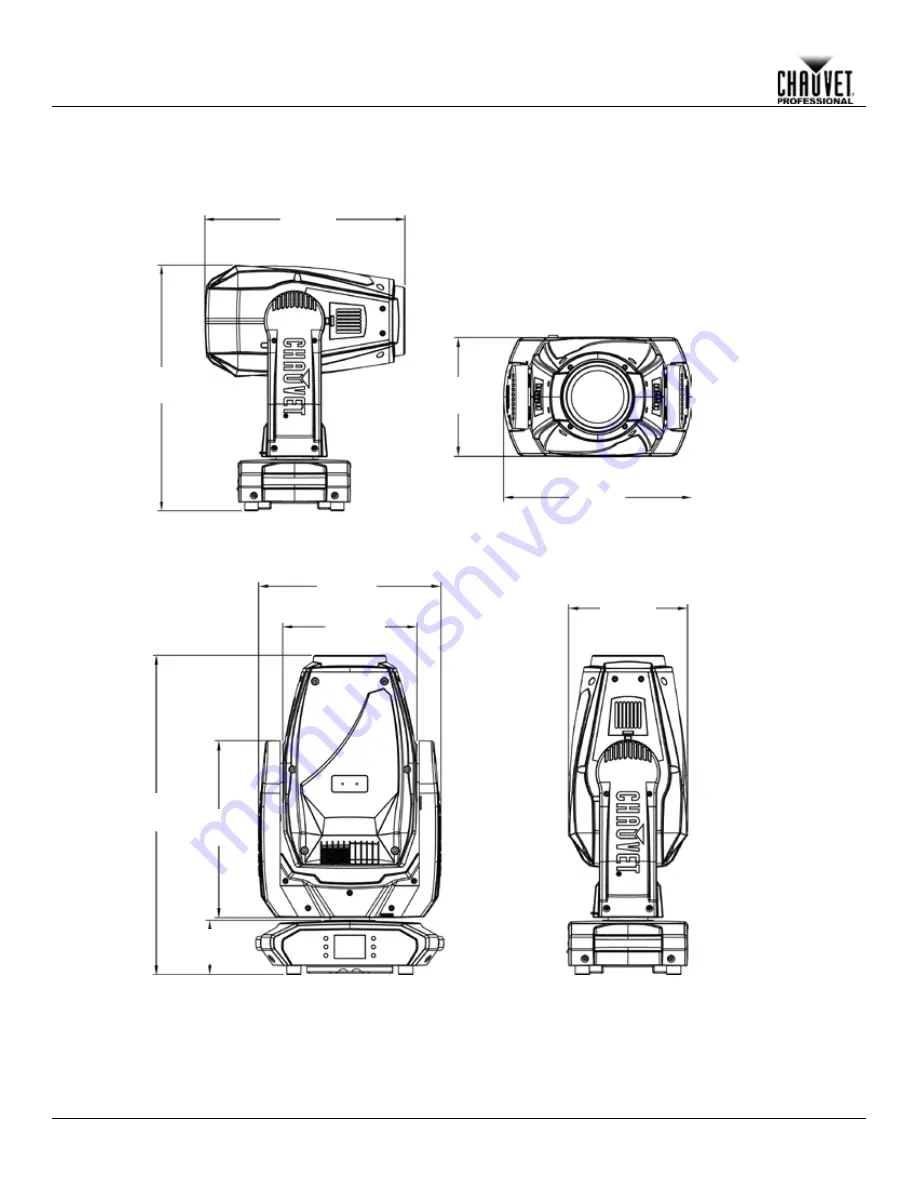
Dimensions
14.6 in
371 mm
15.6 in
396 mm
21.6 in
549 mm
9.8 in
249 mm
17.6 in
447 mm
4.5 in
114 mm
15.1 in
384 mm
11.1 in
282 mm
26.4 in
671 mm
Page 1: ...User Manual...
Page 2: ...purpose without written consent from Chauvet Document Printing For better results print this document in color on letter size paper 8 5 x 11 in double sided If using A4 paper 210 x 297 mm configure y...
Page 3: ...up 5 AC Power 5 AC Plug 5 Fuse Replacement 5 Mounting 6 Orientation 6 Signal Connections 7 Art Net Connection 7 sACN Connection 7 4 Operation 8 Touchscreen and Control Panel Description 8 Menu Map 8 O...
Page 4: ...7 days of delivery Manual Conventions Convention Meaning 1 512 A range of values in the text 50 60 A set of mutually exclusive values in the text SET A button on the product s control panel Settings...
Page 5: ...r carry the product by the power cord or any moving part Power And Wiring Make sure the power cord is not crimped or damaged Always make sure you are connecting this product to the proper voltage in a...
Page 6: ...the ability to control the Maverick MK2 Spot over DMX Art Net or by WDMX there is an option for every situation As an added feature this fixture can receive Art Net in and send out DMX simplifying cab...
Page 7: ...oduction 4 Maverick MK2 Spot User Manual Rev 4 Dimensions 14 6 in 371 mm 15 6 in 396 mm 21 6 in 549 mm 9 8 in 249 mm 17 6 in 447 mm 4 5 in 114 mm 15 1 in 384 mm 9 8 in 249 mm 11 1 in 282 mm 26 4 in 67...
Page 8: ...unnecessary wear and improve its lifespan during periods of non use completely disconnect the product from power via breaker or by unplugging it AC Plug The Maverick MK2 Spot comes with a power input...
Page 9: ...mount this product away from any flammable material as indicated in the Safety Notes Never mount in places where rain high humidity extreme temperature changes or restricted ventilation may affect the...
Page 10: ...r a large network An Art Net protocol document is available from www chauvetprofessional com Art Net designed by and copyright Artistic Licence Holdings Ltd Chauvet Professional recommends using unica...
Page 11: ...st or decreases the numeric value when in a function LEFT Navigates leftwards through the menu list ENTER Enables the currently displayed menu or sets the currently selected value into the selected fu...
Page 12: ...hscreen NO Lock Screen YES Lock the buttons and touchscreen PASSCODE 0920 NO Swap X Y YES Swap the pan and tilt NO X Y Mode Fast Pan and tilt speed Slow WDMX Reset YES Reset the wireless DMX NO Backli...
Page 13: ...255 Tilt Fine 0 255 P T Speed 0 255 Dimmer 0 255 Dimmer Fine 0 255 Shutter 0 255 Virtual Shaking 0 255 Cyan 0 255 Megenta 0 255 Yellow 0 255 CTO 0 255 Color 0 255 Gobo 1 0 255 Gobo 1 Index Fine 0 255...
Page 14: ...ad Fan1 Speed 2000rpm View speed setting Head Fan2 Speed 2000rpm View speed setting Error Information _ _ _ _ _ Will appear on screen Channel Information Frequency 0Hz Status of individual channel Pan...
Page 15: ...a single DMX output signal To activate or deactivate the Ethernet to DMX function do the following Press MENU repeatedly until the Home Screen shows on the display Press ENTER 1 Use UP DOWN LEFT or R...
Page 16: ...using the buttons instead of the touchscreen press ENTER 5 Set the IP address from 000 000 000 000 to 255 255 255 255 with one of the following 6 methods Through the touchscreen Touch the display whe...
Page 17: ...ctions below Navigate to the Settings menu 1 Use UP or DOWN to select Control Mode or touch the display where it says Control 2 Mode If using the buttons instead of the touchscreen press ENTER 3 Use U...
Page 18: ...not black out or YES black out 4 during movement or touch the display where it says the desired option Press ENTER 5 Blackout on Gobo Movement To set whether the product will black out during gobo mo...
Page 19: ...OWN LEFT or RIGHT to select Slow or Fast or touch the display where 4 it says the desired option Press ENTER 5 WDMX Reset To reset the WDMX connection from the Maverick MK2 Spot do the following Navig...
Page 20: ...ons instead of the touchscreen press ENTER 3 Use UP DOWN LEFT or RIGHT to select Smooth or Fast or touch the display 4 where it says the desired option Press ENTER 5 Reset Functions To reset the pan t...
Page 21: ...obo 2 Rotate Focus Focus Fine Focus Auto Zoom Zoom Fine Prism Prism Rotate Iris Frost CMY Macro CMY Macro Speed or Special Function or touch the display where it says the desired function If using the...
Page 22: ...55 4 Press ENTER COLOR 1 Use UP or DOWN to select COLOR 2 Press ENTER 3 Use UP or DOWN to increase or decrease the starting value from 000 255 4 Press ENTER GOBO 1 Use UP or DOWN to select GOBO 2 Pres...
Page 23: ...crease the starting value from 000 255 4 Press ENTER YELLOW 1 Use UP or DOWN to select YELLOW 2 Press ENTER 3 Use UP or DOWN to increase or decrease the starting value from 000 255 4 Press ENTER CTO 1...
Page 24: ...007 013 014 020 021 027 028 034 035 041 042 047 048 059 060 187 188 219 220 223 224 255 Open Red Orange Green Blue Magenta Yellow UV Split colors Clockwise color scroll fast to slow Stop Counter clock...
Page 25: ...rotating fast to slow Stop Counter clockwise rotating slow to fast Bounce effect 20 Gobo Wheel 2 Index Fine 000 255 0 100 21 Focus 000 255 0 100 22 Fine Focus 000 255 0 100 23 Auto Focus 000 010 011 0...
Page 26: ...ll reset Iris reset Frost reset Zoom reset CMY CTO reset Fan low speed Fan full speed Fan auto no function Iris Fast mode Iris Smooth mode XY swap on XY swap off no function XY smooth mode XY fast mod...
Page 27: ...l fast to slow Counter clockwise gobo scroll slow to fast 15 Gobo Rotating 1 000 063 064 145 146 149 150 231 232 255 Rotating Gobo Index Clockwise rotating fast to slow Stop Counter clockwise rotating...
Page 28: ...007 008 015 016 023 024 031 032 039 040 047 048 055 056 095 096 103 104 111 112 119 120 127 128 135 136 143 144 151 152 159 160 167 168 175 176 183 184 191 192 199 200 207 208 215 216 220 221 225 226...
Page 29: ...l Rev 4 Gobo Designs Wheel 1 Circuits Ring of Rings Checker Vortex Triangle Star Field Lenticular Glass Wheel 2 Spiral Dot Chiclets Splot Breakup Wavy Bar Shower Glass Lenticular Glass Color Wheel Red...
Page 30: ...ips head turn screws on the sides of the top cover 3 Separate the gobo holder away from the gobo wheel by pushing it toward the front of the moving head direction 1 in the diagram Be careful not to pu...
Page 31: ...the computer Step 2 Set the control protocol on the Maverick MK1 1 Hybrid to ArtNet in Single Control mode See Single Control Protocol Set the IP Mode to Static See IP Mode 2 Step 3 On the computer op...
Page 32: ...on Internet Protocol Version 4 TCP IPv4 1 to select it Click Properties 2 Step 7 On the TCP IPv4 Properties window Select Use the following IP address 1 Type 2 255 0 0 into the IP address bar 2 Press...
Page 33: ...rs click Upgrade Step 11 Find the latest Firmware Upgrade on the website at https www chauvetprofessional com products maveri ck mk2 wash under DOWNLOADS Step 12 Click Choose File on the Maverick MK1...
Page 34: ...surface 6 Gently polish the lens surfaces until they are free of haze and lint 7 Always dry the external surfaces thoroughly and carefully after cleaning them Do not spin the cooling fans by blowing c...
Page 35: ...r I O U S Canada Worldwide Power input connector True 1 compatible True 1 compatible Power cord plug Edison U S Local plug Light Source Type Power Lifespan LED 440 W 50 000 hours Color Quantity Curren...
Page 36: ...port office and request a Return Merchandise Authorization RMA number before shipping the product Be prepared to provide the model number serial number and a brief description of the cause for the ret...
Page 37: ...World Wide Web www chauvetlighting eu General Information Address Unit 1C Brookhill Road Industrial Estate Pinxton Nottingham UK NG16 6NT Voice 44 0 1773 511115 Fax 44 0 1773 511110 Technical Support...