Matica Technologies Espresso II User Manual Download Page 17

Check that the printer is ON and connected with the USB cable. 
Do not connect the network cable to the printer, then click 

Next

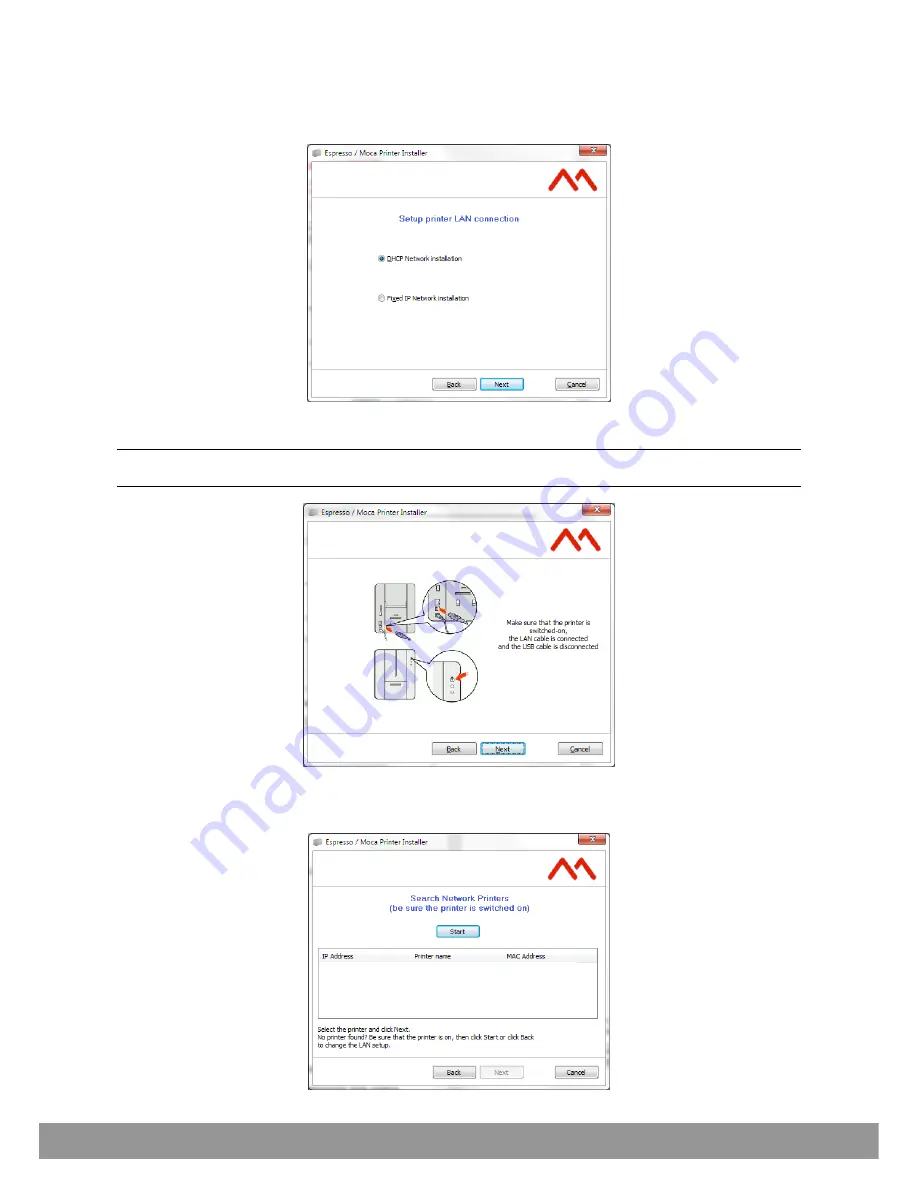
The configuration software displays the following screen page: 


Select 

DHCP Network installation

 network mode and click 

Next


Note

: for further information about the specific company network, contact the network administrator. 

Automatic selection of DHCP Network Installation is advisable for the most common types of installation. 


Check that the printer is ON, disconnect the USB cable and connect the network cable. 
Click 

Next

 to continue. 


3-4 

User Guide 

Summary of Contents for Espresso II

Page 1: ...USER GUIDE...

Page 2: ...VICES AND THEIR COMPONENTS 1 FOR COUNTRIES IN THE EUROPEAN UNION EU The disposal of electric and electronic devices as solid urban waste is strictly prohibited it must be collected separately The dump...

Page 3: ...h the instruction manual may cause harmful interference to radio communications Operation of this equipment in a residential area is likely to cause harmful interference in which case the user will be...

Page 4: ...the Computer and Installing the Software 3 1 USB connection 3 2 Ethernet LAN connection via DHCP 3 3 Ethernet LAN connection with fixed IP 3 6 Uninstall Program Tabs 3 8 Add a second printer or change...

Page 5: ...rinting Graphic Test Card 5 8 Printing a Dual Side Test Card 5 8 Print head replacement procedure 5 9 Replacement procedure 5 9 ENCODING OPTIONS 6 1 Chip Encoding 6 1 Encoding Test 6 1 Test 6 2 Readin...

Page 6: ...on Single Card Feed Option Connection for external smart card encoding Getting Started The printer comes with a number of accessories check carefully that they have been all received The list of acces...

Page 7: ...er and Printer Manager The Placemat Warranty and Customer Service Information Cleaning kit Power cord Power supply USB cable Reject bin optional for Moca 1 Note Contact the dealer immediately if any o...

Page 8: ...olor LED amber red and green indicating the printer s functional status or an error condition Green On steady Printer ready Flashing Printer receiving data or printing Amber On Steady Ribbon almost fi...

Page 9: ...r 7 Kensington lock Power Supply The printer comes with an external auto switching power supply Note Only use the power supply provided with the printer Plastic Cards Listed below are the plastic card...

Page 10: ...ely Once the ribbon is in its carrier the carrier can then be easily dropped into the printer using the yellow guides 1 Installing the ribbon 2 Insert the ribbon not provided with the printer into the...

Page 11: ...is present it can be used without needing to empty the input Hopper The card path can be selected via software to speed card processing Hopper Reject bin The output tray in the front part of the prin...

Page 12: ...ranging between 0 25 mm and 1 25 mm 10 50 mil can be processed by the printer Proceed as follows to adjust the card thickness 1 Open the printing module compartment cover 2 Rotate the green wheel unti...

Page 13: ...and Powering ON the Printer Connect the power cord to the power outlet to the power supply and then connect the power supply to the printer as shown below Press the ON OFF button to power on the prin...

Page 14: ...ter and Installing the Software 1 Power on the computer and then insert the CD ROM into the drive Follow the instructions displayed by the setup program Note Do not connect the printer yet the setup p...

Page 15: ...n click Next to continue A summary screen page with the settings selected is displayed 6 Click Install On completion of the installation procedure the following screen page is displayed Note a Windows...

Page 16: ...Wizard program manually activate this from the Start Programs Matica menu Note The configuration of the connection can be modified at any time activating Wizard mode from the Add Printer Wizard progr...

Page 17: ...e Select DHCP Network installation network mode and click Next Note for further information about the specific company network contact the network administrator Automatic selection of DHCP Network Ins...

Page 18: ...ter is shown in the list of available printers accompanied by the related information IP address name of the printer Mac address Click Next and wait until the configuration software recognises the pri...

Page 19: ...er Wizard program manually activate this from the Start Programs Matica menu Note The configuration of the connection can be modified at any time activating Wizard mode from the Add Printer Wizard pro...

Page 20: ...further information about the specific company network contact the network administrator Automatic selection of DHCP Network Installation is advisable for the most common types of installation A scree...

Page 21: ...Windows 8 1 10 run the program C Program Files x86 Matica Espresso unins000 exe Add a second printer or change the type of connection On terminating the installation the program Add Printer Wizard ap...

Page 22: ...shown below when the program is executed from the Application bar or from Windows programs All the printer drivers installed on the computer are displayed in this window From here the Printer Manager...

Page 23: ...side of the window The following Printer Manager function icon buttons are provided Status Preferences Maintenance Encoding only for the models supporting this feature Settings Help Click Back to ret...

Page 24: ...n the icon This button to run the printer driver user interface program from where Printer Preferences and other printer parameters can be set It provides a short cut to the printer driver program wit...

Page 25: ...d card cleaning Click on Back to return to the Status screen Encoding optional Open the Encoding by clicking on the icon If available this feature enables magnetic encoding and the retrieval of the Sm...

Page 26: ...ed Standby mode also is disabled and therefore the sleep time is set to the factory default value of 5 minutes To set the time field when Sleep is enabled set the value using the sidebar arrow buttons...

Page 27: ...1 Printer Name area the printer s default name or its name assigned during installation is displayed in this area 2 Status Description area the error code or error description is displayed in this ar...

Page 28: ...vided below Using Microsoft Word 1 Run the MS Word application In the Menu bar click File then Page Setup 2 In the Card tab select the card Size option followed by the custom format 55x85 mm default f...

Page 29: ...ving to retransmit the background information in each print file If used correctly may improve printing efficiency In the case of a Half panel it is possible to select whether the panel with Overlay i...

Page 30: ...elected by clicking the Media tab of Printer Preferences the following parameters for the two sides of the card can be selected independently Color Panel Adjustment brightness contrast sharpness Overl...

Page 31: ...ation of each colour being printed by moving its related cursor When the cursors are moved the image with the coloured pencils illustrates how the settings change However to be sure that the actual re...

Page 32: ...explained below The product has an internal counter that keeps track of the number of cards printed and warns the user when the mandatory cleaning procedure must be performed Standard Cleaning Proced...

Page 33: ...ck the Maintenance button The Maintenance window is displayed 7 The counter indicates the number of cards that have been printed starting from the last cleaning operation performed Click the Standard...

Page 34: ...agnetic head The printer has an internal counter that stores the number of Standard cleaning procedures performed so as to notify when the Advanced Cleaning procedure is required A software guided pro...

Page 35: ...n printed starting from the last cleaning operation performed Click the Advanced Cleaning button to start the cleaning procedure Once the cleaning procedure is completed the card is ejected from the r...

Page 36: ...dust from the cleaning roller Roller Cleaning Procedure 1 Unplug the printer from the power supply 2 Open the printing module compartment covers 3 Remove the ribbon carrier a c b 4 Identify the roller...

Page 37: ...ler pushing it into its seat pressing downwards and parallel to the surface of the printing module 8 Re insert the support and close the print module compartment The cleaning procedure has been comple...

Page 38: ...printhead must be cleaned to remove residual ink or dust Printhead Cleaning Procedure 1 Unplug the printer from the power supply 2 Open the printing module compartment covers 3 Using the cleaning swa...

Page 39: ...hen a monochrome ribbon is installed or to test the black panel in a multi panel ribbon Printer information is printed on the Text Test Card Printing Graphic Test Card In the Test Card area click the...

Page 40: ...lug the printer from the power supply 2 Open the printing compartment module cover 3 Remove the print head Press in the direction indicated by the arrow to loosen the spring and to release this from i...

Page 41: ...e Matica Print Manager program has been installed select the Maintenance environment and press the Print Head Replacement button The following screen page is displayed 9 Enter the PH code number and c...

Page 42: ...00025 CHIP ENCODING STATION CONTACTLESS OMNIKEY Allows you to run only on chip encoding contactless cards via Chip Omnikey Code PR000026 CONTACT STATION AND EXTERNAL ENCODER CONNECTION Allows you to r...

Page 43: ...g the card from the selected or default input see card path in the printer driver Card tab b Moving the card to the contact encoder 2 Read ATR Button Click to read the contact card s ATR number For th...

Page 44: ...inter interface to insert a card into the printer position it under the station and establish contact Sending the command sequence A card is moved automatically from the feeder to the encoding station...

Page 45: ...only the track 1 and in the drop down menu is possible only chose the JIS 2 standard The possible choices of JIS 2 standard in the drop down menu are Standard Track 1 JIS 2 DEFAULT 4 Mag strip start...

Page 46: ...path in the printer driver Card tab b Moving the card to the magnetic encoding area 3 Encode button Click to encode a magnetic card To encode the card it must firstly be positioned in the magnetic en...

Page 47: ...nk card Make sure that the ribbon cartridge is inserted correctly The identifier of the ribbon has been damaged and as a result cannot be used by the machine change the ribbon USER Single or Multiple...

Page 48: ...no ribbon fragments are present in the card path If there are switch the machine off and remove them then switch the machine on again Check that no card is present in the path If there is switch the...

Page 49: ...me GOLD 500 prints PR000163 Each Matica ribbon has an RFID tag with ribbon identification data that allows the printer to configure all the counting and optimization parameters and procedures It is st...

Page 50: ...kness 0 25 to 1 25 mm 10 to 50 mil Card format ISO CR80 ISO 7810 53 98 mm x 85 60 mm Ribbons Automatic detection and parameter setting Smart Ribbon level memory and management Smart Ribbon optimizatio...

Page 51: ...Output 24 Volts DC 3 0 A Dimensions and Weight Dimensions H x W x L 253 x 200 x 395 mm Weight 6 6 kg Packaged printer 300 x 480 x 450 mm weight 9 1 kg Quality Standards CE UL CQC Standby mode and redu...

Page 52: ......

Page 53: ...roduct ode CM00000154en revision F Matica Technologies www maticatech com All rights reserved...

Reviews: