


IMPORTANT: THESE INSTRUCTIONS SHOULD BE READ CAREFULLY AND RETAINED FOR FUTURE REFERENCE
Important Safety Advice
Please read these instructions carefully before installing
or using this appliance. Failure to do so may result in
damage to persons and property.
Installation of this appliance must be carried out by a
suitably qualifi ed competent person in accordance with
all Building Regulations, including those referring to
Local Authority Bye-Laws, National Standards and Codes
of Practice.
Do not install this appliance on a shared fl ue.
This appliance operates at very high temperatures and
retains its heat for a period after use. Do not touch any
surfaces while in use. All persons including children and
the infi rm should be warned of this and not allowed to
touch any surfaces while in use. Please use a suitable
fi reguard to prevent contact when in use.
Do not place any photographs, paintings, TV’s or other
combustible items near the appliance as exposure to
hot surfaces will cause damage. Maintain safe distances
from combustibles in all cases in accordance with these
instructions – please refer to installation.
The operator must use the tools provided. The mitten
provided is a tool.
Ensure that there is adequate ventilation in the room in
accordance with building standards. Do not obstruct any
of the air inlets or outlets on the appliance.
A fl ue damper should not be fi tted.
This appliance is for domestic heating use only in
accordance with these operating instructions. Do not
make any unauthorised changes to the appliance.
Only use recommended fuels. Do not burn petroleum coke
fuels, household waste or plastic in this appliance.
Use hardwood only with a moisture content of less than
25%. Burning soft or wet fuels such as unseasoned timber,
painted or treated timber will only result in a build up of
tar in the stove and the fl ue pipe and will cause staining
of the glass.
Do not use fl ammable liquids to ignite the fi re.
Avoid the use of aerosols in the vicinity of the stove when
it is in operation.
Clean your fl ue pipe at once a year (Check your House
Fire Insurance) to ensure there are no blockages. Do not
allow a build up of ash to occur in the ash pan as this will
cause the grate to burn out prematurely.
Regular maintenance should be carried out by a
Competent Engineer.
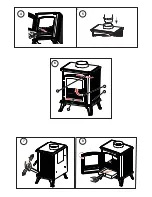
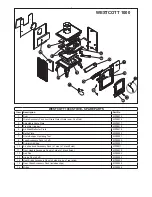
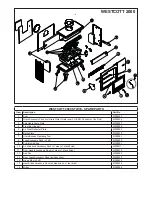
Assembly of the stove
To make the product easier for handling on installation, remove
the baf
fl
e plate, side bricks, back brick and door. Place these in
a secure place to avoid damage. These must be re
fi
tted after
installation.
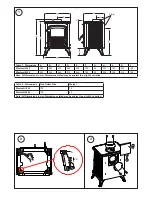
The legs and other
fi
xings are packed in the ashpan for safe
keeping in transport. Fix the legs to the underside of the product
using the bolts provided
(Fig 2)
.
The stove is supplied ready for top
fl
ue connection. For Rear
fl
ue
connection remove the collar and blanking plates and
fi
t in the
desired position. The collar can be
fi
tted on the top or the rear of
the product. Seal with
fi
re cement to ensure it is air tight
(Fig 3)
.
The primary air sealing plate is located on the front of the grate.
To locate in position, slacken the screws beneath the grate and
pull forward, then close the door fully, open again and tighten the
screws
(Fig 4).
Installation Instructions
General
These instructions give a guide for the installation of the stove but
in no way absolves the installer from responsibilities to conform
to all relevant standards relating to the installation of solid fuel
appliances.
In the interests of your safety, most building regulatory Authorities
in Australia and New Zealand require any wood
fi
re installation to
comply with Installation Standard AS/NZS 2918. They may also
have local requirements in addition to those in the Standard. Check
with your local Building Authority before commencing installation
to
fi
nd if you will require a Permit and whether there are extra
requirements. All our Wood
fi
res have been tested to ensure
that they will meet the appropriate safety Standard requirements
if the instructions in this book are followed. As the safety and
emissions performance can be affected by altering the appliance,
no modi
fi
cations are allowed without written permission from the
manufacturer.
We recommend that a qualifi ed specialist installer should
be used.
Please note that to the best of our abilities these instructions are
correct at time of printing, however we cannot be held responsible
for any differences in legislation which may occur in the future.
An extractor fan must not be used in the same room as this
appliance.
NOTE: WHILE ALL MODELS HAVE BEEN TESTED TO
SHOW COMPLIANCE WITH THE EMISSION LIMITS OF AS/
NZS.4013:1999, ONLY SOME MODELS MAY BE INSTALLED IN
DISTRICTS HAVING LOWER ALLOWABLE EMISSION LIMITS.
PLEASE CHECK WITH YOUR BOROUGH OR SHIRE COUNCIL
BEFORE PURCHASING A HEATER OR INSTALLING A WATER
BOOSTER.
WARNING: APPLIANCES INSTALLED IN ACCORDANCE WITH
THIS STANDARD SHALL COMPLY WITH THE REQUIREMENTS
OF AS/NZS 4013 WHERE REQUIRED BY THE REGULATORY
AUTHORITY, I.E. THE APPLIANCE SHALL BE IDENTIFIABLE
BY A COMPLIANCE PLATE WITH THE MARKING ‘TESTED
TO AS/NZS 4013’. ANY MODIFICATION OF THE APPLIANCE
THAT HAS NOT BEEN APPROVED IN WRITNG BY THE
TESTING AUTHORITY IS CONSIDERED TO BE IN BREACH
OF THE APPROVAL GRANTED FOR COMPLIANCE WITH AS/
NZS 4013.
Wescott 1000 & 2000
- 3 -


