background image

— 15 —

English

OPERATING INSTRUCTIONS

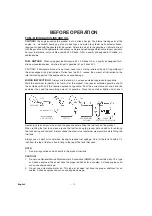
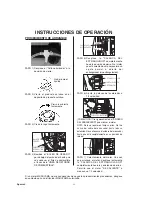
STEP #5) Move the "CHOKE LEVER" fully up

ward to the closed position. If the
engine is already warm, only a
partial or open (no choke) choke
setting may be required.

Step#1) Move  the “Mist cock” to the closed

position.

PRIMER 
BULB

FUEL 

RETURN LINE

CHOKE
LEVER

CLOSE

OPEN

STARTER GRIP

HIGH SPEED

IDLE SPEED

STOP

STARTING PROCEDURE

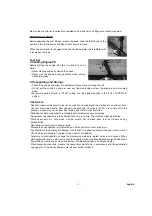
Step#2) Pour chemical into the chemical

tank.

Step#3) Close the lib tightly.

STEP #4) Pump the "PRIMER BULB" under

of the carburetor until fuel can be
seen flowing through the "FUEL-
RETURN LINE".

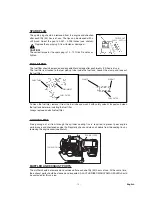
STEP #6) Set the throttle lever at 1/2 speed.

CAUTION! Pull the "STARTER GRIP" briskly
to start the engine.
NOTE: Only short pulls are necessary. Never
pull the starter cord to its fullest extension.
Never let go of the starter grip until it is at the
fully returned position.

Close the
cover tightly

Do not spill
the liquid

OPEN

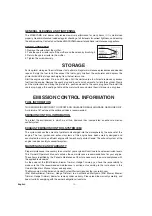
STEP #7) Warming up the engine. When the

engine has started, slowly move the
"CHOKE LEVER" fully upward to the
open position. Allow the engine to
"WARM-UP" at less than 1/2 speed.

If a MARUYAMA engine fails to start after following the above procedures, contact an authorized
MARUYAMA dealer.

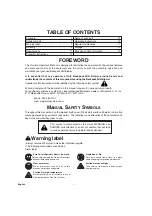
Summary of Contents for MD830-1

Page 1: ... e c e m a n u e l a v a n t d u t i l i s e r c e t a p p a r e i l L e a y e n t i e n d a e s t e m a n u a l a f o n d o a n t e s d e u s a r e s t e a p a r a t o Mister Atomizadore MD830 1 OWNER S OPERATOR S MANUAL MANUAL DEL PROPIETARIO U OPERADOR ...

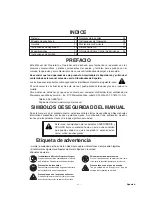
Page 2: ...ssage preceded by symbols or key words The following is an explanation of those symbols and key words and what they mean to you Warning label Always remove dirt or mud to make the indications legible The following alarm labels are attached Alarm label Foreword 1 Name of each part 12 Safety symbols 1 Operating instructions 15 Warning label 1 Regular maintenance 17 Warranty 2 Storage 19 Specificatio...

Page 3: ...arranted for the period of time up to the first scheduled replacement point for that part Maruyama Mfg Co Inc is liable for damages to other engine components caused by the failure of a warranted part still under warranty The purchaser is responsible for the performance of the required maintenance as defined by Maruyama Mfg Co Inc in the Owner s Operator s Manual EMISSION RELATED PARTS WARRANTY In...

Page 4: ...ate previously manufactured products This warranty provides you with specific legal rights which may vary from state to state It is the Owner s and Dealer s responsibility to make sure the Warranty Registration Card is properly filled out and mailed to Maruyama U S Inc Proof of purchase and registration will be required in order to obtain warranty service To locate an Authorized Maruyama Servicing...

Page 5: ...s to the original retail purchaser and each subsequent purchaser that the small off road engine including all parts of its emission control system is 1 designed built and equipped to conform to the U S EPA and Environment Canada emission standards at the time of sale to the original retail purchaser and 2 free from defects in materials and workmanship that may keep it from meeting the requirements...

Page 6: ...ritten warranty This warranty is applicable only where the California U S EPA or Environment Canada emission control system warranty regulation is in effect Part II CALIFORNIA EMISSIONS CONTROL WARRANTY STATEMENT Your Warranty Rights and Obligations The California Air Resources Board and Maruyama are pleased to explain the emission control system warranty on your model year 2015 2016 small off roa...

Page 7: ...c Maintenance Chart is warranted for the period of time before the first scheduled replacement date for that part If the part fails before the first scheduled replacement the part will be repaired or replaced by Maruyama at no charge to the owner provided the repair or replacement is performed at a warranty station Any such part repaired or replaced under warranty will be warranted for the remaind...

Page 8: ...This warranty is applicable only where the California U S EPA or Environment Canada emission control system warranty regulation is in effect Warranted Parts List The following is the emission warranty parts list for your small off road engine i Fuel Metering System A Carburetor and internal parts and or pressure regulator or fuel injection system B Cold start enrichment system C Intake valve s ii ...

Page 9: ...ons of the engine manufacturer b As the small off road engine owner you should be aware however that Maruyama Manufacturing Company may deny you warranty coverage if your small off road engine or a part has failed due to abuse neglect improper maintenance or unapproved modifications c You are responsible for presenting your small off road engine to a Maruyama Manufacturing Company Inc service cent...

Page 10: ... be hoses belts and connectors and other emission related assemblies Where a warrantable condition exists Maruyama Manufacturing Company Inc will repair your small off road engine at no cost to you including diagnosis parts and labor MANUFACTURER S WARRANTY COVERAGE The 1995 and later small off road engines are warranted for two years If any emission related part on your engine is defective the pa...

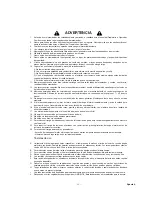
Page 11: ...g parts Keep clear at all times 15 If this product should start to vibrate abnormally stop the engine immediately and check for the cause Vibration is generally a warning of trouble 16 Avoid using this product near rocks gravel stones and similar matter in order to avoid dangerous flying debris 17 Use this product only in daylight or good artificial light 18 Do not allow bystanders in work area 19...

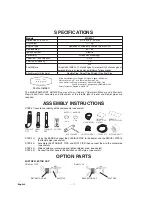
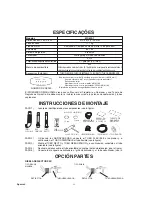
Page 12: ...tional Speed 6350 mn 1 Vibration Value 3 87 m s2 Shoulder Bearing Part Noise emissions Sound power level measured dB A 108 Sound power level guaranteed LWAG dB A 109 Safety Inclination Degree is within 10 ASSEMBLY INSTRUCTIONS STEP 1 Locate and identify all the components see sketch STEP 2 Using the BANDS connect the FLEXIBLE PIPE to the blower and the SWIVEL PIPE to the flexible pipe see sketch S...

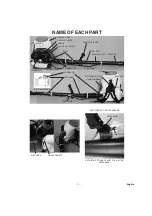
Page 13: ... PIPE HOSE BAND MIST PIPE SWIVEL PIPE THROTTLE LEVER LID MIST PIPE ASSEMBLE NAME OF EACH PART STRAIGHT PIPE ENGINE MIST HOSE HOSE BAND MIST COCK SHOULDER STRAP SERIAL NUMBER BACK PAD LEVER BAND MIST COCK HOSE CONNECT MIST HOSE MIST COCK SETTING PROCEDURE SET METAL FITTINGS OF MIST COCK IN THE LEVER BAND ...

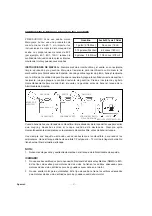
Page 14: ...identify it as fuel mix for the product Use regular unleaded gasoline and fill the container with half the required amount of gasoline Pour the correct amount of oil into the container then add the remaining amount of gasoline Close the container tightly and shake it momentarily to evenly mix the oil and the gasoline before filling the fuel tank on the product When refilling the fuel tank clean ar...

Page 15: ... understand the method of use and cautions Use the chemicals directly after opening the package Chemicals left for a long time after the package is open may cause poor discharging due to moisture absorption Mistaking the discharge quantity re category of chemicals may cause damage Do not leave the chemicals in the chemical tank for a long time The machine might malfunction Store chemicals in a saf...

Page 16: ...arburetor until fuel can be seen flowing through the FUEL RETURN LINE STEP 6 Set the throttle lever at 1 2 speed CAUTION Pull the STARTER GRIP briskly to start the engine NOTE Only short pulls are necessary Never pull the starter cord to its fullest extension Never let go of the starter grip until it is at the fully returned position Close the cover tightly Do not spill the liquid OPEN STEP 7 Warm...

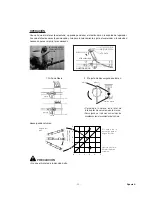
Page 17: ...TAKE GRILLE OF THE BLOWER HOUSING 0 1 1 2 3 4 5 2 3 4 5 Discharging volume Aperture Number on the dial of volume switch The nozzle being held nlevel CAUTION Avoid using too dense hydrate solution Discharging volume min Nozzle holding position 1 Mist cock 2 Adjustment of discharging volume Coincide the number on the dial of volume switch with the market Discharging volume will increase accordingly ...

Page 18: ...ver all the way to the engine stop position CLEANING THE PRODUCTS Remove Mist hose from Mist pipe and discharge chemical from chemical tank After recovering the remnant chemical clean the inside chemical tank using clean water Also wash the spray nozzle with clear water WASHING DISCHARGING MISTCOCK OPEN DISCHARGING REGULAR MAINTENANCE Before each use the mist blower should be inspected for proper ...

Page 19: ...the fuel filter remove it from the fuel tube and wash it with safety solvent Inspect and clean the fuel tank before re installing the fuel filter Always replace a defective fuel filter TIPS PROPER GAP 0 031 0 035 IN FUEL TUBE GROMMET FUEL FILTER CLAMP WEIGHT FUEL FILTER COOLING FINS Free passage of air flow through the cylinder cooling fins is required to prevent poor engine performance and shorte...

Page 20: ...R GRADE GASOLINE ONLY A minimum of 87 octane of the antiknock index is recommended EMISSION CONTROL INFORMATION To protect the environment in which we all live Kawasaki has incorporated an exhaust emission control system EXHAUST EMISSION CONTROL SYSTEM EM The system reduces the amount of pollutants discharged into the atmosphere by the exhaust of this engine The fuel ignition and exhaust systems o...

Page 21: ...ixture Use only clean fresh unleaded regular grade gasoline Octane Rating The octane rating of a gasoline is a measure of its resistance to knocking Use of a minimum of 87 octane of the antiknock index is recommended NOTE If knocking or pinging occurs use a different brand of gasoline or higher octane rating 2 STROKE ENGINE OIL MIXING Gasoline is extremely flammable and can be explosive under cert...

Page 22: ...Maruyama engine dealer Service more frequently under dusty conditions Always remove the spark plug cap from spark plug when servicing the engine to prevent accidental starting WARNING MAINTENANCE Interval Daily First Every Every Every 20 hours 20 hours 50 hours 100 hours Check and replenish fuel Check for fuel leakage Check bolts nuts and screws for looseness and loss Clean fuel filter Clean air f...

Page 23: ...ignifican para usted Etiqueta de advertencia Limpie la suciedad o el barro de la unidad para que las indicaciones siempre estén legibles Encontrará las siguientes etiquetas de alarma fijadas en la unidad Etiquetas de alarma Prefacio 22 Nombres de las partes 26 Etiqueta de advertencia 22 Instrucciones de Operación 29 Garantía 23 Mantenimiento Corriente 31 Instrucciones de Seguridad 24 Almacenamient...

Page 24: ...ra durante dos 2 años a partir de la fecha de la entrega original al detal Las partes relacionadas con la emisión son el conjunto del carburador el conjunto de la bobina de ignición el rotor de ignición la bujía el convertidor catalítico y el estanque de combustible Se puede usar cualquier repuesto equivalente en desempeño y durabilidad en reparaciones o mantenimientos no de garantía y ello no red...

Page 25: ...n forma anormal detenga el motor inmediatamente y revise la unidad para descubrir la causa Generalmente la vibración es la señal de un problema 16 Evite el uso del soplador cerca de rocas gravilla piedras y material similar con el objeto de evitar el peligro de desechos lanzados 17 Use el atomizador únicamente a la luz del día o bajo una buena luz artificial 18 No permita la presencia de personas ...

Page 26: ...87 m s2 Parte del soporte de hombro Emisiones de ruido Nivel de potencia sonora medido dB A 108 Nivel de potencia sonora garantizado LWAG dB A 109 El grado de inclinación de seguridad está dentro de 10 INSTRUCCIONES DE MONTAJE PASO 1 Localice e identifique todos los componentes vea la figura PASO 2 Utilizando las ABRAZADERAS conecte el TUBO FLEXIBLE al soplador y a continuación el TUBO ORIENTABLE ...

Page 27: ...OCÍO TUBO GIRATORIO PALANCA DEL ESTRANGULADOR TAPA NOMBRES DE LAS PARTES TUBO RECTO MOTOR MANGUERA DE ROCÍO BANDA GRIFO DE ROCÍO CORREA DE HOMBRO NÚMERO DE SERIE COJÍN POSTERIOR BANDA DE PALANCA GRIFO DE ROCÍO CONEXIÓN DE MANGUERA MANGUERA DE ROCÍO PROCEDIMIENTO DE AJUSTE DEL GRIFO DE ROCÍO AJUSTE LOS ACCESORIOS METÁLICOS DEL GRIFO DE ROCÍO EN LA BANDA DE PALANCA ENSAMBLEDETUBODEROCÍO ...

Page 28: ...itar que mugre y desechos entren al tanque cuando está destapado Siempre agite momentáneamente el recipiente con la premezcla de combustible antes de llenar el tanque Use siempre una boquilla o embudo cuando reabastezca el combustible para reducir las salpicaduras Llene el tanque sólo hasta que falte 1 2 pulgada 6 12 mm para llegar al borde No llene hasta el final del cuello del tanque NOTA 1 Nunc...

Page 29: ...micos que va a utilizar y entienda bien el modo de utilización y las precauciones a tomar Pulverizar por tanque 1000 m2 o equivocarse de sustancia química puede causar daños Almacene los productos químicos en un lugar seguro y evite que los contenedores se abran durante el transporte de los mismos Trate los contenedores o depósitos de manera que garantice seguridad Preste atención a la manipulació...

Page 30: ...a que se pueda ver el flujo de combustible a través de la LÍNEA DE RETORNO DE COMBUSTIBLE PASO 6 Ajuste la palanca del acelerador a 1 2 velocidad PRECAUCIÓN Tire vigorosamente del ASIDERO DEL ARRANCADOR para arrancar el motor NOTA Sólo se requieren tirajes cortos No tire nunca del cable del arrancador hasta toda su extensión No suelte nunca el asidero del arrancador hasta que esté completamente en...

Page 31: ... 1 2 3 4 5 2 3 4 5 descargando volumen Numere en el dial de interruptor de volumen El cambio de la descarga para el ángulo de tubo PRECAUCIÓN No use el hidrato de la densidad alta descargando volumen min ángulo del tubo 1 Grifo de Rocio 2 El ajuste de descargando volumen Coincida el número en el dial de interruptor de volumen con la marca Descargando el volumen aumentarán de acuerdo con como los a...

Page 32: ...or LIMPIEZA DE LOS PRODUCTOS Quite la manguera nebulizadora del tubo nebulizador y a continuación descargue el producto químico del depósito de producto químico Después recuperar el producto químico remanente limpie el interior del depósito de producto químico utilizando agua limpia Lave también la tobera rociadota con agua limpia LAVADO DESCARGA GRIFO NEBULIZADOR ABIERTO DESCARGA MANTENIMIENTO CO...

Page 33: ...speccione y limpie el depósito de combustible antes de volver a instalar el filtro de combustible Siempre reemplace un filtro de combustible defectuoso ELECTRODOS TOLERANCIA ADECUADA DE 0 8 A 0 9 MM TUBO DE COMBUSTIBLE ARO DE REFUERZO FILTRO DE COMBUSTIBLE ABRAZADERA PESO FILTRO DE COMBUSTIBLE ALETAS DE ENFRIAMIENTO Se requiere el pasaje libre del flujo de aire a través de las aletas de enfriamien...

Page 34: ... cercana del orificio de la bujía Reinstale la bujía Aplique una capa fina de aceite a todas las superficies metálicas y almacene el atomizador en un lugar seco INFORMACIÓN SOBRE CONTROL DE EMISIONES INFORMACIÓN SOBRE COMBUSTIBLE ESTE MOTOR ESTA CERTIFICADO PARA FUNCIONAR UNICAMENTE CON GASOLINA GRADO CORRIENTE Se recomienda un mínimo de 87 octanos del índice antidetonante Este índice antidetonant...

Page 35: ...o incorporado a cualquier motor nuevo para propósitos de control de emisiones antes de su venta o entrega al comprador final o mientras tal motor está en uso o 2 el uso del motor después de que cualquier persona haya retirado o dejado inoperante tal dispositivo o elemento de diseño Los actos relacionados a continuación están entre los actos que se presume constituyen manipulación indebida No manip...

Page 36: ...pósito de combustible La calidad lubricante de esta mezcla se deteriora rápidamente No use gasolina que haya estado guardada por más de dos meses Para garantizar un arranque adecuado en ambientes a bajas temperaturas debe usar combustible fresco formulado para invierno PRECAUCION El motor se despacha sin combustible AJUSTE AJUSTE DE MARCHA EN VACIO 1 La marcha en vacío es el único ajuste posible 2...

Page 37: ...ras 20 horas 50 horas 100 horas Revise y reabastezca el combustible Revise si hay alguna fuga de combustible Revise los pernos tuercas y tornillos para asegurarse de que no estén flojos o sueltos Limpie el filtro de combustible Limpie el elemento del filtro de aire Apriete los pernos y las tuercas Limpie la bujía y ajuste la separación de los electrodos Limpie el polvo y la mugre acumulados en las...

Page 38: ......

Page 39: ......

Page 40: ...Maruyama U S Inc 4770 Mercantile Drive suite100 Fort Worth TX 76137 U S A Phone 940 383 7400 Fax 940 383 7466 www maruyama us com P N 275255 01 15 05 TAP F ...

Reviews: