background image

23

Maintenance / Color Calibration Procedure

■  

Screen Cleaning

Periodically clean the screen surface using ammonia-free cleaning wipes (Marshall Part No. V-HWP-K). 

A clean micro-fiber cloth can also be used using only non-abrasive and ammonia-free cleaning agents. 

Do not use paper towels. Paper towel fibers are coarse and may scratch the surface of the polycarbonate 

faceplate or leave streaks on the surface.  Antistatic and fingerprint resistant cleaning agents are recommended. 

Do not apply excessive pressure to the screen to avoid damaging the LCD.

■  

Faceplate Dusting

Dust the unit with a soft, damp cloth or chamois. Dry or abrasive cloths may cause electrostatic charge on the 

surface, attracting dust particles. Neutralize static electricity effects by using the recommended cleaning and 

polishing practice.

■  

Color Calibration Procedure

•  Allow both the unit you want to calibrate and the Minolta® CA-210 to warm up for a minimum of 20 minutes.

•  Attach the CA-210 color probe to the update dongle.

•  With the unit still turned on, insert the update dongle into the service port at the rear of the OR-841-HDSDI.

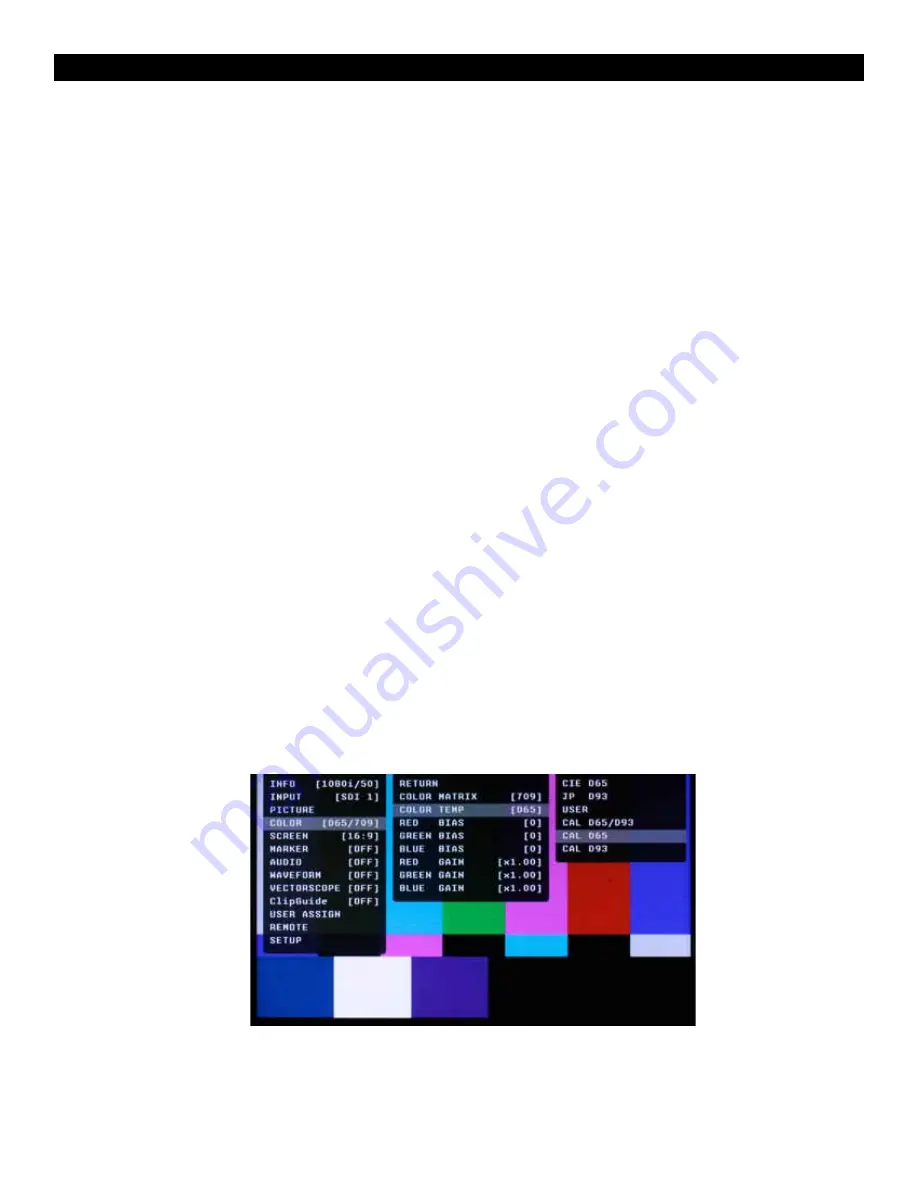
•  Use the RotoMenu navigation control and go to:


Color Menu


Color Temp


• Cal D65/D93 to calibrate both


• Cal D65 to calibrate only D65


• Cal D93 to calibrate only D93


Press enter once to select and again to confirm

•  Follow the on-screen instructions

Notes: 

1. If there is no color probe attached or you make a mistake and try to calibrate the incorrect screen, you will get 

an error message and the screen will default to previous settings.

2. If the calibration process is interrupted while in progress, the current screen settings will be corrupted and the 

calibration process will have to be repeated.

■  

VIDEO INPUT/OUTPUT

HD/SD-SDI Video Input / Output

■  

CONNECTORS

Video Input

 - 2 x BNC Female (75 Ω)

Video Output (Active Loop-Through)

 - 1 x BNC Female (75 Ω)

Parallel Remote

 - RJ-45

Optional Input Slot

Audio Output Jacks 

- 3.5mm Stereo x 2. One Front and One Rear.

Service Terminal

Power Input

 - 4-Pin Male XLR


Pin 1:  GND


Pin 2:  N/C


Pin 3:  N/C


Pin 4:  +12VDC

■  

ELECTRICAL

Power Consumption

 - 1.5 Amp (Max) @ 12VDC (18W Max)

Voltage Requirement 

- 12VDC (10VDC-18VDC)

■  

MECHANICAL

Summary of Contents for ORCHID OR-841-HDSDI

Page 1: ...OR 841 HDSDI Fully Featured 8 4 Rack Mountable Camera Top Portable LCD Field Monitor Operating Instructions Marshall Electronics...

Page 2: ...n 14 Aspect Ratio Setting 14 Mono Color 14 H V Delay 14 Shift H 14 Shift V 15 MARKER CONFIGURATION SUBMENU 15 Markers 15 Center Marker 15 Aspect Markers 15 Safety Marker 15 Marker Mat 15 Line Thicknes...

Page 3: ...ge in real time It displays in full color and can also be displayed in various sizes positions and transparency options The Vectorscope has adjustable gain from 1x to 5x Waveform monitor function The...

Page 4: ...een Markers A variety of screen markers in 4 3 16 9 and full screen modes allow accurate monitoring of the different aspect ratios used in broadcast environments User Definable Function Buttons Nine u...

Page 5: ...threaded mounts There is an optional OR 8RK rack mount kit for mounting two OR 841 HDSDI units side by side in a standard 19 rack When used in this configuration the Dual OR 841 HDSDI units occupy 5...

Page 6: ...Saturation Sharpness Turning the encoder will allow the user to make adjustments to the selected mode ROTOMENU Control Press the ROTOMENU Encoder to access the on screen Menu Turn the encoder to the L...

Page 7: ...ources supplying at least 1 Amp at 12 Volts IMPORTANT If using a power source other than the included power supply be sure that the polarity of the DC input is correct Pin 1 GND Pin 2 N C Pin 3 N C Pi...

Page 8: ...ble Formats 8 Format HD SD SDI 480 60i 576 50i 480 60p 576 50p 720 60p 720 50p 720 30p 720 25 720 24p 1080 60p 1080 50p 1080 60i 30PsF 1080 50i 25PsF 1080 48i 24Psf 1080 30p 1080 25p 1080 24p VGA SVGA...

Page 9: ...CAL D65 CAL D93 RED BIAS 128 to 127 0 is Calibrated Setting GREEN BIAS 128 to 127 0 is Calibrated Setting BLUE BIAS 128 to 127 0 is Calibrated Setting RED GAIN 0 000 to 1 992 x1 00 is Calibrated sett...

Page 10: ...L MEDIUM LARGE POSITION LEFT TOP LEFT BOTTOM RIGHT TO RIGHT BOTTOM TYPE OVERLAY OVERLAP Y OVER LIMIT 100 0 IRE 0 to 109 1 Y UNDER LIMIT 100 0 IRE 7 3 to 109 1 VECTORSCOPE RETURN LAYOUT NORMAL LAYOUT A...

Page 11: ...SATURATION SHARPNESS REMOTE RETURN PIN 1 THRU 8 Pin 5 is Ground INPUT 1 INPUT 2 GAMMA 1 0 GAMMA 1 8 GAMMA 2 0 GAMMA 2 2 GAMMA 2 4 GAMMA 2 6 WHITEBLANCE D65 WHITEBALANCE D93 MONO SCAN ASPECT ZOOM HV DE...

Page 12: ...Main Menu and Navigation Step through menu items by using the RotoMenu control Choose a submenu or select a menu item by pushing the RotoMenu control Return to the previous menu by pressing the F 9 bu...

Page 13: ...panese D93 White Point x 0 2830 y 0 2980 USER Adjustable Color Bias and Gain CAL D65 D93 CAL D65 CAL D93 RGB Bias and Gain Select this submenu to fine tune the monitor s color balance R G B or execute...

Page 14: ...ng the remainder of the screen regardless of its original format In 16 9 mode images are scaled to fill the maximum 16 9 portion of the screen 1024 x 576 regardless of its original format Mono Color U...

Page 15: ...ettings to superimpose one of 6 markers on the screen when in 16 9 mode 4 3 16 9 1 85 1 2 35 1 4 3 and 1 85 1 4 3 and 2 35 1 Safety Marker Use this setting to adjust the safety marker from 80 to 100 O...

Page 16: ...justs the point at which the level meters will change color from Green to Yellow This is normally the level used for alignment For digital audio in the US the SMPTE standard is 20dBFS 0VU 4dBu The Eur...

Page 17: ...occupy on the screen when in the Normal mode Choices are Left Top Left Bottom Right Top and Right Bottom Display Type Use this menu to choose how to display the waveform The choices are Overlay or Ove...

Page 18: ...aque and will block the source video Gain Use this menu to change the gain of the Vectorscope display Normally the Vectorscope displays x1 00 In order to allow a magnified view the gain is adjustable...

Page 19: ...SIGN SUBMENU F 1 thru F 9 There are nine Function Keys and One Rotary Encoder on the front panel of the OR 841 HDSDI Each of these F keys key may be assigned any one of 31 different functions as requi...

Page 20: ...Mix Red and Green for Amber Cannot mix R G B for White It will be pink due to white balance Cannot be assigned with separated tallies Left Right Separated Mode Supports R G B tallies on each Left and...

Page 21: ...r or White Balance Data Requires Confirm action by selecting Confirm again Select Reset RotoMenu control Select Confirm Press RotoMenu control Resetting default will not effect backed up data Backup U...

Page 22: ...o 40 C RoHs Do not dispose Return to Manufacturer or Authorized Recycle Facility PANEL VIDEO INPUT OUTPUT HD SD SDI Video Input Output CONNECTORS Video Input 2 x BNC Female 75 Video Output Active Loop...

Page 23: ...s by using the recommended cleaning and polishing practice Color Calibration Procedure Allow both the unit you want to calibrate and the Minolta CA 210 to warm up for a minimum of 20 minutes Attach th...

Page 24: ...tions or modifications in design or construction void this warranty It is considered normal for a minimal amount of pixels not to exceed three to fail on the periphery of the display active viewing ar...

Reviews: