background image

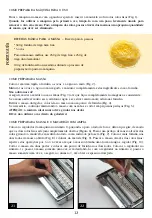
TIP: For fettuccine the recommended thickness of the sheet of pasta is with the  thickness-adjustment 
knob on no. 5, for tagliolini it should be on setting no. 7. The thinnest pasta sheet thickness is achieved 
by setting the machine on no. 9 and feeding the sheet of pasta through twice. Now cut the sheet of pasta 
crosswise into pieces about 25 cm (~ 10 inches) long and lightly dust them with flour again (Fig. 11).
Insert the crank into one of the holes of the cutting rollers and while you make it turn in the direction 
of the arrow, feed the sheet of pasta through to achieve the desired type of pasta: fettuccine fig. 12 or 
tagliolini fig. 13 Pick up the pasta with the special stick and transfer it to the pasta drying rack.
NOTE 1: If the rollers are not able to “cut” it means that the sheet of pasta is too soft: in this case we 
recommend to knead the dough with your hands, adding some flour and feeding it through the smooth 
rollers again.
NOTE 2: When the sheet of pasta is too dry and is not “gripped” by the cutting rollers, we recommend to 
knead the dough with your hands and add some water. Feed the dough through the smooth rollers again.
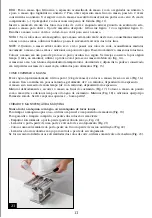
Lay the pasta on a damp clean tea towel and cook it immediately. If you wish to store it for a while (max 
1 month), you can use the practical Tacapasta (pasta drying rack) by Marcato to let it dry out (fig. 14). 
The pasta will dry out in about 5-6 hours, depending on the temperature and humidity and can be stored 
in suitable containers normally found in a kitchen (Fig. 15).

HOW TO COOK THE PASTA
Bring plenty of salted water to the boil (~ 4 litres for half a kg of pasta), then add the fresh or dry pasta 
(Fig. 16). Fresh pasta cooks in just a few minutes, on average between 2 and 4 minutes, depending on its 
thickness. Dry pasta needs longer cooking time (between 4 and 6 minutes), depending on its thickness. 
Stir gently and drain the pasta when it is cooked (Fig. 17). Pour the pasta into the pan with the sauce and 
add some of the water in which the pasta was boiled. Stir (Fig. 18) and add some grated Parmesan cheese.
Serve on heated plates and... enjoy your meal!

MACHINE CARE AND MAINTENANCE

Never wash the machine with water or in the dishwasher!

To clean the machine use a brush and wooden stick (Fig. 19).
To ensure thorough cleaning, the roller combs are removable:
- push the comb-holder sideways (round part made of steel) (Fig. 20).
- lift the comb-holder on one side and remove it from its seat (Fig. 21).
- stick one end of the comb-holder in the hole of the anti-friction comb made of resin (Fig. 22).
- lift the steel rod and extract the comb from its seat.
- to reassemble the combs repeat the operations described above in reverse order.
If needed lubricate the ends of the cutting rollers; only use Vaseline oil (Fig. 23).

8

7

5

Summary of Contents for Ampia Wellness

Page 1: ...ioni per l uso e la manutenzione Instructions for use and maintenance Mode d emploi et d entretien Gebrauchs und Wartungsanleitungen Instrucciones para el uso y el mantenimiento Instru es de uso e man...

Page 2: ...Fig 7 Infarinate leggermente i due lati della sfoglia cos ottenuta Fig 8 e piegatela a met Fig 9 Ripassate la sfoglia attraverso i rulli lisci ripetete queste operazioni 5 6 volte fino a quando la sf...

Page 3: ...a in 5 6 ore circa a seconda della temperatura e della umidit e poi potr essere conservata dentro appositi contenitori che si tengono in cucina fig 15 COME SI CUOCE LA PASTA Portate ad ebollizione abb...

Page 4: ...f pasta with flour Fig 8 and fold it in half Fig 9 Feed the sheet of pasta through the smooth rollers again repeat these operations 5 6 times until the sheet of pasta has a long and regular shape Fig...

Page 5: ...he practical Tacapasta pasta drying rack by Marcato to let it dry out fig 14 The pasta will dry out in about 5 6 hours depending on the temperature and humidity and can be stored in suitable container...

Page 6: ...che Fig 7 Enfarinez l g rement les deux c t s de la p te ainsi obtenue Fig 8 et pliez la en deux Fig 9 Repassez la p te travers les rouleaux lisses r p tez ces op rations 5 6 fois jusqu ce que la p te...

Page 7: ...s Marcato pour les faire s cher Fig 14 Les p tes s chent en 5 6 heures environ en fonction de la temp rature et de l humidit ensuite vous pourrez les conserver dans des r cipients pr vus cet effet dan...

Page 8: ...bahn beidseitig leicht mit Mehl bestreuen Abb 8 und in zwei H lften bereinanderlegen Abb 9 Die Teigbahn erneut durch die Glattwalzen laufen lassen Diesen Vorgang 5 6 mal wiederholen bis die Teigbahn e...

Page 9: ...den um sie zu trocknen Abb 14 Zum Trocknen ben tigen die Nudel je nach Temperatur und Feuchtigkeit circa 5 6 Stunden Anschlie end k nnen sie in entsprechenden Beh ltern in der K che aufbewahrt werden...

Page 10: ...arina ambos lados de la masa Fig 8 y d blela por la mitad Fig 9 Vuelva a pasar la masa a trav s de los rodillos lisos repita estas operaciones 5 6 veces hasta que la masa haya adquirido una forma alar...

Page 11: ...en 5 6 horas aproximadamente dependiendo de la temperatura y la humedad y despu s podr ser conservada en recipientes espec ficos de cocina Fig 15 C MO SE CUECE LA PASTA Lleve a ebullici n abundante a...

Page 12: ...io como indicado pela seta Fig 7 Colocar mais farinha nos dois lados da massa obtida Fig 8 e dobrar na metade Fig 9 Passar a massa atrav s dos rolos lisos repetir estas opera es por 5 ou 6 vezes at qu...

Page 13: ...Marcato fig 14 A massa seca em 5 ou 6 horas dependendo da temperatura e da umidade e depois disto pode ser conservada em recipientes normais de conserva o utilizados para alimentos Fig 15 COMO COZINH...

Page 14: ...AN CESE CINESE GIAPPONESE ARABO RUSSO SPAGNOL O PORTOGHESE 2 Macchina per pasta fresca corta e lunga realizzata con materiali che non rilasciano metalli pesanti sulla pasta nelle lingue qui sopra 3 IT...

Page 15: ...2 3 4 5 AMPIA 0 6 7 8 9 7 5 6 10 1 2 3 4 5 6 9 25 cm 11 12 13 Marcato 14 5 6 15 4 16 2 4 4 6 17 18 19 20 21 22 23 1 6 500 g 5 250 g 250 g 100 g 15...

Page 16: ...2 3 4 5 AMPIA 6 7 8 9 0 5 6 10 2 1 2 3 5 7 9 9 25cm 10inch 11 12 13 1 2 14 5 6 15 500g 4 16 2 4 4 6 17 18 Buon Appetito 19 20 21 22 23 500 g 5 250 g 250 g 100 g 16...

Page 17: ...2 3 4 5 AMPIA 0 6 7 8 9 5 6 10 2 1 1 2 1 3 5 7 2 9 25 cm 10 11 12 13 1 2 1 Marcato 14 5 6 15 4 16 2 4 4 6 17 18 19 20 21 22 23 1 6 500 5 250 250 100 17...

Page 18: ...en Gebrauch bzw einen Gebrauch der von den in diesem Handbuch gegebenen Anweisungen abweicht PORTUGU S GARANTIA Todos os produtos MARCATO s o fabricados com os melhores materiais dispon veis e s o su...

Page 19: ...da massa mm O FRAN PONESE AGNOL 1 i che 2 O ori n Per ti per uisto a non vocati uello uale MARCATO 10 e 4 5 6 n 0 n 1 n 2 n 3 n 4 n 5 n 6 n 7 n 8 n 9 4 8 mm 3 8 mm 3 3 mm 2 5 mm 1 9 mm 1 5 mm 1 2 mm...

Page 20: ...ALY Tel 39 049 9200988 Fax 39 049 9200970 E mail info marcato it www marcato it TUTTI I DIRITTI SONO RISERVATI ALL RIGHTS RESERVED MARCATO S r l CAMPODARSEGO PD ITALY COPYRIGHT 2018 MARCATO S r l STAM...

Reviews: