3
Features
Front Panel
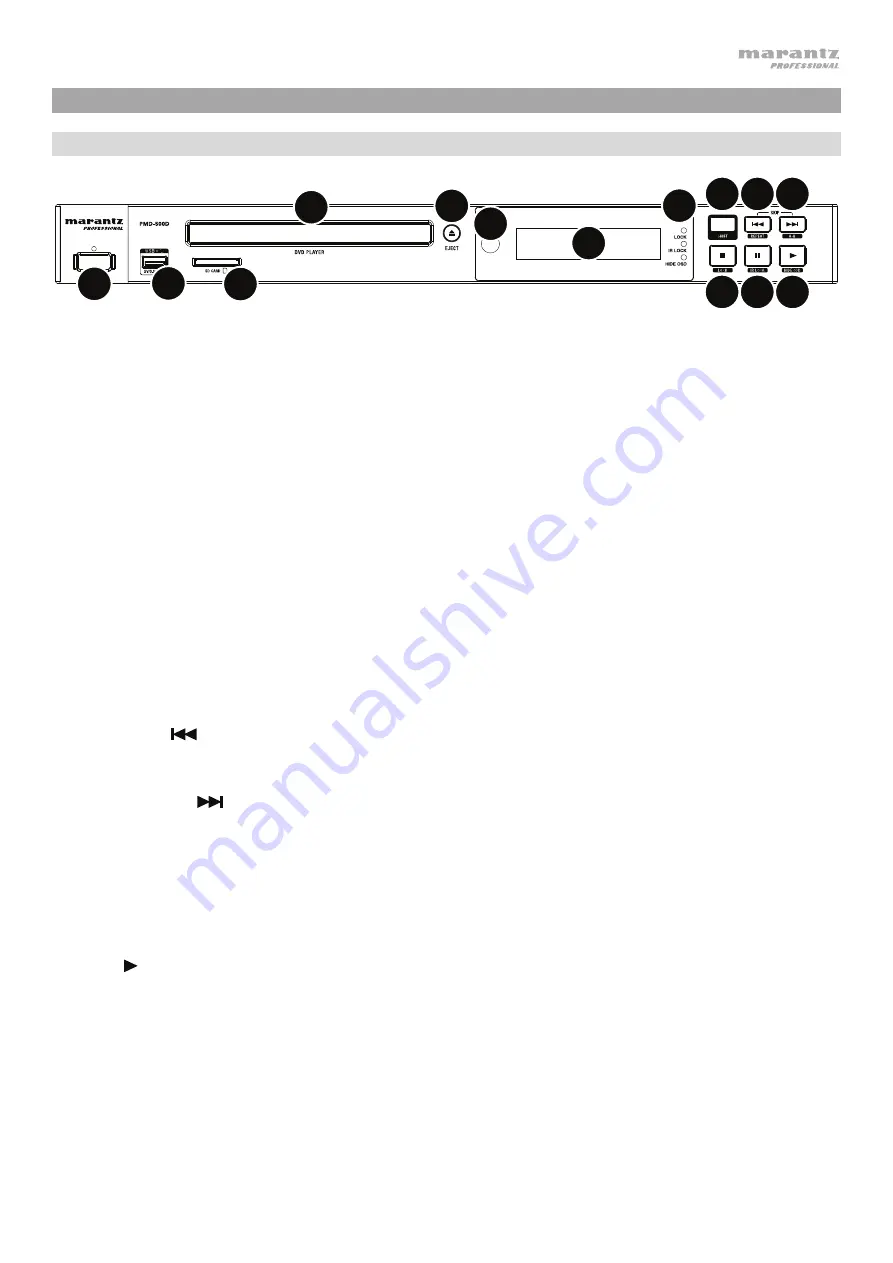
1
2
14
3
4
5
6
7
8 9
10 11
12 13
1.
Power:
Press this button to turn PMD-500D on/off. The light above the button will be
red
when it is in
standby mode or
green
when it is on. Make sure the
AC In
is properly connected to a power outlet.
Do not turn the unit off during media playback—doing so could damage your media.
2.
USB Port:
Connect a mass-storage-class USB device to this port. See
for more information.
3.
SD Card Slot:
Insert an SD or SDHC card into this slot.
See
for more information.
4.
Disc Tray:
Insert a compatible disc into this tray when it is open.
5.
Eject:
Press this to eject or close the
disc tray
.
6.
Remote Sensor:
Point the remote control at this sensor when operating it. See
for
more information.
7.
Display:
This screen indicates the unit’s current operation.
8.
Mode Indicators:
These lights indicated whether or not certain functions are enabled or disabled
(
Lock
,
IR Lock
, or
Hide OSD
). See
for more information.
9.
Shift:
Press and hold this button to perform the secondary function of any one of the five buttons next
to it (described below).
10.
Skip Back
(
)
:
Press this button to skip to the previous chapter, track, or file. Press and hold
Shift
and press this button to cycle through the Repeat modes. See the
chapter for more
information.
11.
Skip Forward
(
)
:
Press this button to skip to the next chapter, track, or file. Press and hold
Shift
and press this button to loop a section of video or audio during playback. See the
chapter
for more information.
12.
Stop
(
)
:
Press this button to stop playback. Press and hold
Shift
and press this button to
enable/disable the Lock feature. See
13.
Pause
(
)
:
Press this button to pause playback. Press and hold
Shift
and press this button to
enable/disable the IR Lock feature. See
for more information.
14.
Play
( )
:
Press this button to start or resume playback. Press and hold
Shift
and press this button to
enable/disable the Hide OSD feature. See
for more information.
Summary of Contents for PMD-500D
Page 97: ...97 ...
Page 100: ...marantzpro com Manual Version 1 2 ...


