background image

28

ENGLISH

About source audio output

When the source input mode has been switched between the 

[5.1 Channel]

 and 

[2 Channel]

 mode settings using the 

[Audio Out]

setting in the Setup screen 

Audio 2

 menu or by pressing  

5.1 CH (MODE)

 on the front panel, audio output for each source will be as

shown on the following table.

Setting Your Speaker System for
Multichannel Audio Playback

This player contains a built-in decoder for Dolby Digital and
DTS audio sources as well as 5.1 channel discrete audio
output. Ideally, a 5.1 channel system contains 6 speakers: 2
front speakers, 2 surround speakers, a center speaker, and a
sub woofer. However, as this is not always the case,
accurately setting the 

[Speaker Setting]

 setting to reflect

your speaker setup allows the player’s built-in decoder to
reroute signals to compensate for absent speakers.
Make adjustments in the 

[Speaker Setting]

 setting in the

Setup screen 

Audio 2

 menu.

Notes

• If you have already completed the Setup Navigator screen

operations, the settings on this page have already been set by
the player.

• If you have not made  connections to the 

5.1 CH SURROUND

AUDIO OUT

 jacks on the rear panel of the player, it is not

necessary to make any changes to this setting.
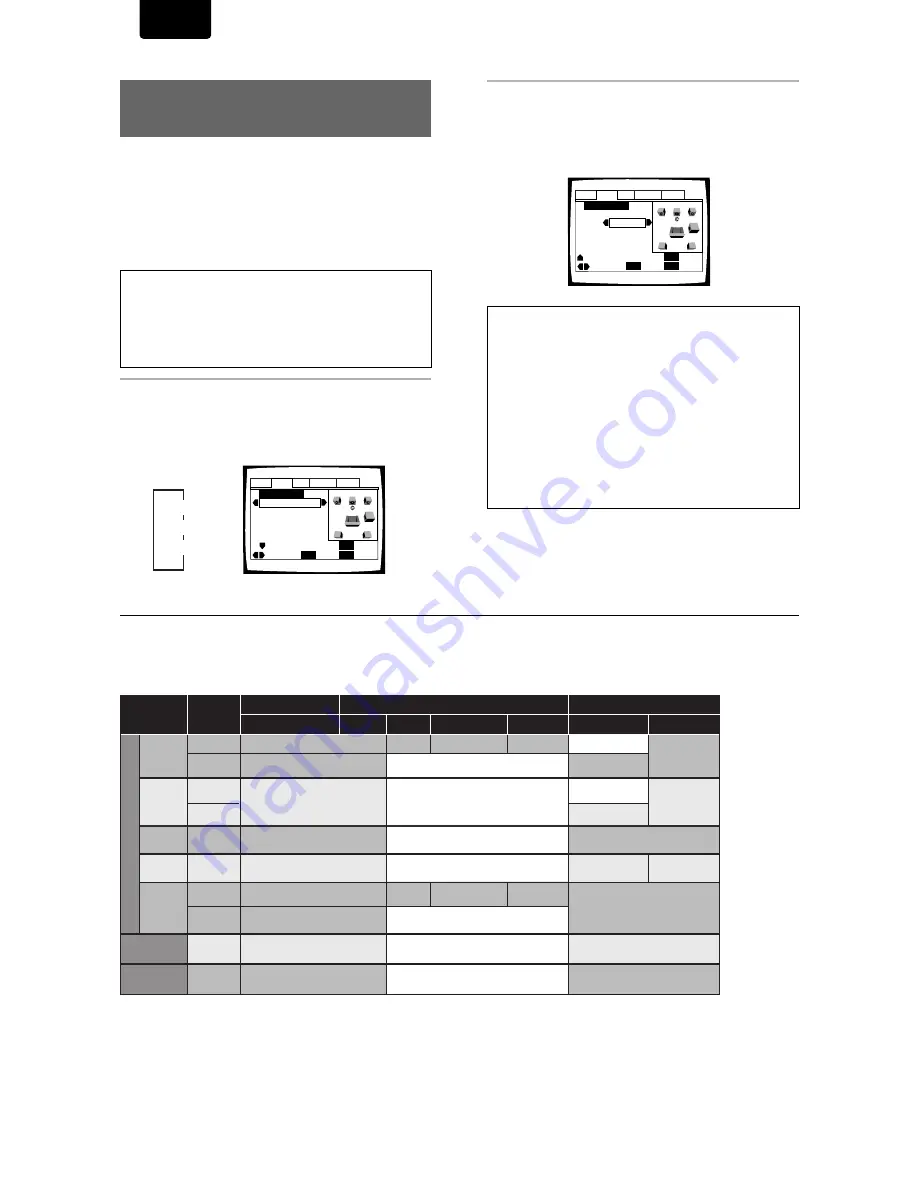
1

Use the cursor buttons (

2

2

2

2

2

/

3

3

3

3

3

) to select the

speaker.

Every time the 

cursor button

 is pressed, the selected

speaker changes in the following order.

*1: When the 

DOLBY V

 indicator is lit, PCM output is muted.

*2: When the Setup screen 

Audio 1

 menu 

[DTS Out]

 setting is set to 

[Off]

, DTS digital output is muted.

*3: When the 

5.1 CH

 mode is selected, 

5.1 CH

 indicator is lit.

Center

Sub-woofer

Surround

5

5

5


2

Use the cursor button (

) to move the cursor

down to the speaker bar and use the cursor
buttons (

2

2

2

2

2

/

3

3

3

3

3

) to select [On] or [Off]

corresponding to whether the selected speaker
is present in your system or not, respectively.

Notes

• To help identify the speakers being selected, the initials of the

speakers in the speaker system representation on the right side
of the screen will appear in blue.

• When 

[On]

 is selected for a speaker or pair of speakers, the

icons for those speakers turn yellow in the speaker system
representation on the right side of the screen.

• If 

[Off]

 is selected for both 

[Center Speaker]

 and 

[Surround

Speaker]

[Sub-woofer]

 is automatically set to 

[Off]

.

• When the sub woofer is 

[On]

, the low range components of the

center and surround signals will be mixed in the LFE signal and
output from the 

SUB WOOFER

 jack.

• When the sub woofer is 

[Off]

, the low range components of the

center and surround signals will be mixed in the L and R signals
and output from the front speakers.

Audio1

Audio2

General

Language

Video

Speaker Setting

Center

On

—/+

SETUP

Move

Exit

ENTER

Select

Speaker

Return

L

R

SW

LS RS

¥   ¥   ¥

RETURN

Audio1

Audio2

General

Language

Video

Speaker Setting

Center

On

—/+

SETUP

Move

Exit

ENTER

Select

Speaker  

Return

L

R

SW

LS RS

RETURN

AUDIO

CONTENTS

OUTPUT

MODE

SYSTEM AUDIO OUT (2 CH)

5.1 CH

2 CH

5.1 CH

2 CH

5.1 CH   /

2 CH

5.1 CH

2 CH

5.1 CH   /

2 CH

5.1 CH   /

2 CH

DV

D

CD

VIDEO CD

Dolby

Digital

Dolby

Digital

Karaoke

LPCM

DTS

Front Lch, Rch

2 ch DOWNMIX Lch, Rch

MUTE

Lch, Rch

Center

Surround Lch, Rch

LFE

2 ch DOWNMIX Lch, Rch

2 ch DOWNMIX Lch, Rch

Lch, Rch

(5.1 CH SURROUND AUDIO OUT)

DIGITAL OUTPUT (S/PDIF)

Lch, Rch

Front Lch, Rch

L, R

Front L,R

Center

Surround L,R

Sub Woofer

Dolby Digital

3

PCM

Dolby digital

Dolby Digital

Lch, Rch

*1

DTS

*2

Center Surround Lch, Rch

LFE

MUTE

Lch, Rch

MUTE

5.1 CH   /

2 CH

MPEG

Lch, Rch

Lch, Rch

MPEG

MUTE

MUTE

Dolby Digital

Lch, Rch

Lch, Rch

MUTE

MUTE

*3

*3

*3

*3

*3

 *3

 *3

MUTE

Lch, Rch

MUTE

Summary of Contents for DVD Player

Page 1: ...rted into a 13A socket elsewhere HOW TO CONNECT A PLUG The wires in the mains lead are coloured in accordance with the following code BLUE NEUTRAL N BROWN LIVE L 1 The BLUE wire must be connected to the terminal which is marked with the letter N or coloured BLACK 2 The BROWN wire must be connected to the terminal which is marked with the letter L or coloured RED 3 Do not connect either wires to th...

Page 2: ...l audio Digital video MPEG 2 133 min 242 min 266 min 484 min VIDEO CD CD Digital audio Digital video MPEG 2 DVD VIDEO VIDEO CD CD 41 min 75 min 82 min 150 min VIDEO CD single CD single Digital audio Digital video MPEG 1 Max 74 minutes Digital audio Digital video MPEG 1 Max 20 minutes Digital audio Max 74 minutes 12 cm 5 in single sided 8 cm 3 in single sided 12 cm 5 in single sided 8 cm 3 in singl...

Page 3: ...NECTOR terminal TruSurround and Virtual Dolby Digital TruSurround uses technology that simulates multichannel surround sound using only two speakers Virtual Dolby Digital works in conjunction with Dolby Digital audio sources to create a realistic surround sound Virtual Dolby Digital is selected automatically when Dolby Digital sources are loaded Frame advance playback in foward and reverse directi...

Page 4: ...e section starting on page 23 are also used in a number of other functions Learning the procedure for operating these menus will make using this player much easier and more enjoyable Play a disc When all the connections and setups have been made you are ready to play a DVD Video CD or CD with the player The section Getting Started Using Your DVD Player starting on page 19 outlines the basic player...

Page 5: ...channel Audio Playback 28 Setting the TV Screen Size 29 Setting the Video Output Format for AV CONNECTOR Connections 30 Switching the S Video Output 30 Selecting the type of paused image to display 30 Setting the position of the on screen display 30 Viewing from a Desired Camera Angle Multi Angle 31 Setting the Language Options 32 Setting the on screen display OSD language 32 Setting Language and ...

Page 6: ...not using the remote control for a long period of time over 1 month remove the batteries to avoid possible damage from battery corrosion If battery leakage occurs wipe the battery liquid from the battery component then insert new batteries When disposing of used batteries please comply with governmental regulations or environmental public instruction s rules that apply in your country or area Remo...

Page 7: ...n Page 26 y 5 1 CH mode button Page 12 27 u REVERSE button Page 21 40 i FORWARD button Page 21 40 o STOP button Page 22 50 0 PAUSE STEP button Page 40 1 PLAY button Page 19 21 40 2 Door open close button Page 19 SYS ANA MANU OPT SYNC RAND TRK PROG SCAN REPT ALL A B DIG REM TITL TIME TIME TRK CHP TOTL TOTL REM REM STEP TRK DOWN MIX ANGLE LAST MEMO Dolby V 96kHz 5 1CH CONDITION OSD DUBBING R L CD RW...

Page 8: ...age 14 1 AC outlet jack 2 AC IN power cord connection terminal Page 10 11 Display Window q 96 kHz indicator w 5 1CH indicator e Condition MEMO indicator r Camera Angle indicator t DOWN MIX indicator y LAST MEMO indicator u TITLE number indicator i DTS indicator o CHAPTER TRACK number indicator 0 TOTAL TRACK indicator 1 CHAPTER TITLE TRACK Repeat indicator 2 Dolby V irtual indicator 3 SYS BUS indic...

Page 9: ... Page 20 41 45 CLEAR button Page 35 42 43 44 45 47 48 AUDIO button Page 34 CONDITION MEMORY button Page 48 DIMMER button Page 8 REPEAT A B button Page 42 Next button Page 20 21 43 Previous button Page 20 21 43 TRAY OPEN CLOSE button Page 19 22 TOP MENU button Page 20 41 PAUSE STEP button Page 40 RETURN button Page 20 24 Stop button Page 20 22 44 47 T C button Page 41 ANGLE button Page 31 SETUP but...

Page 10: ...nplug the power cord from the power outlet The analog video output on this player uses copy protect circuitry to prevent the video playback on DVDs from being copied If you connect the player to a TV via a VCR or record and play back the contents of a disc with a VCR the playback picture may not be normal Connecting Your DVD Player Unlike any other audiovisual media format DVD offers a wide array ...

Page 11: ...wn on this page is meant as an example Please refer to the manuals supplied with the components to which you are making connections to determine the best possible setup for your home system An explanation of each type of audio and video connection available can be found on pages 12 14 5 1 CH SURROUND AUDIO OUT 5 1 channel audio refers to the current industry surround sound standard requiring two f...

Page 12: ...mplifier or receiver AV amplifier or receiver with built in Dolby Digital DTS or MPEG decoder 2 CH AUDIO OUT Make analog audio connections to a stereo amplifier or receiver Analog audio connections can also be made to a TV or monitor with stereo input jacks Use the supplied audio cord to connect the SYSTEM AUDIO OUT on the player to the audio input on the stereo amplifier or receiver When making a...

Page 13: ...or of the plug with the color of the jack yellow TV or monitor S VIDEO IN S VIDEO VIDEO IN VIDEO yellow yellow TV SYSTEM switch Video output changes as follows according to the playback disc s recorded format NTSC PAL PAL NTSC conversion is possible on Video CDs PAL NTSC conversion is not possible on DVDs When the TV SYSTEM switch is set to the AUTO position the disc s format will be output as is ...

Page 14: ...onnect with the remote control output jack of a component such as the SR 14 SR 18 SR 19 which is compatible with Marantz remote control system The remote control allows to switch the power of this DVD player to POWER ON and Standby mode Note be sure to leave power switch on the Front panel in the power mode SYSTEM MODE For details refer to the User Guide of the PS2100 or SR2100 When connecting thi...

Page 15: ...f you are going to use the Setup Navigator it is not necessary to change the setting on the first screen Please proceed to the next step If you do not want to set up the player using the Setup Navigator use the cursor button to select Auto Start Off at this time The Setup Navigator function may still be used at a later time in manual Setup screen menu operation page 23 5 Press ENTER The selection ...

Page 16: ...screen size The TV Type screen establishes the size or more appropriately the width to height ration of your television or monitor The width to height ratio of conventional TVs is 4 3 while the width to height ratio of wide screen and high definition TVs is 16 9 This width to height ratio is called the aspect ratio Settings Widescreen 16 9 Standard 4 3 Factory setting Note There are two screen for...

Page 17: ...ed in the Analog Jacks screen the following screens appear to determine the configuration of your speaker system In all of the following screens select Present if the speaker in question is present in your system and Not Present if it is not Center Speaker Surround Speakers Sub woofer Settings Present Not Present Factory setting Note If Not Present is selected for both Center Speaker and Surround ...

Page 18: ...mats can be decoded If you have made no digital connections select Not Connected Settings Dolby Digital Dolby Digital DTS Dolby Digital MPEG Dolby D DTS MPEG PCM Not Connected Factory setting Setting compatibility with 96 kHz output The 96 kHz PCM Audio screen establishes whether or not the AV component the player is connected to is capable of processing an audio signal with a sampling rate of 96 ...

Page 19: ...bited by the player The operation is prohibited by the programming on the disc Playing DVDs Video CDs and CDs DVD Video CD CD Before you can start to enjoy the digital audio and video on DVDs be sure that you have either performed the Setup Navigator procedure described in the previous section or made the necessary settings in the Setup screen menus as outlined in the next section to set up the pl...

Page 20: ...number buttons are used to make selections on Video CD menu screens When the Video CD has more than one menu pages can be advanced to or returned to with PREV 4 or NEXT To play Video CDs without displaying menu screens Video CDs with Playback Control PBC display a menu screen when play is started It is possible however to play back Video CDs without displaying menu screens When a Video CD with PBC...

Page 21: ...g to lit fast forward scanning will continue even if the button is released When the desired location has been reached press PLAY 3 Fast reverse scanning Press and hold REV 1 1 1 1 1 4 4 4 4 4 1 1 1 1 1 on the front panel during playback Release REV 1 when you reach the desired location Normal playback resumes When the Scan indicator on the screen changes from flashing to lit fast reverse scanning...

Page 22: ...play shows RESUME and the stop position is memorized The resume position remains memorized as long as the disc is in the player even if you switch the power off Pressing STOP 7 twice causes the disc to return to the beginning when PLAY 3 is pressed again The display shows the disc type DVDs or Video CDs Press PLAY 3 3 3 3 3 Playback starts from the resume position Notes The actual restart position...

Page 23: ...f a DVD has been loaded be sure to press STOP 7 before proceeding Note If the Setup screen is opened during playback of a DVD being viewed in the letter box format the screen may switch to the wide screen format This is not a malfunction and the screen will return to normal when the Setup screen is closed DIMMER ENTER RETURN T C 10 MENU TOP MENU AUDIO SUBTITLE ANGLE OSD PROGRAM SETUP LAST MEMORY C...

Page 24: ... When setting up the system or when making adjustments it is convenient to know what settings are applicable to the different disc formats When the settings appear for each menu option the currently selected setting appears with the setting indicator highlighted in one of three colors blue green or yellow These colors correspond to what formats the menu option effects as shown in the table below N...

Page 25: ... DVDs recorded in DTS When this player is connected to an AV component that has a built in DTS decoder select DTS If your system is not equipped to decode DTS select Off Refer to the operating instructions supplied with your audio components if you are unsure about compatibility with DTS 96 kHz PCM Out This player is capable of outputting digital signals with a sampling frequency of 96 kHz If you ...

Page 26: ...s DVD Video CD Depending on the audio source this player is capable of switching between Virtual Dolby Digital multichannel audio sources and TruSurround stereo audio sources to produce a surround sound effect from stereo speakers This function works only when connections are made to the SYSTEM AUDIO OUT 2 CH jacks and AV EUROCONNECTOR jacks Settings Off 2 2 2 2 2V TruSurround Factory setting Note...

Page 27: ...s in the Audio Out setting in the Setup screen Audio 2 menu Settings 2 Channel 5 1 Channel Factory setting Notes This setting can also be changed by using 5 1 CH MODE on the front panel However this button does not work when the on screen menu operation is being performed When 5 1 Channel is selected the front right R and left L audio channels are also output from the SYSTEM AUDIO OUT jacks If the...

Page 28: ...sor down to the speaker bar and use the cursor buttons 2 2 2 2 2 3 3 3 3 3 to select On or Off corresponding to whether the selected speaker is present in your system or not respectively Notes To help identify the speakers being selected the initials of the speakers in the speaker system representation on the right side of the screen will appear in blue When On is selected for a speaker or pair of...

Page 29: ...at the top and bottom portions of the screen to provide the full wide screen presentation of a movie on a standard TV 4 3 aspect ratio Pan Scan setting Any setting Wide screen format DVD unnatural squeezed effect If you are viewing a wide screen format DVD on a standard TV and the TV Screen setting is set to 16 9 Wide the picture may appear squeezed on the screen To remedy this condition select ei...

Page 30: ... to have a composite video signal output S Video to have an S video signal output and RGB to have an RGB signal output For more information on which format is most appropriate refer to the instructions supplied with your TV or monitor Make changes to the Video Out setting in the Setup screen Video menu Settings Video S Video RGB Factory setting Audio1 Audio2 Language TV Screen 16 9 Wide Video Out ...

Page 31: ...e Setup screen Video menu described in the section below Turning the angle indicator on and off When a picture recorded in different angles is played back is displayed on the screen This setting lets you see clearly whether the playback picture is recorded in multiple angles or not Turn the angle indicator on or off in the Angle Indicator setting in the Setup screen Video menu in the Expert menu m...

Page 32: ...Italiano SETUP Select On Screen Language Language Note The languages that can be selected may be different from those shown above The OSD Language setting is factory set to English If you want English to be displayed it is not necessary to adjust this setting Settings English français German Italiano Español Factory setting Selecting an audio language preference The audio language that you normall...

Page 33: ...anguage English Subtitle Language Japanese Auto Language Japanese Move Exit ENTER Select English French Spanish German Italian Other SETUP Setup audio language 3 If you select List of Languages use the cursor buttons 5 5 5 5 5 to select the language For languages which are only shown as a code please refer to Language Code List on page 53 If you select Code use the cursor buttons 5 5 5 5 5 to inpu...

Page 34: ...disc when the audio track is changed by pressing AUDIO the screen may briefly turn black This is not a malfunction Audio 1 English Dolby Digital 5 1CH Audio 2 Spanish HELLO HOLA Dolby Digital 5 1CH Audio 1 L Audio 2 R Audio Stereo DIMMER ENTER RETURN T C 10 RANDOM REPEAT MENU TOP MENU AUDIO SUBTITLE ANGLE OSD PROGRAM SETUP LAST MEMORY CONDITION MEMORY CLEAR 0 9 8 7 6 5 4 3 2 1 A B TRAY OPEN CLOSE ...

Page 35: ... DVD menu screen and then make your selection HELLO HOLA Subtitle 1 English Subtitle 2 Spanish Selecting a subtitle language preference The subtitle language that you will normally display can be selected from the subtitles programmed on a disc Even when the subtitle language is changed during playback by pressing SUBTITLE the language selected at this setting will be selected when the disc is cha...

Page 36: ...to the standard subtitles for viewers who are hard of hearing Select Assist Subtitle to display these subtitles on DVDs where this function is offered Make changes to the Subtitle Display setting in the Setup screen Language menu in the Expert menu mode page 24 Audio1 Audio2 General Language Video OSD Language English Audio Language English Subtitle Language Spanish DVD Language English Subtitle O...

Page 37: ...ns in this section may not work or have no effect on some DVDs Setting the Parental Lock Level DVD This player lets you set the Parental Lock if the DVD has a parental lock level recorded on it With Parental Lock capable discs you can block access to material you feel is inappropriate for your children Refer to the DVD disc jacket and the accompanying documentation to see if a particular disc cont...

Page 38: ...ntal Lock level to a higher or lower level according to the settings printed on the DVD disc jacket or accompanying documentation If you use the Condition Memory function to save the settings for a particular disc the Parental Lock level is saved as well Because it is saved in memory Parental Lock levels can be set for individual discs according to their content rather than a set level for all DVD...

Page 39: ...Factory setting When Other is selected This player gives you the option of creating your own background color by adjusting the red green and blue levels 1 Use the cursor buttons 5 5 5 5 5 to select a color bar The selected color bar becomes highlighted 2 Use the cursor buttons 2 2 2 2 2 3 3 3 3 3 to adjust the level of the color As the color bar is adjusted the square on the right side of the scre...

Page 40: ... slow playback pressing PLAY 3 restores normal playback operation Frame by frame advance playback Viewing one frame at a time 1 Press PAUSE 8 8 8 8 8 2 Press FWD or REV 1 1 1 1 1 rapidly FWD The picture advances one frame each time the button is pressed REV 1 The picture backs up a DVD a few frames each time the button is pressed To return to normal playback When viewing frame by frame playback pr...

Page 41: ...ress TOP MENU to display the menu screen and then make your selection With some DVDs the search operation may not be possible and may stop shortly after being performed In this case the mark is displayed Time search is not possible with CDs When performing DVD time search playback may start from a slightly different time than that specified Time search is not possible during when the disc is stopp...

Page 42: ... repeatedly You can only perform A B repeat within the same title chapter or track To cancel A B repeat play Press CLEAR Playback continues but the repeat function is canceled Return to a specified location on a disc 1 Press REPEAT A B at the desired location 2 When you want to return to the specified location press PLAY 3 3 3 3 3 To clear the specified location Press CLEAR to cancel repeat play o...

Page 43: ... play Press CLEAR This returns you to normal playback of chapters tracks in order from the chapter track currently playing Notes With Video CDs random play is not possible during playback when the menu is displayed PBC playback To perform random play start playback without displaying a menu by pressing a track number button while in the stop mode and then press RANDOM Random play of programmed cha...

Page 44: ... Use the cursor buttons 5 2 3 to highlight the number to be placed after the new number and then press the number button s of the number to be inserted The new number is inserted before the previously selected number To stop program play Press STOP 7 Notes When programming chapters chapters not programmed may appear on the screen This is not a malfunction Programming may not be possible with certa...

Page 45: ...ram On a CD or Video CD track program press PROGRAM to confirm The program screen displays the current program On a DVD select the program type title or chapter with the cursor buttons 2 2 2 2 2 3 3 3 3 3 The current DVD title or chapter program can then be confirmed on the appropriate program screen To add to a program 1 Press PROGRAM 2 Press a number button to add a new title chapter or track at...

Page 46: ...emory to On the player will save your program and recall it the next time you use the same DVD When the program memory exceeds 24 programs will be erased in chronological order from the oldest program in memory 1 Use the cursor button to highlight Program Memory and use the cursor button 3 3 3 3 3 to select On 2 Press ENTER The program is saved in memory Note When a DVD with a program stored in me...

Page 47: ...il the Video CD is removed from the player Resuming playback from where LAST MEMORY was pressed 1 Load a disc that has a Last Memory point memorized Some DVDs will start playback automatically when loaded In this case press STOP 7 to stop playback 2 Press LAST MEMORY while in the stop mode The disc begins playback at the memorized point Last Memory mode may not function for some DVDs If you regist...

Page 48: ... to memorize new settings Switching of the multi language mode etc is automatic on some discs Memorizing Settings for Often Viewed DVDs Condition Memory DVD You can store in memory settings for DVDs you often watch Settings remain in memory even if you remove the disc from the player or switch power to the player to standby If you load a disc that has its settings memorized CONDITION appears in th...

Page 49: ... 19 2 18 1 19 Play Tr Rate 1 1 1 32 8 9 Play Chapter 1 1 1 19 2 18 0 59 Viewing Disc Information DVD Video CD CD Use OSD to get current information about the disc currently loaded You can get information about the titles and chapters on a DVD or tracks on a Video CD or CD When viewing DVDs you can also check the digital bitstream transmission rate Press OSD during while a disc is playing Press OSD...

Page 50: ...n CD total elapsed time of CD Bottom Row remaining time of CD total time of CD Play Track 1 0 03 3 32 3 29 Play All 1 2 0 15 6 32 6 15 Video CD with PBC disabled Play All 5 10 20 19 22 57 2 38 Play Track 5 20 19 4 40 2 38 Play Track 5 20 19 4 40 2 02 Display off Disc information Top Row current track number total number of tracks total elapsed time of Video CD Bottom Row remaining time of Video CD...

Page 51: ... commercially available but special care should be exercised in their use since some may cause damage to the lens Never play cracked or warped discs The disc revolves in the player at high speed when it is played Never play a cracked scratched or warped disc This may damage the player or cause it to malfunction Never use discs with special shapes CD s with special shapes heart shaped CDs octagonal...

Page 52: ...ontrol If the disc table opens against strong resistance such as a closed glass door damage to the unit may result Condensation Moisture may form in the operating section of the player if the player is brought from cool surroundings into a warm room or if the temperature of the room rises suddenly When this happens the player s performance will be impaired To prevent this let the player stand in i...

Page 53: ...kh kk Greenlandic kl Cambodian km Kannada kn Kashmiri ks Kurdish ku Kirghiz ky Latin la Lingala ln Laothian lo Lithuanian lt Latvian lv Malagasy mg Maori mi Macedonian mk Malayalam ml Mongolian mn Moldavian mo Marathi mr Malay ms Maltese mt Burmese my Nauru na Nepali ne Norwegian no Occitan oc Oromo om Oriya or Panjabi pa Polish pl Pashto Pushto ps Quechua qu 0721 0801 0809 0818 0821 0825 0901 090...

Page 54: ...tions are correct and that plugs are firmly connected Internal player settings are incorrect If AV CONNECTOR connections have been made make sure that the Setup screen Video menu Video Out setting corresponds to the capabilities of the TV or monitor that connections have been made to page 30 Operation settings of TV or AV amplifier is not appropriate Be sure that your TV receiver or amplifier is s...

Page 55: ...Check that all connection plugs are firmly inserted The connection plug or terminal is dirty Check that the plugs and terminals are wiped clean of dirt etc Audio cable connection is wrong Check to make sure that the audio cables are connected correctly page 10 12 Connection is made to the stereo amplifier s PHONO input terminal Change connection to any input terminal except PHONO The pause mode is...

Page 56: ...tal output jack either coaxial or optical must be connected to the digital input jack of an AV amplifier or Dolby Digital decoder to enjoy the sound of Dolby Digital soundtracks DTS DTS stands for Digital Theater System DTS is a surround system different from Dolby Digital that has become a popular surround sound format for movies Dynamic range Dynamic range refers to the difference between the ma...

Page 57: ...ntains a movie may have only one title with many or no chapter divisions Karaoke discs may have many titles assigning a title to each song on the disc TruSurround TruSurround is a simulated surround system which produces a surround sound effect from stereo speakers Virtual Dolby Digital Virtual Dolby Digital uses Dolby Digital multichannel audio sources to create a realistic surround sound effect ...

Reviews: