background image

Tools You Will Need

Tools You Will Need

Before you start, assemble the following tools:

g

3/8" wrench

g

7/16" wrench

g

Regular pliers

g

Adjustable wrench

g

Regular screwdriver (flat head)

g

Phillips screwdriver (cross head)

Everything else you will need is included with your Compact ComposTumbler.

Dear Friend:

Thank you for purchasing the new Compact ComposT

umbler. Properly assembled

and operated, your new tumbler can go on giving you rich, healthy compost for

years. And that in turn will give you a healthier

, more beautiful and productive 

lawn and garden – naturally

.

Your Compact ComposT

umbler has been shipped ready to be assembled. All of the

parts and pieces you will need are included–all you supply are the proper tools 

and the labor.

This manual is designed to help you through the step-by-step assembly process 

and make it an easy and painless operation.

The entire assembly can be completed by just one person, although there are steps

that would be easier with a second pair of hands!

You will probably find it easiest to assemble your Compact ComposT

umbler on or

near the place where you intend to use it. While the completed assembly isn’

t heavy,

it is somewhat bulky and awkward to move.

Work on a smooth surface to prevent scratching the paint on the drum.

Before you start:

Take the time to read this manual completely before you actually start the assembly

.

That way you can avoid any surprises halfway through the job.

Check the “Tools Y

ou Will Need” list below and make sure you have all of them

handy. Having the proper tools can make the assembly much faster and easier

.

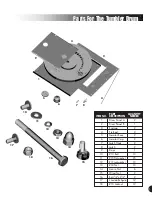
Then, check over the parts included and compare them against the parts list on

Pages 3 and 4. Make sure you have and can identify all of the parts for both the

Frame and the T

umbler Drum before you start.

Summary of Contents for compact compostumbler

Page 1: ...C O M PAC T Assembly Instructions ...

Page 2: ...y step assembly process and make it an easy and painless operation The entire assembly can be completed by just one person although there are steps that would be easier with a second pair of hands You will probably find it easiest to assemble your Compact ComposTumbler on or near the place where you intend to use it While the completed assembly isn t heavy it is somewhat bulky and awkward to move ...

Page 3: ... 2 2 Drum Panel B 1 3 Endcap 2 4 Tie Rod 3 5 Aerator Base 2 6 Aerator Cap 2 7 Latch Hook 2 8 Latch 2 9 Door 1 10 10 Bolt 13 11 10 Flatwasher 25 12 10 Lockwasher 13 13 10 Nut 13 14 Acorn Nut 6 15 Wing Nut 2 16 Bolt 1 4 x 31 4 2 17 Shoulder Bolt gold 12 18 10 Locknut 12 1 2 3 9 4 7 8 5 6 10 11 12 13 14 15 16 18 17 ...

Page 4: ...Handle 1 21 Brace 2 22 Frame Leg 2 23 Strut 2 24 Drive Gear 1 25 Cotter Pin 1 26 Grip 1 27 Grip Cap 1 28 6 Screw 1 29 Stub Axle 2 30 3 8 Fender Washer 2 31 3 8 Locknut 2 32 Bolt 3 8 x 4 2 33 Bolt 4 x 11 2 6 34 Bolt 1 4 x 3 4 1 35 1 4 Lockwasher 7 36 1 4 Nut 7 19 20 21 22 23 24 25 26 27 28 29 30 31 32 33 34 36 35 ...

Page 5: ...bolts C Using the slotted screwdriver and 3 8 wrench tighten all the fasteners STEP 2 Drum Assembly Select g 1 Endcap item 3 g 1 Drum Body Assembly from step 1 A Place the Endcap with the ComposTumbler lettering facing down on the work surface Note the position of the screen in the Endcap Carefully pick up the partially assembled drum and fit it into the Endcap The mixing fins should be inside wit...

Page 6: ...ap easier Use the Phillips cross screwdriver and 3 8 wrench to turn the locknuts onto the shoulder bolts until tight The shoulder bolts should still turn easily after assembly If they do not loosen them1 4 turn STEP 4 Second Encap Assembly Select g 1 Endcap item 3 g 3 Tie Rods item 4 g 6 Acorn Nuts item 14 A Position the second Endcap over the open end of the Drum Assembly lining up the Endcaps so...

Page 7: ... a 7 16 wrench at the other NOTE Do not over tighten STEP 5 Door Assembly Select g 2 Aerator Bases item 5 g 2 Aerator Caps item 6 g 2 Bolts 1 4 x 3 1 4 item 16 g 2 Wing Nuts item15 g 1 Door item 9 A Position one Aerator Base with the curved edge and square pins inward on the outside of the Door B Insert one 1 4 x 3 1 4 bolt through the Aerator Base and hole in the Door C Slip one Aerator Cap over ...

Page 8: ...d screwdriver and 3 8 wrench to tighten all Latch mounting fasteners B Position the Latch Hooks on the other side of the panel opening with the hook ends toward the opening Secure them the same way as the latches but make the fasteners only hand tight C Position the Door Assembly in place on the panel Fit the notches on one end of the Door into the Hooks on the panel and the hooks of the Latches i...

Page 9: ...crew until just snug Note The head of the Screw will be in the hole of the Drive Handle locking the Grip Cap in position STEP 8 Gear Drive Assembly Select g 1 Drive Support item 19 g 1 Drive Gear item 24 g 1 Drive Handle Assembly from step 7 g 1 Cotter Pin item 25 A Push the Drive Gear through the tube in the Drive Support with the Gear on the inside of the Support B Insert the bar of the Drive Ha...

Page 10: ...r Washers item 30 g 2 3 8 Nuts item 31 A From inside the Drum position a Stub Axle into the center hole of the Endcap while at the same time adjusting the end of the Drive Support so that it fits into the channel of the Stub Axle B Position a Frame Leg into the end of the Drive Support until the holes align C Now push one of the 3 8 x 4 Bolts through both parts and into the center hole of the Stub...

Page 11: ... shown Make sure the Strut is properly positioned so you do not need to disassemble it later A Position the flattened face of one Strut against the inside of the Drive Assembly and secure it with a 1 4 x 1 1 2 Bolt 1 4 Lockwasher and 1 4 Nut Repeat for the other Strut B Push a 1 4 x 11 2 Bolt through the hole near the end of a Frame Leg and position the end of the Strut over the Bolt as well Next ...

Reviews: