


7
Door Assembly
Door Assembly
STEP 4 Continued:
C.
Thread a second acorn nut onto the exposed end of the Tie Rod. If there is not enough exposed thread to start
the nut or if the rod will not go all the way through the drum, double check to make sure the drum edges are fitted
all the way into the rim of the Endcaps. If there is a problem, loosen the acorn nut on the first end of the tie rod or
press firmly on both Endcaps to seat them fully.
D.
Repeat steps B & C with the remaining tie rods and acorn nuts, connecting the two remaining pairs of holes
near the Door Opening. When all three tie rods have been positioned and secured, tighten all acorn nuts using
an adjustable wrench at one end and a
7
/
16
" wrench at the other. NOTE: Do not over tighten.
STEP 5:
Door Assembly
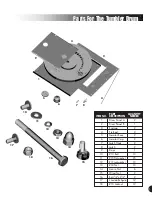
Select:
g
2 Aerator Bases (item 5)
g
2 Aerator Caps (item 6)
g
2 Bolts,
1
/
4
" x 3
1
/
4
" (item 16)
g
2 Wing Nuts (item15)
g
1 Door (item 9)
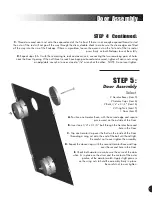
A.
Position one Aerator Base, with the curved edge and square
pins inward, on the outside of the Door.
B.
Insert one 1/4” x 3-1/4” bolt through the Aerator Base and
hole in the Door.
C.
Slip one Aerator Cap over the Bolt on the inside of the Door,
threading a wing nut onto the end of the bolt until hand tight.
Be careful not to over tighten the assembly.
D.
Repeat the above steps with the second Aerator Base and Cap
over the second hole in the Door.
E.
Check both aerators to make sure the curve of the door
when it’s in place on the drum and the contour of the outer
portion of the aerator match. Apply slight pressure
on the wing nuts to hold the assembly firmly in place.
Be careful not to over tighten.


