


8
Latch Assembly
Latch Assembly
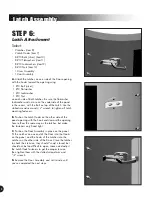
STEP 6:
Latch Attachment
Select:
g
2 Latches (item 8)
g
2 Latch Hooks (item 7)
g
8 #10 Bolts (silver) (item 10)
g
8 #10 Flatwashers (item 11)
g
8 #10 Lockwashers (item 12)
g
8 #10 Nuts (item 13)
g
1 Drum Assembly
g
1 Door Assembly
A.
Attach the Latches on one side of the Door opening
with the hooks toward the opening using:
1 #10 Bolt (silver)
1 #10 Flatwasher
1 #10 Lockwasher
1 #10 Nut
on each side of both Latches. Be sure the flatwasher,
lockwasher and nut are on the underside of the panel
in the recess, with the Bolt on top of the Latch. Use the
slotted screwdriver and
3
/
8
" wrench to tighten all Latch
mounting fasteners.
B.
Position the Latch Hooks on the other side of the
panel opening with the hook ends toward the opening.
Secure them the same way as the latches, but make
the fasteners only hand tight.
C.
Position the Door Assembly in place on the panel.
Fit the notches on one end of the Door into the Hooks
on the panel, and the hooks of the Latches into the
notches on the other side of the Door. Close the latches
to check their tension; they should “snap” closed, but
should not be too difficult to open. Loosen and adjust
the Latch Hook fasteners to get the proper tension,
then tighten them with the slotted screwdriver and
3
/
8
" wrench.
D.
Remove the Door Assembly and set it aside until
you’ve completed the next steps.


