


23
USING THE OVEN
2.
COMMISSIONING
(see figure at end of booklet)
Introduction
Before switching on the appliance, connect the appliance to
the power supply at the isolating switch and open the water
shut-off valves.
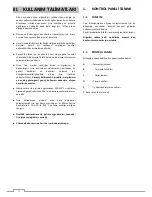
2.1
TURNING ON THE APPLIANCE
●
The
desired
temperatureis
set
tousingthe
thermostatswitch"B" and lightburningis controlled bythe
thermostatbulb"A"
● Setthe desiredcooking timeusing atimer switch “D”.
Timeis activatedis observedwithtimer lamp “C”.
● The thermostatlightblinkingindicates thatthe ovenhas
reachedthe
desired
temperature.
Timerlightblinkingindicatestheend ofcooking time.
● Interior ofthe oveninterior cabinis lightenedbylight
switch “E”. Viewedthe current state ofbakedproducts.
● Oven humidification cook by using the steam key “F”
provide. This key ismanueldesiredby the userstart
andstoprange.
Note: Before running a cooking cycle with humidification,
preheat the oven chamber to about 100°C using the dry
heating cycle.
2.2
TURNING OFF THE OVEN
●
Open the door.
● Make surethe ovenhas cooled downinsidethe cabin
● "D" Make sure youresetthetimer.
● "B" Thermostat switchthe zeroposition.
● Unplugthe main powersource. Besure to turn offthe
electricalconnection tothe machine.
3.
COOKING CYCLES
(see figure at end of booklet)
Power up the appliance ( indicator “H” on).
3.1
HEATING
CYCLE
“WİTH
HUMIDIFICATION”
Moistureduring cookingto make thedesired
range"F"humidificationby using the key, this
process be carried outmanually.
4.
TURNING OFF THE OVEN IN
THE EVENT OF FAULTS
In the event of faults, switch off the appliance as follows:
● Disconnect the appliance from the main power
supply at the isolating switch and close the water and
gas cocks.
● Contact a technical service centre with personel
trained and authorised by the manufacturer.
5.
CARE AND MAINTENANCE
● Disconnect the appliance from the main power
supply at the isolating switch and close the water and
gas cocks.
● At the end of each day clean the oven interior with an
oven cleaner, following the directions given by the
product supplier.
● Do not wash the appliance with jets of water.
● Do not use products containing chlorine (bleach,
hydrochloric acid etc.) even diluted, to clean the steel
surfaces.
● Do not use corrosive substances (i.e. muriatic acid) to
clean the floor underneath the appliance