background image

5 ENGLISH

17.

Cutting elements continue to rotate after the

motor is switched off.

18.

Do not operate power tools in explosive atmo-

spheres, such as in the presence of flammable 

liquids, gases or dust.

 Power tools create sparks 

which may ignite the dust or fumes.

19.

Take a rest to prevent loss of control caused 

by fatigue.

 We recommend to take a 10 to

20-minute rest every hour.

20.

Hold the power tool by insulated gripping 

surfaces only, because the cutting tool may 

contact hidden wiring.

 Cutting tool contacting a

“live” wire may make exposed metal parts of the 

power tool “live” and could give the operator an 

electric shock.

21.

Do not use the tool on steep slopes.

22.

The shoulder harness must be used during 

operation, if supplied with the tool.

23.

Do not start the tool when the cutting tool is 

tangled with cut grass.

24.

Before starting the tool, be sure that the cut-

ting tool is not touching the ground and other

obstacles such as a tree.

25.

Always keep your hands, face, and clothes 

away from the cutting tool when it is rotating.


Failure to do so may cause personal injury.

26.

Only use the cutting tool that are marked with 

a speed equal or higher than the speed marked 

on the tool.

Maintenance instructions

1.

The condition of the nylon cutting head, pro-

tective devices must be checked before com-

mencing work.

2.

Turn off the motor and remove the battery 

cartridge before carrying out maintenance, 

replacing the nylon cutting head or nylon cord 

and cleaning the tool.

3.

Check for loose fasteners and damaged parts

such as cracks in the nylon cutting head.

4.

Follow instructions for lubricating and chang-

ing accessories if applicable.

5.

When not in use store the equipment in an 

indoor dry location that is locked up or out of 

children's reach.

6.

Use only the manufacturer's recommended 

replacement parts and accessories.

7.

Inspect and maintain the tool regularly, espe-

cially before/after use. Have the tool repaired 

only by our authorized service center.

8.

Keep handles dry, clean and free from oil and 

grease.

9.

Always keep the tool in good working condi-

tion.

 Poor maintenance can result in inferior per-

formance and shorten the life of the tool.

SAVE THESE INSTRUCTIONS.

WARNING:


DO NOT let comfort or familiarity 

with product (gained from repeated use) replace 

strict adherence to safety rules for the subject 

product. MISUSE or failure to follow the safety 

rules stated in this instruction manual may cause 

serious personal injury.

WARNING:


Use of this product can create 

dust containing chemicals which may cause 

respiratory or other illnesses. Some examples of 

these chemicals are compounds found in pesti-

cides, insecticides, fertilizers and herbicides.
Your risk from these exposures varies, depend-

ing on how often you do this type of work. To 

reduce your exposure to these chemicals: work 

in a well ventilated area, and work with approved 

safety equipment, such as those dust masks that 

are specially designed to filter out microscopic 

particles.

Symbols

The followings show the symbols used for tool.

volts

direct current

no load speed

revolutions or reciprocation per minute

Important safety instructions for 

battery cartridge

1.

Before using battery cartridge, read all instruc-

tions and cautionary markings on (1) battery 

charger, (2) battery, and (3) product using 

battery.

2.

Do not disassemble battery cartridge.

3.

If operating time has become excessively 

shorter, stop operating immediately. It may 

result in a risk of overheating, possible burns

and even an explosion.

4.

If electrolyte gets into your eyes, rinse them

out with clear water and seek medical atten-

tion right away. It may result in loss of your 

eyesight.

5.

Do not short the battery cartridge:

(1)

Do not touch the terminals with any con-

ductive material.

(2)

Avoid storing battery cartridge in a con-

tainer with other metal objects such as 

nails, coins, etc.

(3)

Do not expose battery cartridge to water

or rain.

A battery short can cause a large current 

flow, overheating, possible burns and even a 

breakdown.

6.

Do not store the tool and battery cartridge in 

locations where the temperature may reach or

exceed 50 °C (122 °F).

7.

Do not incinerate the battery cartridge even if 

it is severely damaged or is completely worn 

out. The battery cartridge can explode in a fire.

8.

Be careful not to drop or strike battery.

9.

Do not use a damaged battery.

Summary of Contents for XRU15PT

Page 1: ...INSTRUCTION MANUAL Cordless Grass Trimmer XRU15 IMPORTANT Read Before Using ...

Page 2: ...llowed to reduce the risk of fire electric shock and personal injury including the following Read All Instructions Failure to follow the warnings and instructions may result in electric shock fire and or serious injury SAVE THESE INSTRUCTIONS General instructions 1 Never allow people unfamiliar with these instructions or children to use the machine Local regulations can restrict the age of the ope...

Page 3: ...ngly recom mended that the user wears work overalls 7 Special gloves made of thick leather are part of the prescribed equipment and must always be worn during operation of the tool 8 When using the tool always wear sturdy shoes with a nonslip sole This protects against injuries from flying debris and ensures a good footing 9 Use a dust mask if operation is dusty Electrical and battery safety 1 Avo...

Page 4: ...y from the nylon cutting head 5 Before starting make sure that the nylon cut ting head has no contact with hard objects such as branches stones etc as the nylon cutting head will revolve when starting 6 Remove any adjusting key wrench or blade cover before turning the power tool on An accessory left attached to a rotating part of the power tool may result in personal injury 7 Make sure there are n...

Page 5: ...king condi tion Poor maintenance can result in inferior per formance and shorten the life of the tool SAVE THESE INSTRUCTIONS WARNING DO NOT let comfort or familiarity with product gained from repeated use replace strict adherence to safety rules for the subject product MISUSE or failure to follow the safety rules stated in this instruction manual may cause serious personal injury WARNING Use of t...

Page 6: ...iant products may result in a fire exces sive heat explosion or leak of electrolyte SAVE THESE INSTRUCTIONS CAUTION Only use genuine Makita batteries Use of non genuine Makita batteries or batteries that have been altered may result in the battery bursting causing fires personal injury and damage It will also void the Makita warranty for the Makita tool and charger Tips for maintaining maximum bat...

Page 7: ... 3 1 Speed indicator 2 ADT indicator ADT Automatic Torque Drive Technology 3 Power lamp 4 Main power button 5 Reverse button 6 Battery cartridge 7 Lock off lever 8 Switch trigger 9 Hanger 10 Handle 11 Protector for nylon cutting head 12 Shoulder harness ...

Page 8: ... not install the battery cartridge forcibly If the cartridge does not slide in easily it is not being inserted correctly Tool battery protection system The tool is equipped with a tool battery protection sys tem This system automatically cuts off power to the motor to extend tool and battery life The tool will auto matically stop during operation if the tool or battery is placed under one of the f...

Page 9: ...ol if it runs when you simply pull the switch trigger without pressing the lock off lever Return the tool to our authorized service center for proper repairs BEFORE further usage WARNING NEVER tape down or defeat pur pose and function of lock off lever CAUTION Before installing the battery car tridge into the tool always check to see that the switch trigger actuates properly and returns to the OFF...

Page 10: ... up This tool has a reverse button to change the direction of rotation It is only for removing weeds and debris entan gled in the tool To reverse the rotation tap the reverse button and pull the trigger when the cutting tool is stopped The power lamp starts blinking and the cutting tool rotates in reverse direction when you pull the switch trigger To return to regular rotation release the trigger ...

Page 11: ...ndle on the upper clamp and fix it with hex socket bolts as illustrated 2 1 3 5 4 6 1 Hex socket bolt 2 Handle 3 Upper clamp 4 Damper 5 Lower clamp 6 Spacer CAUTION Do not remove or shrink the spacer Doing so lose the balance of the tool and may cause personal injury Hex wrench storage CAUTION Be careful not to leave the hex wrench inserted in the tool head It may cause injury and or damage to the...

Page 12: ...u can replace the cutting tool easily NOTICE Be sure to use genuine Makita nylon cutting head 1 2 3 4 6 5 1 Nylon cutting head 2 Receive washer 3 Spindle 4 Hex wrench 5 Tighten 6 Loosen 1 Insert the hex wrench through the hole in the tool head to lock the shaft Rotate the shaft until the hex wrench is fully inserted 2 Place the nylon cutting head onto the spindle and tighten it securely by hand 3 ...

Page 13: ...G Always position the tool on your right hand side Correct positioning of the tool allows for maximum control and will reduce the risk of seri ous personal injury WARNING Be extremely careful to maintain control of the tool at all times Do not allow the tool to be deflected toward you or anyone in the work vicinity Failure to keep control of the tool could result in serious injury to the bystander...

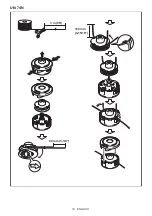
Page 14: ...ever use gasoline benzine thinner alcohol or the like Discoloration deformation or cracks may result To maintain product SAFETY and RELIABILITY repairs any other maintenance or adjustment should be performed by Makita Authorized or Factory Service Centers always using Makita replacement parts Replacing the nylon cord WARNING Use only the nylon cord with diameter specified in this instruction manua...

Page 15: ...15 ENGLISH 95 M10L 3 m 9 ft 80 mm 3 1 8 100 mm 3 15 16 ...

Page 16: ...16 ENGLISH B F ECO 4L 3 m 9 ft 80 mm 3 1 8 100 mm 3 15 16 ...

Page 17: ...17 ENGLISH For Ultra Auto 4 3 m 9 ft 80 mm 3 1 8 100 mm 3 15 16 ...

Page 18: ...18 ENGLISH UN 74N 3 m 9 ft 80 mm 3 1 8 100 mm 3 15 16 ...

Page 19: ...19 ENGLISH Manual feed type When the nylon cord gets short pull it out from the eyelet and feed it from the another eyelet 150 mm 5 29 32 1 mm 1 32 0 75 m 2 5 ft x 2 ...

Page 20: ... foreign object The drive system does not work correctly Ask your local authorized service center for repair Abnormal vibration stop the machine immediately One end of the nylon cord has been broken Tap the nylon cutting head against the ground while it is rotating to cause the cord to feed The drive system does not work correctly Ask your local authorized service center for repair Cutting tool an...

Reviews: