background image

10 ENGLISH

Speed adjusting

You can adjust the tool speed by tapping the main 

power button. Each time you tap the main power button, 

the level of speed will change.

2

1

►  

1.

 Speed indicator 

2.

 Main power button

Speed indicator

Mode

Rotation speed

High

6,500 /min

Medium

5,300 /min

Low

3,500 /min

Automatic Torque Drive Technology

When you turn on the Automatic Torque Drive 

Technology (ADT), the tool runs at optimum rotation 

speed and torque for the condition of grass being cut.

To start ADT, press and hold the reverse button until the 

ADT indicator turns on.

To stop ADT, press and hold the reverse button until the 

ADT indicator turns off.

2

1

►  

1.

 ADT indicator 

2.

 Reverse button

Indicator

Mode

Rotation speed

ADT

3,500 - 6,500 /min

Reverse button for debris removal

WARNING:


Switch off the tool and remove 

the battery cartridge before you remove entan-

gled weeds or debris which the reverse rotation 

function can not remove.

 Failure to switch off and 

remove the battery cartridge may result in serious 

personal injury from accidental start-up.

This tool has a reverse button to change the direction of 

rotation. It is only for removing weeds and debris entan-

gled in the tool.

To reverse the rotation, tap the reverse button and pull 

the trigger when the cutting tool is stopped. The power 

lamp starts blinking, and the cutting tool rotates in 

reverse direction when you pull the switch trigger.

To return to regular rotation, release the trigger and wait 

until the cutting tool stops.

1

2

►  

1.

 Reverse button 

2.

 Power lamp

NOTE:

 During the reverse rotation, the tool operates 

only for a short period of time and then automatically 

stops.

NOTE:

 Once the tool is stopped, the rotation returns 

to regular direction when you start the tool again.

NOTE:

 If you tap the reverse button while the cutting 

tool is still rotating, the tool comes to stop and to be 

ready for reverse rotation.

Electric brake

This tool is equipped with an electric brake for the cut

-

ting tool. If the tool consistently fails to quickly stop the 

cutting tool after the switch trigger is released, have the 

tool serviced at our service center.

CAUTION:


This brake system is not a substi-

tute for the protector. Never use the tool without 

the protector.

 An unguarded cutting tool may result 

in serious personal injury.

Summary of Contents for XRU15PT

Page 1: ...INSTRUCTION MANUAL Cordless Grass Trimmer XRU15 IMPORTANT Read Before Using ...

Page 2: ...llowed to reduce the risk of fire electric shock and personal injury including the following Read All Instructions Failure to follow the warnings and instructions may result in electric shock fire and or serious injury SAVE THESE INSTRUCTIONS General instructions 1 Never allow people unfamiliar with these instructions or children to use the machine Local regulations can restrict the age of the ope...

Page 3: ...ngly recom mended that the user wears work overalls 7 Special gloves made of thick leather are part of the prescribed equipment and must always be worn during operation of the tool 8 When using the tool always wear sturdy shoes with a nonslip sole This protects against injuries from flying debris and ensures a good footing 9 Use a dust mask if operation is dusty Electrical and battery safety 1 Avo...

Page 4: ...y from the nylon cutting head 5 Before starting make sure that the nylon cut ting head has no contact with hard objects such as branches stones etc as the nylon cutting head will revolve when starting 6 Remove any adjusting key wrench or blade cover before turning the power tool on An accessory left attached to a rotating part of the power tool may result in personal injury 7 Make sure there are n...

Page 5: ...king condi tion Poor maintenance can result in inferior per formance and shorten the life of the tool SAVE THESE INSTRUCTIONS WARNING DO NOT let comfort or familiarity with product gained from repeated use replace strict adherence to safety rules for the subject product MISUSE or failure to follow the safety rules stated in this instruction manual may cause serious personal injury WARNING Use of t...

Page 6: ...iant products may result in a fire exces sive heat explosion or leak of electrolyte SAVE THESE INSTRUCTIONS CAUTION Only use genuine Makita batteries Use of non genuine Makita batteries or batteries that have been altered may result in the battery bursting causing fires personal injury and damage It will also void the Makita warranty for the Makita tool and charger Tips for maintaining maximum bat...

Page 7: ... 3 1 Speed indicator 2 ADT indicator ADT Automatic Torque Drive Technology 3 Power lamp 4 Main power button 5 Reverse button 6 Battery cartridge 7 Lock off lever 8 Switch trigger 9 Hanger 10 Handle 11 Protector for nylon cutting head 12 Shoulder harness ...

Page 8: ... not install the battery cartridge forcibly If the cartridge does not slide in easily it is not being inserted correctly Tool battery protection system The tool is equipped with a tool battery protection sys tem This system automatically cuts off power to the motor to extend tool and battery life The tool will auto matically stop during operation if the tool or battery is placed under one of the f...

Page 9: ...ol if it runs when you simply pull the switch trigger without pressing the lock off lever Return the tool to our authorized service center for proper repairs BEFORE further usage WARNING NEVER tape down or defeat pur pose and function of lock off lever CAUTION Before installing the battery car tridge into the tool always check to see that the switch trigger actuates properly and returns to the OFF...

Page 10: ... up This tool has a reverse button to change the direction of rotation It is only for removing weeds and debris entan gled in the tool To reverse the rotation tap the reverse button and pull the trigger when the cutting tool is stopped The power lamp starts blinking and the cutting tool rotates in reverse direction when you pull the switch trigger To return to regular rotation release the trigger ...

Page 11: ...ndle on the upper clamp and fix it with hex socket bolts as illustrated 2 1 3 5 4 6 1 Hex socket bolt 2 Handle 3 Upper clamp 4 Damper 5 Lower clamp 6 Spacer CAUTION Do not remove or shrink the spacer Doing so lose the balance of the tool and may cause personal injury Hex wrench storage CAUTION Be careful not to leave the hex wrench inserted in the tool head It may cause injury and or damage to the...

Page 12: ...u can replace the cutting tool easily NOTICE Be sure to use genuine Makita nylon cutting head 1 2 3 4 6 5 1 Nylon cutting head 2 Receive washer 3 Spindle 4 Hex wrench 5 Tighten 6 Loosen 1 Insert the hex wrench through the hole in the tool head to lock the shaft Rotate the shaft until the hex wrench is fully inserted 2 Place the nylon cutting head onto the spindle and tighten it securely by hand 3 ...

Page 13: ...G Always position the tool on your right hand side Correct positioning of the tool allows for maximum control and will reduce the risk of seri ous personal injury WARNING Be extremely careful to maintain control of the tool at all times Do not allow the tool to be deflected toward you or anyone in the work vicinity Failure to keep control of the tool could result in serious injury to the bystander...

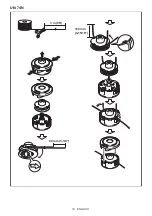
Page 14: ...ever use gasoline benzine thinner alcohol or the like Discoloration deformation or cracks may result To maintain product SAFETY and RELIABILITY repairs any other maintenance or adjustment should be performed by Makita Authorized or Factory Service Centers always using Makita replacement parts Replacing the nylon cord WARNING Use only the nylon cord with diameter specified in this instruction manua...

Page 15: ...15 ENGLISH 95 M10L 3 m 9 ft 80 mm 3 1 8 100 mm 3 15 16 ...

Page 16: ...16 ENGLISH B F ECO 4L 3 m 9 ft 80 mm 3 1 8 100 mm 3 15 16 ...

Page 17: ...17 ENGLISH For Ultra Auto 4 3 m 9 ft 80 mm 3 1 8 100 mm 3 15 16 ...

Page 18: ...18 ENGLISH UN 74N 3 m 9 ft 80 mm 3 1 8 100 mm 3 15 16 ...

Page 19: ...19 ENGLISH Manual feed type When the nylon cord gets short pull it out from the eyelet and feed it from the another eyelet 150 mm 5 29 32 1 mm 1 32 0 75 m 2 5 ft x 2 ...

Page 20: ... foreign object The drive system does not work correctly Ask your local authorized service center for repair Abnormal vibration stop the machine immediately One end of the nylon cord has been broken Tap the nylon cutting head against the ground while it is rotating to cause the cord to feed The drive system does not work correctly Ask your local authorized service center for repair Cutting tool an...

Reviews: