10 ENGLISH
Quick reference
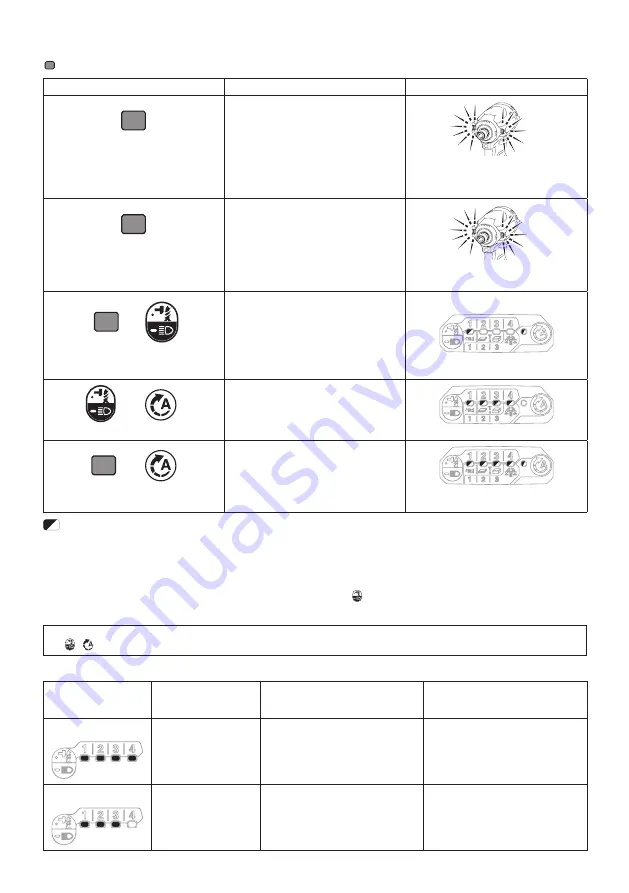
The following table shows the functions of the quick mode-switching button.
indicates the quick mode-switching button.
Button(s) / Purpose
Action
How to confirm
(When quick mode-switching function
is OFF)
Changing the impact force by the quick
mode-switching button
Press
The front lamps on the tool flash once.
(When quick mode-switching function
is ON)
Switching to the registered application
mode
Press
The front lamps on the tool flash once.
+
Registering the application mode
Press and hold (each button)
Example: Wood mode is registered
The lamp of desired application mode
blinks.
+
Erasing the registered application mode
Press and hold (each button)
All impact force grade lamps blink.
+
Disabling/resuming the quick
mode-switching button
Press and hold (each button)
All lamps on the panel blink.
: The lamp is blinking.
Changing the impact force
You can change the impact force in four steps: 4 (max), 3 (hard), 2 (medium), and 1 (soft).
This allows a tightening suitable to the work.
The level of impact force changes every time you press the button or the quick mode-switching button.
You can change the impact force within approximately one minute after releasing the switch trigger.
NOTE:
You can extend the time to change the impact force approximately one minute if you press the but
-
ton ,
, or the quick mode-switching button.
►
Fig.9
Application mode
(Impact force grade
displayed on panel)
Maximum blows
Purpose
Example of application
4 (Max)
4,400 min
-1
(/min)
Tightening with the maximum force
and speed.
Driving screws to underwork materi-
als, tightening long screws or bolts.
3 (Hard)
3,600 min
-1
(/min)
Tightening with less force and speed
than Max mode (easier to control than
Max mode).
Driving screws to underwork materi-
als, tightening bolts.


