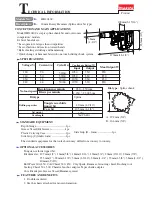


7. Remove rear cover by loosening
tapping screw 4x18.
And then loosen Hex Nut M6
with holding fan with your hand.
(see Fig.8)
8. Remove crank housing.
(see Fig. 8)
9. Remove armature together with
gear housing from motor housing
by hitting the armature shaft after
removing fan. (see Fig.8)
10.Assembling armature
Install ball bearing 6000 and
oil seal 12 on gear housing by
pressing them.
(see Fig. 9)
(4) Removing Chuck section
1. Remove tool holder cap by sliding down
sleeve 46.
And then the sleeve 46 can be removed
from the machine. (see Fig. 4)
Remove cuck cover by hitting its edge
with plastic hammer slightly. (see Fig.5)
2. Remove compression spring 50 after
removing retaining ring S-50.
And then remove crank housing cover
after taking off pan head screw. (see Fig. 4)
3. Remove ring spring 29. (see Fig.10)
< Note >
The ring spring 29 can be removed easily
with repairing tool No.1R-212.
Tapping screw 4x18
Fan
Rear cover
Hex Nut M6
Fix rod
Motor housing
Crank housing
Controller
Pick up coil
Gear housing complete
Ball bearing 6000
Oil seal 12
Gear housing complete
Armature
Baffle plate
< Note >
Apply the grease to
the part marked with
on oile seal 12.
Fig. 8
Fig. 9
Ring spring 29
Repairing tool No.1R-212.
Fig. 10


