


(2) Installing Change Lever Complete
(1) Removing Change Lever Complete
Set Change Lever Complete at neutral position,
and slightly hit the back side of lock button with a plastic hammer to remove it.
(See Fig.1.)
2. Install change lever on crank housing
with setting crank pin 4 into the upper hole of
change link.
( The change lever has to be set at hammering position.)
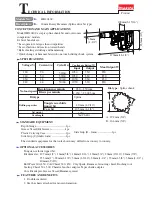
Figure 1
1. Change link is constructed to be slidden up and down.
Slide the change link upward with your finger.
(See Fig.2)
plastic hammer
Lock button
Change lever
at neutral position.
Figure 2
(See Fig 3A)
Remark
Do not operate the machine without change lever.
Otherwise it causes damage of the inner mechanism.
Change link
slided upward
with finger
Upper hole of change link
Crank pin 4 has to be
set into the upper hole
of change link
Change lever
Figure 3
Position of
Crank pin 4
( The change lever has to be set at hammering position.)
Figure 3A


