P
6
/
12
R
epair
[3] DISASSEMBLY/ASSEMBLY
[3]-2. Bit Holder Section and Anvil of BTW110
DISASSEMBLING
ASSEMBLING
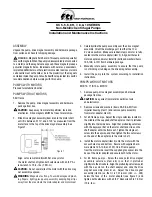
Remove Ring spring 8 and O ring 5 from Anvil as illustrated in
Fig. 10
.
When using the removed Ring spring 8 again, correct it in the following manner. (
Figs. 11 and 12
)
Fig. 10
Fig. 11
Fig. 12
Remove Ring spring 8 with
1R004.
And remove O ring 5 which
is put under Ring spring 8.
Ring spring 8
Note
: The removed Ring spring 8 is deformed in this step.
It is recommended to use the new Ring spring.
However, in case the Ring spring has to be reused,
refer to
Figs. 11 and 12
.
Insert 1R222 on Anvil to which the
Ring spring 8 is set.
Ring spring 8 can be fit into the groove
on Anvil.
O ring 5
Anvil
8mm
1.15mm
1R237
Set ring spring 9 to 1R237 which is
used as a Jig and correct the deformed
Ring spring 8 with pliers as illustrated
in
Fig. S
.
10.0mm
7.7mm
The dimensions as it was
of Ring spring 8
Fig. S
Ring spring 8
Anvil
1R222
Ring spring 8