background image

73D0129

33

DVKHL Series Gas Fireplace

SIGnature cOMManD - OptIOnaL Fan BLOwer SySteM

To Junction Box
In Fireplace

WHITE

BLACK

WHITE

BLACK

BLACK

WHITE

GREEN

Connector
Pin To Contro l Box

{

{

Light

Optional

AUX

FP2684
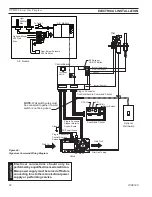
BLOTKHLSC fan wiring

Blower (300w Max)

Figure 47 -
BLOTKHLSC Blower Wiring Diagram

FP2705

control Box

n

O

te

the  black  and  white  wires  on  the ac  box 
wiring harness are marked ‘Blower’, ‘Light’ 
and  ‘aux’.  It  is  important  to  use  the  wires 
marked ‘Blower’ or the control will not work 
correctly.

w

arn

In

G

electrical  connections  should  only  be 
performed by a qualified licensed electrician. 
Main power supply must be turned off before 
connecting  the  fan  to  the  main  electrical 
power supply or performing service.

BLOtKHLSc SIGnature cOMManD BLOwer

electrical  Grounding  Instructions:  this 
appliance  is  equipped  with  a  three-prong 
(grounding) plug for your protection against 
shock hazard and should be plugged directly 
into  a  properly  grounded  three-prong 
receptacle.

w

arn

In

G

The BLOTKHLSC Blower Kit requires the SCSACM A/C 
Module  and  the  TSFRSC  remote  to  install  and  operate 
this  kit.  Refer  to  blower  instructions  for  installation  and 
remote instructions for operation.

Summary of Contents for 400DVKHL

Page 1: ...or additional information consult a qualified installer service agency or the gas supplier This appliance may be installed in an aftermarket permanently located manufactured home USA only or mobile ho...

Page 2: ...Burner 29 To Turn Off Gas 29 Check Gas Pressure Signature Command 30 Electrical Installation Signature Command 30 Electrical Wiring 30 Junction Box Wiring 31 Command Center Wall Installation 31 Wall...

Page 3: ...ank s inside any structure Locate propane LP supply tank s outdoors To prevent performance prob lems do not use propane LP fuel tank of less than 100 lbs capacity 3 If you smell gas shut off gas suppl...

Page 4: ...for servicing and proper operation 17 When the appliance is installed directly on carpeting tile or other combustible material other than wood floor ing you must set appliance on a metal or wood pane...

Page 5: ...H ELEVATIONS Input ratings are shown in BTU per hour and are certified without deration for elevations up to 4 500 feet 1 370 m above sea level For elevations above 4 500 feet 1 370 m in USA installat...

Page 6: ...B 35Z x 902 mm 39Z x 1003 mm C 32 813 mm 36 914 mm D 22Z x 572 mm 24Z x 622 mm E 28Z 714 mm 32Z 816 mm F 30 762 mm 30 762 mm G 38M zn 976 mm 38M zn 976 mm H 23M 606 mm 23M 606 mm I 44C 1127 mm 44C 112...

Page 7: ...ation or other materials This could cause a fire NOTE COLD CLIMATE INSULATION If you live in a cold climate seal all cracks around your appliance and wherever cold air could enter the room with noncom...

Page 8: ...appliance Never obstruct the front opening of the fireplace Do not install in the vicinity where gasoline or other flammable liquids may be stored Vent pipe routing Refer to the Venting section found...

Page 9: ...om the mantel ceiling and side wall 6 5 3 21 2 41 2 45 1 31 2 FP2129 mantel leg 11 2 FP2129 Fireplace Opening Figure 5 Mantel clearances Top View WARNING Follow these instructions carefully to ensure...

Page 10: ...mbustible materials i e brick tile slate steel or other materials with a UL fire rating of Zero may be used to cover the black painted face of the appliance It is permissible to bring combustible wall...

Page 11: ...ystem could result in serious injury property damage or loss of life NOTICE Failure to follow these instructions will void the warranty 1 FP2131 Vent pipe clearances 1 3 73 1854 mm 24 Vertical Rise Re...

Page 12: ...A Vent System in an Outside Chase below If pipe is enclosed in chase it is not exposed It is very important that the venting system maintain its balance between the combustion air intake and the flue...

Page 13: ...ly above the meter regulator assembly 5 m above the meter regulator assy I Clearance to service regulator vent outlet 3 91 cm 3 91 cm J Clearance to nonmechanical air supply inlet 6 15 cm for applianc...

Page 14: ...to the face of the outer wall must not exceed 16 4 9 m Sidewall Vent Graph showing the relationship between vertical and horizontal dimensions for a Direct Vent flue system Figure 10 Rear Wall Ventin...

Page 15: ...ase of the flue collars to the center of the wall opening Figure 12 Step 4 Using appropriate length of pipe section s attach to fire place with three 3 screws Follow with the installation of the elbow...

Page 16: ...ber of offsets and horizontal vent length The horizontal vent run refers to the total length of vent pipe from the flue collar of the fireplace or the top of the Transition Elbow to the face of the fi...

Page 17: ...on depth down to 7 178 mm below grade level The 7 178 mm is measured from the center of the horizontal vent pipe as it penetrates through the wall Ensure that sidewall venting clearances are observed...

Page 18: ...allowed in the system is 270 Figure 23 The minimum height of the vent above the highest point of penetration through the roof is 2 610 mm FP1183 max height 40 Maximum Height 12 Minimum Height 10 Maxi...

Page 19: ...rpendicular to each other NOTE Pay special attention to these installation instructions for required clearances air space to combustibles when passing through ceilings walls roofs enclosures attic raf...

Page 20: ...combustible material 4 Connect a section of pipe and extend up through the hole NOTE If an offset is needed to avoid obstructions you must support the vent pipe every three 3 feet Use wall straps for...

Page 21: ...er must supply an external regulator The external regulator will reduce incoming gas pressure You must reduce incoming gas pressure to between 11 and 13 inches of water If you do not reduce incoming g...

Page 22: ...ikely to freeze A sediment trap collects moisture and contaminants and keeps them from going into the burner system gas controls If sediment trap drip leg is not installed or is installed wrong burner...

Page 23: ...nter clockwise 2 or 3 turns and then place tubing to pressure gauge over test point Turn unit to high Figure 30 After taking pressure reading be sure and turn captured screw clockwise firmly to reseal...

Page 24: ...to cool before proceeding 2 Clean the inside of the firebox wall and floor where the blower and wires will be installed Make sure the firebox wall and floor are clean and dry before mounting the blowe...

Page 25: ...x Run the two wires mentioned earlier up the left firebox wall and snap wires into clip assembled in 10 on the outer shell wall Make the connection to the left blower Replace the refractory and hearth...

Page 26: ...re 36 Blower Access Covers FP2136 blower access plates Figure 35 Blower Access Covers FP2136 Figure 38 Attach Blowers to Brackets Figure 37 Install New Louvers FP2233 attach blower brackets 1 09 FP223...

Page 27: ...attempted repair may result in a fire or explosion D Do not use this appliance if any part of it has been under water Immediately call a qualified service technician to inspect the appliance and to r...

Page 28: ...The gas control knob is designed to be operated by hand DO NOT use any tools during this operation Damaged knobs may result in serious injury WARNING 1 Depress and turn knob counterclockwise to pilot...

Page 29: ...ing the burner Depress and turn the knob counterclockwise to the ON position Figure 41 It will take less than four 4 seconds for the burner to ignite Pilot position Depress and turn knob to pilot posi...

Page 30: ...ace is equipped with the Signature Control valve which operates on 6 volts The AC adapter plugs into the fireplace junction box A C power supply Four 4 AA batteries are used for back up during power o...

Page 31: ...ot extend beyond the 15 ft wire cable provided If a longer distance is required the 15 ft may be extended up to 30 ft maximum by using two 2 SCSWEK cables plugged together Route the wire from junction...

Page 32: ...Connector Control Board to Solenoid Gas In Gas Out Pilot Gas Tubing Valve A C Module FP2704 SCS wiring diagram To Outlet Light 300 Watt Max Optional Blower 300 Watt Max Rear Burner Solenoid 300 Watt...

Page 33: ...correctly WARNING Electrical connections should only be performed by a qualified licensed electrician Main power supply must be turned off before connecting the fan to the main electrical power supply...

Page 34: ...ow the gas supplier s instructions If you cannot reach your gas supplier call the fire department C Use only your finger to push in the master switch Never use tools If the switch will not function by...

Page 35: ...gas go to next step 4 Press the master switch to the ON position Within eight 8 seconds it will beep once This indicates the system is ready 5 Press ON button Sparker will spark and pilot flame will l...

Page 36: ...battery Indication for Transmitter X Child Proof Lock out X LCD Backlight X Security Codes 16 X Countdown 6 hr Timer X Standard Thermostatic Control Mode X Smart Mode Thermostat Auto Flame Blower Modu...

Page 37: ...s button One beep for RF receiver ON or two beeps for RF receiver OFF will be given as confirmation Refer to Figure 48 for location 2 After the RF receiver is on holding the OFF button on the Command...

Page 38: ...Low then Off 3 Hold the OFF button anytime for three seconds or by turning off the wall switch These two commands of OFF are Memory Off the system will remember all last settings before turning off T...

Page 39: ...s The blue LED backlight lights up for 8 seconds when any of the touch buttons is pressed The menus include TIMER THERMO LIGHT FAN and AUX Rear Burner Control The adjustment arrows include ON up and O...

Page 40: ...n and the green LED on the Command Cen ter will flash for 10 seconds FP2649 set privace code Figure 51 FP2650 command ctr ctrl brd RF Receiver ON OFF Control Board Figure 52 FP2650 command ctr ctrl br...

Page 41: ...ro 6 To exit Timer Mode a Push and hold the TIMER button for 3 seconds Or b Use the OFF down buttons to decrease the Set Time to zero Or c Slide down on the arrow buttons to exit TIMER mode and shut o...

Page 42: ...he blower speed will take effect right away if the fireplace is off the receiver will remember this setting and the blower is still off see blower On Delay and Off Delay in the next section 4 After th...

Page 43: ...ons then press TIMER but ton and THERMO button at the same time for 3 sec onds The backlight will flash once to indicate that the setting has changed to B 2 When the current setting is B pressing TIME...

Page 44: ...heck battery installation or replace batteries 3 LCD display shows funny display 3 Reset the transmitter see Resetting the Transmitter section 4 Appliance does not come on 2 The transmitter did not ma...

Page 45: ...f the glass toward the glass 4 Remove glass frame by releasing the three latches located at the top of the firebox Tilt glass away from the unit lift glass frame up and away from the unit Figure 63 FP...

Page 46: ...d to secure the panel in place 4 Place the rear lower panel by setting it over the channel behind the light socket Make sure the grout line lines up with the one on the side 5 NOTE Have the left panel...

Page 47: ...e wide end toward the back and the branch toward the front and left Set the log by having the protrusion on the bottom of the log rest to the left side of the grate bar and behind the pilot shield Als...

Page 48: ...surface of the middle log When this log is in place the pointed end will come in contact with the back of the pilot log placed in step 2 Step 6 LG599 KHLDV upper right log LG599 6 Place the right uppe...

Page 49: ...gs clean by vacuuming or brushing at least twice a year Make sure the burner porting pilot air opening and burner air opening are free of obstructions at all times Pilot Flame The flames from the pilo...

Page 50: ...s may be used Handle glass door with care to avoid striking or scratching it on hard objects To clean glass door follow Glass Removal procedure outlined in the Final Installation section Film deposit...

Page 51: ...hermocouple connection at the gas valve is fully inserted and tight Disconnect the thermocouple from the valve place one millivolt lead wire on the tip of the thermocouple and the other meter lead wir...

Page 52: ...he pilot flame for maximum flame impingement on thermocouple A Check for flue product leak Replace defective pipe section B Check horizontal venting piping is running upward 1 4 per foot Do not run th...

Page 53: ...h Battery polarity wrong LED on the Command Center does not show solid green The 5 pin connector on the AC board broken or bent AC plug is plugged to AC mains Battery voltage low Using battery Check v...

Page 54: ...t shown 1 26D2128K 26D2128K 5 Light Lens 1 73D0022 73D0022 6 Panel Access Door 2 73D0029K 73D0029K 7a Cottage Clay Firebrick Set 1 FBKHLDV40CC FBKHLDV500CC 7b Cottage Red Firebrick Set 1 FBKHLDV400CR...

Page 55: ...73D0129 55 DVKHL Series Gas Fireplace REPLACEMENT PARTS Standing Pilot Millivolt control 1 3 4 5 6 7 8 2C 2I 2T 2 10 11 12 13 14 730024 khldv mv valve parts...

Page 56: ...030 69D0030 69D0030 69D0030 5 Rocker Switch 1 41D0048 41D0048 41D0048 41D0048 6 Piezo Igniter 1 14D0503 14D0503 14D0503 14D0503 7 Rear Injector 1 58D0102 58D0052 57D0679 57D0680 7 Front Injector 1 57D...

Page 57: ...73D0129 57 DVKHL Series Gas Fireplace REPLACEMENT PARTS SIGNATURE COMMAND SYSTEM 730024 KHLDV SG parts 12 08 1 2 3 4 14 5a b c d e 6 7a b 8a b 9 13 16 17...

Page 58: ...1 57D0612 58D0056 56D3059 62D3005 8a Rear Burner Assembly 1 73D3270 73D3270 73D3268 73D3268 8b Front Burner Assembly 1 73D3269 73D3269 73D3267 73D3267 9 Venturi 1 45D0600 45D0600 45D0600 45D0600 10 W...

Page 59: ...s REPLACEMENT PARTS Item Description Qty 400DVKHL 500DVKHL 1 Log 1 1 73D0539 73D0200 2 Log 2 1 73D0540 73D0201 3 Log 3 1 73D0541 73D0202 4 Log 4 1 73D0542 73D0203 5 Log 5 1 73D0543 73D0204 6 Log 6 1 7...

Page 60: ...60 73D0129 DVKHL Series Gas Fireplace HOT 1 2 3 4 5 6 9 7 8 10 730024 KHLDV vent parts VENTing components REPLACEMENT PARTS...

Page 61: ...K Heat Deflector Firestop 90 Elbow and Adjustable Pipe 11 to 14 24 Section of Pipe 2 1 Vertical Termination see below see below 5DT VC 2 1 Extended Vertical Termination 58DVA VCE 1283 2 1 High Wind Ve...

Page 62: ...cordance with the above provisions shall comply with NFPA 720 and ANSI UL 2034 listed and IAS certified Signage A metal or plastic identification plate shall be permanently mounted to the exterior of...

Page 63: ...ifetime Warranty will also be void if the appliance is not operated and maintained according to the operating instructions supplied with the appliance and does not extend to 1 firebox burner assembly...

Page 64: ...ris Kentucky 40361 www mhsc com Efficiency Ratings Model EnerGuide Ratings Fireplace Efficiency 400DVKHLNV 69 6 400DVKHLPV 78 2 400DVKHLNSC 73 2 400DVKHLPSC 82 2 500DVKHLNV 75 2 500DVKHLPV 69 8 500DVK...

Reviews: