background image

© MAHLE 

14  |  ACX2120H  |  Commissioning

en

6.


Commissioning


t

All the operations described in Section 5 and 6 must be per

-

formed prior t

rvice.

6.1


Connections and positioning


m

The ACX2120H is designed for 110V, 50/60Hz. Follow the 

information on the ACX2120H rating plate.

1.  

Set the A

ration-proof surface.

2.  

Actuate the caster brake to stop the ACX2120H from rolling.

3.  

Connect the power supply cable to the power supply.

4.  

Switch on the main switch.


m

The unit must be positioned on a stable, horizontal surface to 

ensure correct operation. Unit must be in an area with proper 

ventilation and at least 10cm from any potential obstacle to 

its internal ventilation.


m

Keep unit out of rain and excessive humidity as moisure could 

cause irreparable damage.


m

Prevent exposure to direct sunlight and excessive dust.


m

Unit must be properly grounded with the power plug ground 

pin. Failure to ground unit can cause damage and constitutes 

a risk of fatal injury or shock to the operator.


t

Do not unplug any internal electrical connections and only 

have internal components opened and repaired by trained 

customer service personnel.


t

Contact customer service in the event of any transportation 

damage (e.g. oil leakage).


t

Leave quick couplings closed when unit is not in use and at 

end of vehicle service operations.

6.2


First start-up verification


X

Check the service hoses for damage.


X

Firmly connect the service quick-release cou -

plings to the service hoses.


X

Wear protective goggles.


X

Wear protective gloves.

Execute the following actions in sequential order by following the 

procedure as shown on the display:


Gas weight check (vacuums entire refrigerant circuit to 

ensure no contaminants are in system prior t


First int


o

It is possible to interrupt the initial check and print a report 

in which the status of the check is reported (if printer option 

was purchased).


t

Equipment cannot operate in automatic mode until all the 

steps of initial check are completed.

1.  

Set the internal cylinder 

to desired quantity (min. 3kg).

2.  

Follow on-screen instructions.

3.  

Make sure hoses are disconnected from any external source 

at this time.

4.  

Start the procedure that initially creates vacuum in the internal 

refrigerant circuit (approximately 15 minute process).

5.  

Once message is displayed, the unit can be connected to the 

external cylinder and the valves opened.

6.  

Just before the targeted refrigerant amount is reached, unit 

will pause and prompt user to close external refrigerant tank 

connection.

7.  

Once this is done, the unit will continue to recover the refriger -

ant from the hoses and end once this is completed. The total 

amount recovered will then be displayed.


t

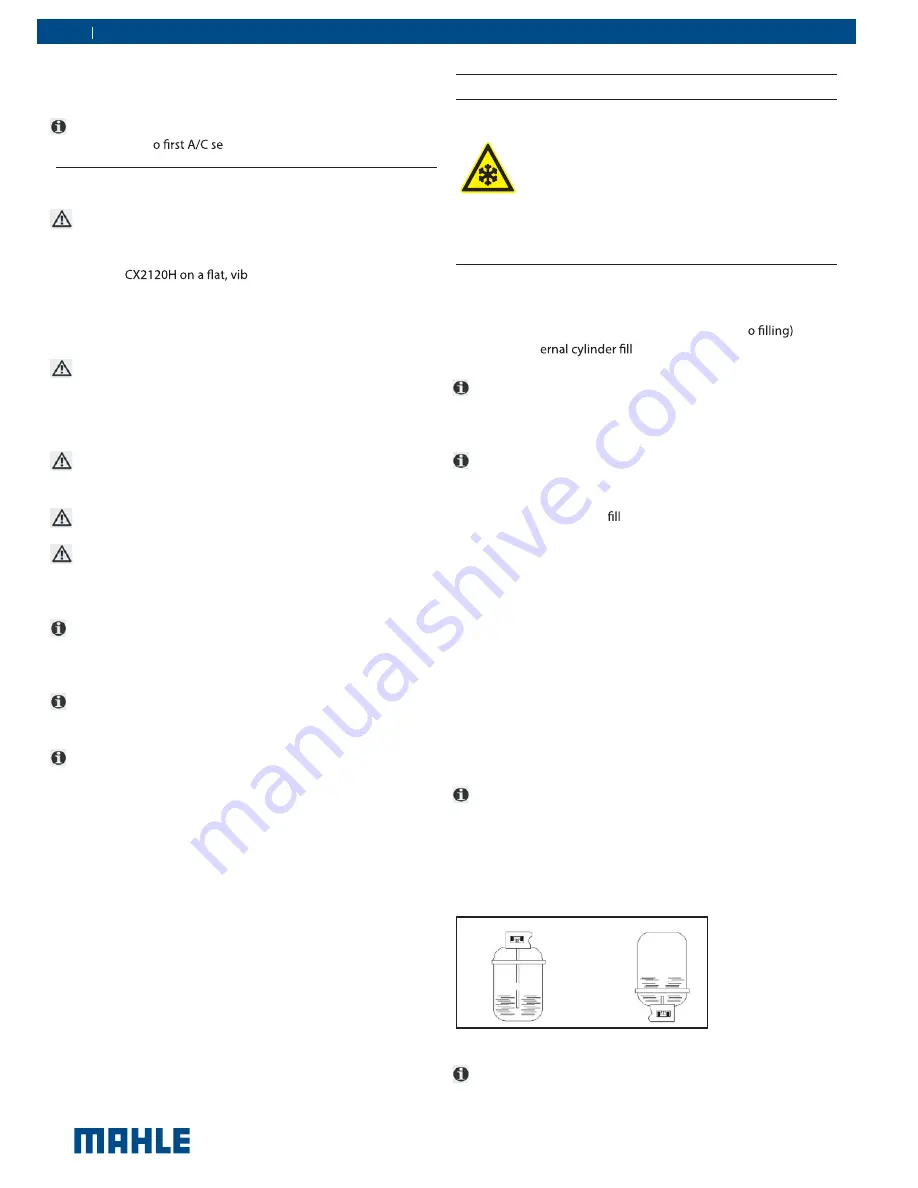
Check the type of source tank, two types are available:


Connect to the the liquid valve and keep tank in the upright 

position to transfer refrigerant.


Refrigerant cylinder without plunger (single valve):

Refrigerant cylinder with plunger (typically 2 valves):


Connect to the available valve and invert tank to transfer 

refrigerant.

Fig. 13:   Virgin refrigerant cylinder tank types


t

The LP (blue) gauge indicates the pressure inside the external 

cylinder.

Refrigerant causes frostbite on the skin

Warning - Risk of frostbite from escaping 
refrigerant

Summary of Contents for ArcticPRO ACX2120H

Page 1: ...EN Operation manual A C Service Equipment MAHLE ACX2120H...

Page 2: ...5 Equipment installation 13 5 1 Unpacking ACX2120H 13 5 2 Load cell screw release 13 6 Commissioning 14 6 1 Connections and positioning 14 6 2 First start up veri cation 14 7 Setup 15 7 1 ACX2120H 15...

Page 3: ...1 Multipass 24 10 12 System info 24 10 13 Software update 25 10 14 Refrigerant weight accuracy check 25 10 15 Printer maintenance 26 10 16 Periodic checks 26 11 27 12 27 12 1 A C Service unit disposal...

Page 4: ...tective goggles X Wear protective gloves 2 Important notes Beforestartup connectingandoperatingMAHLE products it is absolutely essential that the Original instructions owner smanualand inparticular th...

Page 5: ...towards making to work in are carried out Electrical engineering in Germany is subject to the accident prevention regulations of the trade association Electrical Plant and Equipment as under BGV A3 pr...

Page 6: ...becontaminatedwithmoisture lubricant dirtandtraces of other gases If the refrigerant has been contaminated by being mixed with other gases remove the contaminated refrigerant and add fresh R134a befor...

Page 7: ...ice if components have to be replaced other than in the course of maintenance work ACX2120Hmustbeconnectedtoaproperlygroundedelectri cal connection If there is damage to the ACX2120H terminate usage i...

Page 8: ...e ACX2120H can only be operated with R134a The ACX2120H is not to be used for service work on vehicles with air conditioning systems employing refrigerants other than R134a as this will cause damage P...

Page 9: ...Locking Caster 9 Rear Wheel 10 Used Oil Bottle 11 Printer optional 1 2 3 4 1 1 2 3 5 4 2 Fig 2 Rear View 1 Service Hoses 2 Fan 3 Vent 4 Hose Storage Fig B USB Ports 1 USB Type B device port to PC 2 US...

Page 10: ...ice functions are available in the pages shown on the LCD display Data entry and moving of the cursor is controlled by the keypad The LCD displays the service equipment s status the progress of A C sy...

Page 11: ...coLOCK is the intelligent coupler that with the suitable auto mated procedure in the software enables to reduce the amount of non condensible gases formed inside the cylinder avoid the refrigerant los...

Page 12: ...t 22lbs Method to weigh gas content Load cell Recovered oil container 250ml Vacuum pump 2CFM dual stage Vacuum pump oil quantity 250ml Compressor capacity 0 87cu in 14cc Dr ter 75kg of recovered R134a...

Page 13: ...ps and remove the carton Fig 9 Fig 9 Removing carton 2 Cut straps securing unit to pallet 3 With 2 people lift both front wheels by levering with the handle so unit is setting on the rear wheels Fig 1...

Page 14: ...tive gloves Executethefollowingactionsinsequentialorderbyfollowingthe procedure as shown on the display Gas weight check vacuums entire refrigerant circuit to ensure no contaminants are in system prio...

Page 15: ...E is highlighted and press 2 Adjust whether the Recharge mode is in Quick mode or Zero tolerance by pressing If Zero Tolerance mode is selected press to highlight the pressure and use to adjust the va...

Page 16: ...t SAVE then press to save selection 4 Unit will restart upon saving the language selection m If a language is selected that is not understood simply switch unit depress enter key and turn unit back on...

Page 17: ...e used for air conditioning systems repaired using a chemical sealant Non compliance will void the warranty m Neverattempttoclosethevalvesoftheinternalrefrigerantbottle while the ACX2120H is in operat...

Page 18: ...lection and move to next parameter The following options are available HP only LP only HP and LP HP LP Injection through HP hose on the system low pressur t Third row of information displays the vacuu...

Page 19: ...misempty operatormustexitandselectavacuumprocess m There is potential for unit to display an error during this service for high internal pressure This can occur due to high operating temperatures or h...

Page 20: ...instructions 9 2 5 Pressure check t This process is used to check the pressure inside the vehi cle s A C system using the ACX2120H 1 Connect HP LP couplers to the vehicle A C system 2 Follow on screen...

Page 21: ...e goggles X Wear protective gloves t Before the ACX2120H can be used the internal refrigerant cylinder must be with liquid refrigerant Use only R134a refrigerant t The refrigerant can be obtained from...

Page 22: ...until CYLINDER REFRIGERANT VIEW is highlighted and press 2 Screen will display the Total refrigerant weight and the Avail able refrigerant weight Fig 25 Refrigerant weight screen t Available refriger...

Page 23: ...Long life pump screen 10 9 Vacuum pump oil change t After 60 hours of runtime or 1000 hours if the Long Life Pump test is completed successfully the vacuum pump oil must be replaced 1 Disconnect ACX2...

Page 24: ...ect the HP and LP couplers and hoses and allow the hose drain process to run to completion 4 Disconnect Turn front locking latch using a flathead screwdriver and carefully open the front housing ACX21...

Page 25: ...power cord to power supply and switch on unit 4 From the MAINTENANCE menu press until REFRIG Erant weight accuracy check is highlighted and press 5 Press YES tocontinuewhenthescreeninFig 34appears Fig...

Page 26: ...peration Make sure no corrosion or leakage is present in the in ternal cylinder and other metallic parts of the equipment under normal conditions the internal cylinder life is at least 20 years If aut...

Page 27: ...or by its reseller Con tact technical support for replacement parts not listed above 12 Disposal 12 A C Service unit disposal 12 2 Recycled material disposal 12 3 Packaging disposal At the end of its...

Page 28: ...ting an external suitable tank with safety valve W032 NO PRESSURE VEHICLE WITHOUT REFRIGERANT OR DISCONNECTED During the refrigerant recovery phase Hoses not connected Couplers not opened Check connec...

Page 29: ...the internal tank Check calibration and calibrate if necessary A037 FURTHER REFRIG ERANT INJECTION NOT POSSIBLE During gas injection phase Hoses not connected to vehicle A C system Couplers closed Va...

Page 30: ...MAHLE 30 ACX2120H Maintenance forms en 14 Maintenance 14 1 Vacuum pump oil change Vacuum pump oil change record Date Maintenance t Maint tech signature and stamp...

Page 31: ...MAHLE Maintenance forms ACX2120H 31 en Vacuum pump oil change record Date Maintenance technician identification Maint tech signature and stamp...

Page 32: ...MAHLE 32 ACX2120H Maintenance forms en 14 2 Filter dryer change Filter Dryer Change Record Date Maintenance t Maint tech signature and stamp...

Page 33: ...MAHLE Maintenance forms ACX2120H 33 en Filter Dryer Change Record Date Maintenance technician identification Maint tech signature and stamp...

Page 34: ...MAHLE 34 ACX2120H Maintenance forms en Filter Dryer Change Record Date Maintenance technician identification Maint tech signature and stamp...

Page 35: ...LE Maintenance forms ACX2120H 35 en 14 3 Refrigerant load cell calibration check Refrigerant Load Cell Calibration Check Record Date Result of check pass fail Maintenance t Maint tech signature and st...

Page 36: ...MAHLE 36 ACX2120H Maintenance forms en Refrigerant Load Cell Calibration Check Record Date Result of check pass fail Maintenance technician identification Maint tech signature and stamp...

Page 37: ...MAHLE Maintenance forms ACX2120H 37 en 14 4 Other checks maintenance repairs Filter Dryer Change Record Job Date Result of check pass fail Maintenance t Maint tech signature and stamp...

Page 38: ...MAHLE 38 ACX2120H Maintenance forms en Filter Dryer Change Record Job Date Result of check pass fail Maintenance technician identification Maint tech signature and stamp...

Page 39: ...MAHLE Notes ACX2120H 39 en 15 Notes...

Page 40: ...2019 03 04 035 82681 00 REV A MAHLE Aftermarket Inc Service Solutions 10 Innovation Drive York PA 17402 USA 717 840 0678 www servicesolutions mahle com...

Reviews: