ASSEMBLY INSTRUCTIONS
MAGNUM INDUSTRIAL MI-91520 DELUXE 14” BAND SAW
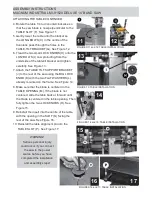
ATTACHING THE STORAGE BRACKETS
The MI-91520 is equipped with onboard storage
brackets to store the rip fence and miter gauge
when not in use. Attach the rip fence storage
bracket and miter gauge storage brackets to the
back of the saw as shown in Figures 5 and 6, us-
ing the bolts and washers already mounted to the
saw.
ATTACHING THE TABLE
The worktable mounts on a bracket.
This bracket can adjust from 0° to 45°
to the right. These adjustments are easy
to make with the angle scale and lock
knobs.
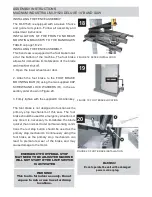
1. Remove the RED INSERT (A) from
the centre of the table and the
TABLE ALIGNMENT PIN (B) from
the table slot. See Figure 7.
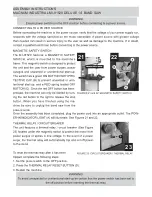
2. Turn the table right side up.Verify
that the LONG BOLTS (C) in the
centre of each trunnion are pointing down. See Figure 8.
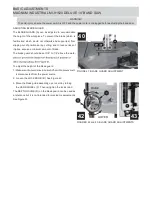
3. Carefully position the table over the TABLE”TILT BRACKET (D), guiding the saw
blade through the TABLE SLOT (E). See Figures 9 and 10.
Note: If the long bolts have moved out of position, have an assistant tap them into place with a
screw driver.
FIGURES 5 and 6: STORAGE
FIGURE 7: TABLE INSTALLATION
FIGURES 8, 9 and 10: TABLE INSTALLATION
5
6
7
9
8
10
D
Summary of Contents for MI-91520
Page 1: ...OPERATING MANUAL MODEL NO MI 91520...
Page 17: ...INSTALLATION OF THE FENCE...
Page 18: ...INSTALLATION OF THE MEASURING TAPE AND POINTER...
Page 19: ...INSTALLATION OF THE RESAW GUIDE...
Page 20: ...LEVELING THE FENCE VERTICAL ADJUSTMENT OF THE FENCE 90 TO THE TABLE...
Page 21: ...ALIGNMENT OF THE FENCE PARALLEL TO THE MITER SLOT...
Page 24: ......
Page 25: ......
Page 27: ......
Page 28: ......
Page 29: ......
Page 30: ......
Page 32: ......
Page 33: ...PARTS LISTS FOR RS FENCE...
Page 34: ......
Page 35: ...MITER GAUGE FENCE JIG...


