background image

DVD/CD Player

MWD200G

Supplied Accessories

Before Using Your Unit

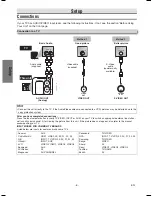
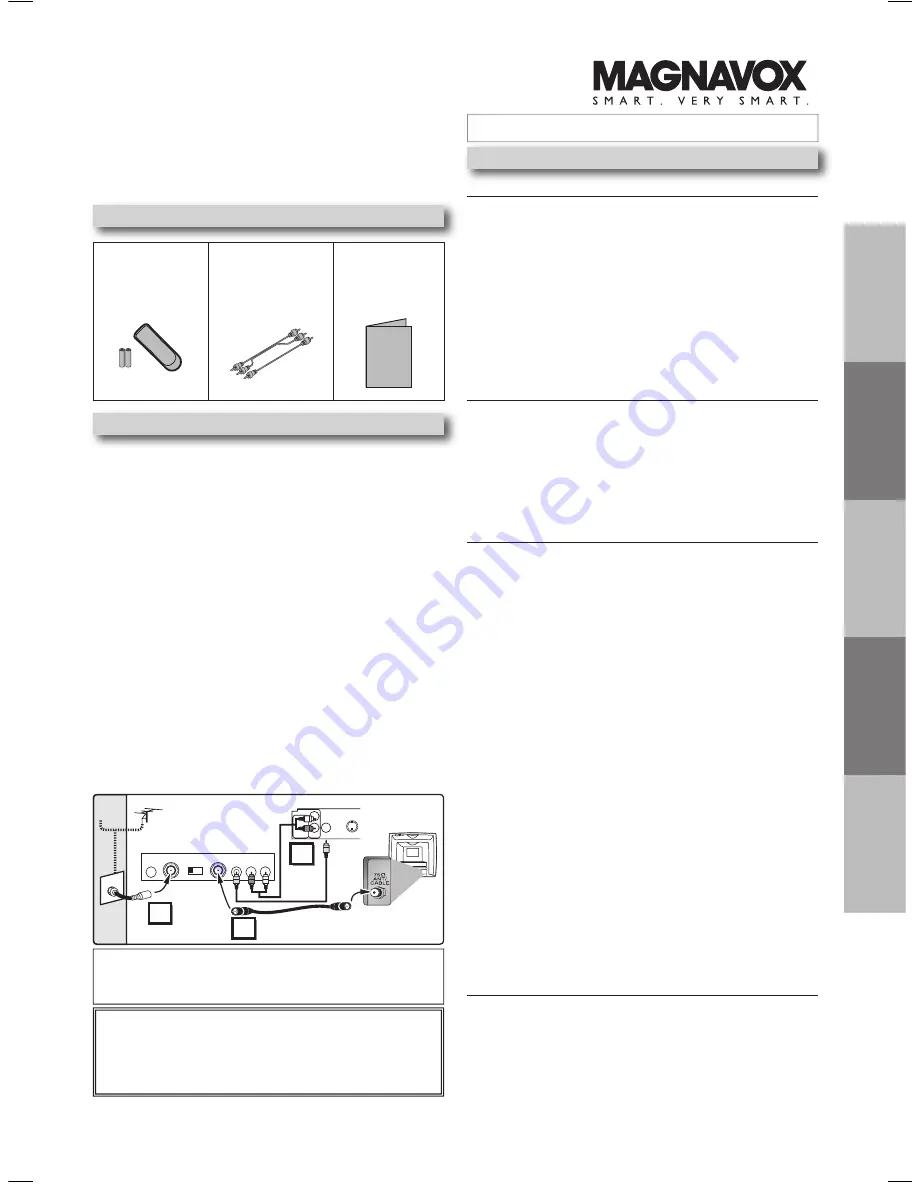
If your TV has AUDIO/VIDEO input jacks, see the section 

“Connections” on page 6.

 If not, it is still possible to con-

nect this unit to your TV by using a STEREO AUDIO/VIDEO 

RF modulator (commercially available). In this case, follow 

the instructions below. 

1) Connect the AUDIO/VIDEO output jacks of this unit to the 

AUDIO/VIDEO input jacks of your RF modulator by 

Audio / Video cables.

2) The antenna input jack of your TV may have been already 

occupied. If so, disconnect the RF cable from your TV, 

and then connect the RF cable to your RF modulator 

(usually marked “ANT IN”).

) Connect your RF modulator to your TV by another RF 

cable.

4) Set your RF modulator’s channel /4 switch to either  or 

4, whichever the TV channel is least used in your area. If 

your RF modulator has a modulator/antenna switch, set it 

according to your RF modulator’s manual.

5) Turn on your TV and choose the same channel as you 

set the RF modulator’s channel /4 switch to. For more 

details, follow the instructions supplied with the RF modu-

lator.

Hint

• 

The quality of picture may become poor if the unit is con-

nected to an RF modulator.

AUDIO OUT

L

R

DIGITAL

AUDIO OUT

COAXIAL

VIDEO

OUT

S-VIDEO

OUT

STEREO AUDIO / VIDEO RF Modulator

(commercially available)

TO TV

CHANNEL

VIDEO

AUDIO

R

L

3

4

ANT IN

AC 120V

(Back of TV)

Audio/Video

Cables

(Supplied)

(Back of this unit)

RF Cable (Not supplied)

Antenna

Cable

Signal

3

2

1

Antenna in jack

If your TV does not have AUDIO / VIDEO input jack.

Owner’s Manual

Please read before using this unit.

If you need additional operating assistance 

after reading this owner’s manual, please call

TOLL FREE : 1-800-605-8610

or visit our web site at http://www.funai-corp.com

Table of Contents

INSTRUCCIONES EN ESPAÑOL INCLUIDAS.

Remote control 

(NB070UD/ 

NB079UD) with 

two AA batteries

Audio/Video cables

(WPZ0102TM015/

WPZ0102LTE01)

Owner’s Manual 

(1VMN21954)

Owner's Manual

Precautions

Setup

Functions

Information

Español

Precautions

Laser Safety ...................................................................2

■ 

IMPORTANT SAFEGUARDS ........................................3
Location and Handling ....................................................4
Avoid the Hazards of Electrical Shock and Fire .............4
Warning of Dew Formation .............................................4
About Copyright ..............................................................4
Symbols Used in This Manual ........................................4
Maintenance ...................................................................4

■ 

About the Media............................................................5
Playable Media ...............................................................5
Unplayable Media ...........................................................5

Setup

■ 

Connections ..................................................................6
Connection to a TV .........................................................6
Connection to an Audio System .....................................7
Rear Terminals ...............................................................7

■ 

About the Remote Control ...........................................8
Remote Control ..............................................................8
Installing the Batteries for the Remote Control ..............8

Functions

■ 

Playback ........................................................................9

■ 

On-Screen Display ......................................................10

■ 

Search Function .........................................................10
Using Track Search ......................................................10
Using Title / Chapter Search ........................................10
Using Time Search .......................................................11
Marker Setup ................................................................11

■ 

Repeat / Random / Programmed Playback ..............12
Repeat Playback ..........................................................12
Repeat A-B Playback ...................................................12
Random Playback ........................................................12
Programmed Playback .................................................12

■ 

Special Settings ..........................................................13
Subtitle Language .........................................................1
Audio Language ...........................................................1
Camera Angles .............................................................1
Black Level Setting .......................................................1
Stereo Sound Mode......................................................1
Virtual Surround ............................................................1

■ 

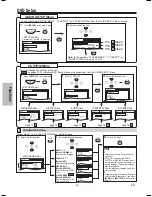
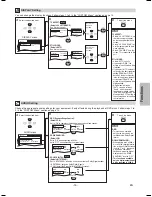
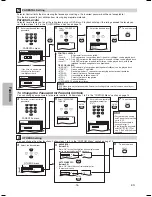
DVD Setup ...................................................................14
LANGUAGE Setting .....................................................14
DISPLAY Setting ..........................................................15
AUDIO Setting ..............................................................15
PARENTAL Setting ......................................................16
OTHERS Setting ..........................................................16
Reset to the Default Setting
(except for PARENTAL Setting) ...................................17

Information

■ 

Troubleshooting Guide ..............................................17

■ 

Specifications .............................................................18

■ 

Language Code List ...................................................18

■ 

Limited Warranty ........................................................18

■ 

Español ........................................................................19

■ 

Quick Use Guide .........................................Back Cover   

MWD200G_E6AA0UD_1UH_V2.indd   1

2006/05/08   11:04:49

Summary of Contents for MWD200G

Page 1: ...does not have AUDIO VIDEO input jack Owner s Manual Please read before using this unit If you need additional operating assistance after reading this owner s manual please call TOLL FREE 1 800 605 8610 or visit our web site at http www funai corp com Table of Contents INSTRUCCIONES EN ESPAÑOL INCLUIDAS Remote control NB070UD NB079UD with two AA batteries Audio Video cables WPZ0102TM015 WPZ0102LTE0...

Page 2: ...ocate the receiving antenna 2 Increase the separation between the equipment and receiver Connect the equipment into an outlet on a circuit different from that to which the receiver is connected 4 Consult the dealer or an experienced radio TV technician for help This Class B digital apparatus complies with Canadian ICES 003 Cet appareil numérique de la classe B est conforme à la norme NMB 003 du Ca...

Page 3: ...zed plug 13 Power Cord Protection Power supply cords should be routed so that they are not likely to be walked on or pinched by items placed upon or against them paying particular attention to cords at plugs convenience recep tacles and the point where they exit from the product 14 Lightning For added protection for this product during a lightning storm or when it is left unattended and unused for...

Page 4: ...service and adjustment inside the cabinet call a qualified dealer or an Authorized Service Center Be sure to remove disc and unplug the AC power cord from the output before carrying this unit Moisture may form inside this unit under the following condi tions Immediately after a heater is turned on In a steamy or humid room When this unit is suddenly moved from a cold to warm environment If moistur...

Page 5: ... video format and finalized can be played back Unfinalized discs cannot be played back Depending on the recording status of a disc the disc may not be played back at all The picture or sound may not be smooth etc 9 If the recorded portion of the disc is too small smaller than 55mm across it may not be played back 10 Do not glue paper or put stickers on to the disc These may damage the disc and the...

Page 6: ...pictures may be distorted due to the copy protection system Admiral AUX Curtis Mathis LINE1 LINE2 00 90 91 92 9 GE INPUT TV VCR 00 90 91 92 9 Hitachi INPUT AUX JVC VIDEO VIDEO1 VIDEO2 VIDEO Kenwood AUX LXI Series 00 Magnavox AUX CHANNEL Panasonic TV VIDEO RCA INPUT TV VCR 00 90 91 92 9 Samsung TV VIDEO Sanyo VIDEO Sharp 00 Sony VIDEO1 VIDEO2 VIDEO Toshiba TV GAME Zenith 00 INPUT MODES FOR COMMON T...

Page 7: ... Hint Playing a DVD using incorrect settings may generate noise distortion and may also damage the speakers Connection to an Audio System Rear Terminals AUDIO OUT L R DIGITAL AUDIO OUT COAXIAL VIDEO OUT S VIDEO OUT AUDIO OUT analog jacks Connect the supplied audio cable red white here through the audio in jacks of a TV or other audio equipment S VIDEO OUT jack Connect an optional S Video cable her...

Page 8: ...CLEAR To clear the markers To clear the numbers To cancel the point for A B repeat To clear the markers To remove status number in program input To clear the numbers entered incorrectly To cancel the point for A B repeat DISPLAY To display the current disc mode To display the current disc mode REV FWD To search forward back ward through a disc To begin slow forward reverse playback during the paus...

Page 9: ... being switched to the 2nd layer This is not a malfunction Operations described in this section are mainly based on the remote control use Some operations can be carried out on main unit STANDBY ON AUDIO SUBTITLE ANGLE REPEAT CLEAR A B PAUSE SETUP TOPMENU MENU ENTER MODE ZOOM RETURN SLOW SKIP OPEN CLOSE DISPLAY SEARCH MODE 1 2 3 4 5 6 7 8 9 0 10 PLAY REV FWD STOP 4 3 1 Playback Hint On DVDs set ST...

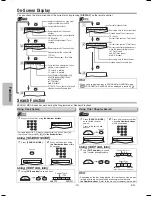
Page 10: ...ly when the repeat setting is active C Chapter repeat T Title repeat A B A B repeat 11 16 0 00 00 0 03 30 1 3 0 00 00 1 23 45 T L1 BIT RATE The amount of audio and video data currently being read Layer numbers appears only when playing a two layered Disc L0 Layer 0 is playing L1 Layer 1 is playing DISPLAY DISPLAY DISPLAY DISPLAY DISPLAY 1 2 4 3 1 2 3 Hint When you are playing a disc in PROGRAM or ...

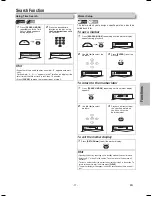
Page 11: ...s in the Time Search display if the total time of the title or track is less than 10 minutes Press CLEAR to erase the incorrect input at step 2 1 2 3 4 5 6 7 8 9 0 This feature allows you to assign a specific point on a disc to be called back later To set a marker ENTER ENTER 1 Press RETURN to exit the marker display RETURN SEARCH MODE Hint Opening the disc tray or putting unit in standby mode wil...

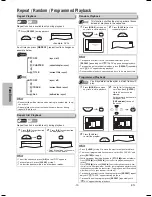
Page 12: ...me discs or during repeat A B playback Hint To repeat the current track in the random selections press REPEAT repeatedly until TRACK appears during playback To repeat the entire random selections press REPEAT repeatedly until ALL appears during playback During random playback you cannot go back to the previous track Hint Press CLEAR at step 2 to erase the most recently entered track To erase all p...

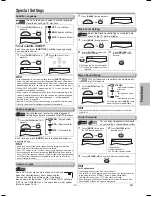
Page 13: ...nu Refer to the manual accompanying the discs for details Hint For CD playback only The setting will be kept even if the unit is turned off On Audio CD s Virtual Surround will not be effective if the sound mode is set to something other than STEREO Refer to Stereo Sound Mode Turn down the level or select OFF if the sound is distorted When playing back 96kHz with Virtual Surround function the sound...

Page 14: ...TAL ON ON BITSTREAM SETUP DISPLAY TV ASPECT STILL MODE 4 3 LETTER BOX AUTO SETUP LANGUAGE AUDIO SUBTITLE DISC MENU PLAYER MENU ORIGINAL OFF ENGLISH ENGLISH 1 Press SETUP in the stop mode SETUP QUICK CUSTOM INITIALIZE SETUP QUICK PLAYER MENU TV ASPECT DOLBY DIGITAL ENGLISH 4 3 LETTER BOX BITSTREAM QUICK SETUP Menu Refer to the sections PLAYER MENU TV ASPECT or DOLBY DIGITAL on page 14 or 15 You can...

Page 15: ... 3 PAN SCAN 16 9 WIDE ANGLE ICON ON AUTO POWER OFF ON TV ASPECT 4 3 LETTER BOX STILL MODE AUTO ANGLE ICON ON AUTO POWER OFF ON ON OFF OFF ON TV ASPECT 4 3 LETTER BOX STILL MODE AUTO STILL MODE AUTO FIELD FRAME 5 6 To exit the menu SETUP SETUP DRC Dynamic Range Control Default ON Set to ON to compress the range between soft and loud sounds DOLBY DIGITAL QUICK Default BITSTREAM Set to BITSTREAM when...

Page 16: ...et to ON to show the angle icon when multiple camera angles are available during DVD playback AUTO POWER OFF Default ON Set to ON to turn this unit off automatically after 30 minutes of no use TV ASPECT 4 3 LETTER BOX 4 3 PAN SCAN 16 9 WIDE ANGLE ICON ON AUTO POWER OFF ON TV ASPECT 4 3 LETTER BOX STILL MODE AUTO ANGLE ICON ON AUTO POWER OFF ON ON OFF OFF ON TV ASPECT 4 3 LETTER BOX STILL MODE AUTO...

Page 17: ...ital connections Check if the audio format of the selected audio language matches your receiver capabilities Picture freezes momentarily during playback Check the disc for finger prints scratches and clean with a soft cloth wiping from center to edge Disc can t be played Clean the disc Ensure the disc label is facing up Check if the disc is defective by trying another disc Cancel the parental lock...

Page 18: ... original packaging or packag ing affording an equal degree of protection to any AUTHORIZED SERVICE CENTER FUNAI CORP will not reimburse you for any service done by unauthorized service providers without prior written approval To locate your nearest Authorized Service Center or for gen eral service inquiries please contact us at FUNAI CORPORATION Customer Service Tel 1 800 605 8610 http www funai ...

Page 19: ...el punto para la repetición A B Para borrar los marcadores Para eliminar el Nº de estado en la entrada de programa Para borrar los números mal entrados Para borrar el punto para la repetición A B DISPLAY Para mostrar el modo de disco actual Para mostrar el modo de disco actual REV FWD Para buscar en avance ret roceso por un disco Para empezar la reproducción en avance lento retroceso durante el mo...

Page 20: ...ition A B To repeat between your chosen point of A and B To repeat between your chosen point A and B ANGLE To select camera angles on a disc AUDIO To select audio lan guage on a disc To select STEREO L ch or R ch CLEAR To clear the markers To clear the numbers To cancel the point for A B repeat To clear the markers To remove status number in program input To clear the numbers entered incorrectly T...

Reviews: