


hand
TFT
tatus,
and a
en will
blank
prevent the
To change the icon theme and the wallpaper
HOME
]
button.
ings”
uch
apers
g up/
the photo of mobile storage.
stored
[Set
g brake
safety
7
Main menu
Main Menu
Touch the
[
HOME
]
button to enter main
source menu.
1
9
6
8
7
2
5
4
3
1. Show current player source.
2. Hold and drag down to show the
3. Car AV system source bar:
Touch and hold the center of the bar and
drag left/right to show more icons.
Touch desired icon to enter corresponding
mode.
4. Clock.
5. Enter music menu. (USB or SD card)
6. Enter radio mode.
7. Show applications list.
8. Enter bluetooth phone mode.
9. Enter NAVI mode.
Applications Menu
Touch [
] to enter applications menu.
1. IN-CAR
Car AV applications.
2. APPS
Show the Android applications installed.
In the list menu, drag left/right to scroll.
Touch and hold an icon for more than 2
seconds to add shortcut to the desktop. To
delete the shortcut, hold it and drag to the
[ ] on the top, and release after it turns
red.
Touch the [ BACK ] button on the panel to
exit.
Disc Operation
Insert a Disc
Insert a disc into the slot, and the unit will
change to disc mode automatically.
Notes:
Please confirm whether there is a disc in
the unit before you insert another one.
The unit will exit current playing source and
enter DVD mode when one disc is inserted.
The following disc formats are supported:
CD-R, CD-RW, DVD-R, DVD+R, DVD-RW,
DVD + RW .
Eject the Disc
Press [ ] on the panel to eject the disc.
Notes:
After ejecting the disc, the unit reverts to
another source automatically.
If the disc is not removed from the unit
within 10 seconds, the disc will be reloaded
to prevent accidental damage.
Disc Playback
When a disc is inserted, the display will
show “Loading...”. For MP3/WMA or a disc
with mixed files, reading time may exceed 1
minute.
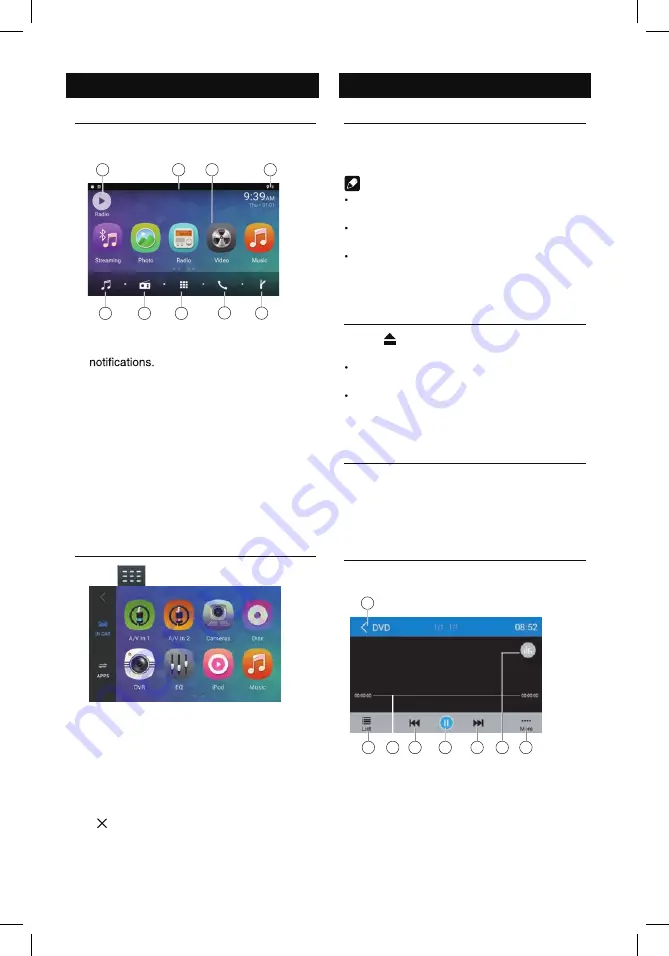
DVD Playback Menu
During playback, touch the screen (except top
left corner) to show control buttons.
1
7
8
6
5
4
3
2
1. Return to home menu
2. Show DVD menu
3. Progress bar
4. Previous chapter
5. Play/Pause
6. Next chapter
7. Enter preset EQ menu
8. Show more control buttons
7
Main menu
Main Menu
Touch the
[
HOME
]
button to enter main
source menu.
1
9
6
8
7
2
5
4
3
1. Show current player source.
2.
e
h
t
w
o
h
s
o
t
n
w
o
d
g
a
r
d
d
n
a
d
l
o
H
3. Car AV system source bar:
Touch and hold the center of the bar and
drag left/right to show more icons.
Touch desired icon to enter corresponding
mode.
4. Clock.
5. Enter music menu. (USB or SD card)
6. Enter radio mode.
7. Show applications list.
8. Enter bluetooth phone mode.
9. Enter NAVI mode.
Applications Menu
Touch [
] to enter applications menu.
1. IN-CAR
Car AV applications.
2. APPS
Show the Android applications installed.
In the list menu, drag left/right to scroll.
Touch and hold an icon for more than 2
seconds to add shortcut to the desktop. To
delete the shortcut, hold it and drag to the
[ ] on the top, and release after it turns
red.
h
c
u
o
T
the [ BACK ] button on the panel to
exit.
Disc Operation
Insert a Disc
Insert a disc into the slot, and the unit will
change to disc mode automatically.
Notes:
Please confirm whether there is a disc in
the unit before you insert another one.
e
h
T
unit will exit current playing source and
enter DVD mode when one disc is inserted.
The following disc formats are supported:
CD-R, CD-RW, DVD-R, DVD+R, DVD-RW,
DVD + RW .
Eject the Disc
Press [ ] on the panel to eject the disc.
Notes:
After ejecting the disc, the unit reverts to
another source automatically.
If the disc is not removed from the unit
within 10 seconds, the disc will be reloaded
to prevent accidental damage.
Disc Playback
When a disc is inserted, the display will
show “Loading...”. For MP3/WMA or a disc
with mixed files, reading time may exceed 1
minute.
DVD Playback Menu
During playback, touch the screen (except top
left corner) to show control buttons.
1
7
8
6
5
4
3
2
1. Return to home menu
2. Show DVD menu
3. Progress bar
4. Previous chapter
5. Play/Pause
6. Next chapter
7. Enter preset EQ menu
8. Show more control buttons
1
2
3
4
5
6
8
7
1
9
8
7
6
2
5
4
3


