12
INSTALLATION INSTRUCTIONS
GROUNDING INSTRUCTIONS
This appliance must be grounded. In the event of malfunction or breakdown, grounding
provides a path of least resistance for electric current in order to reduce the risk of elec-
tric shock. This appliance is equipped with a cord that includes an equipment-grounding
conductor and a grounding plug. The plug must be plugged into an appropriate outlet
that is properly installed and grounded in accordance with all local codes and ordinanc-
es.
DANGER –
Improper connection of the equipment-grounding conductor can result in a
risk of electric shock. The conductor with green insulation (with or without yellow stripes)
is the equipment-grounding conductor. If repair or replacement of the cord or plug is
necessary,
DO NOT
connect the equipment-grounding conductor to a live terminal.
Check with a qualified electrician or serviceman if you do not completely and thorough-
ly understand the grounding instructions, or if you are in doubt as to whether the appli-
ance is properly grounded. Do not modify the plug provided with the appliance – if it will
not fit the outlet, then it will be necessary to have a proper outlet installed by a qualified
electrician.
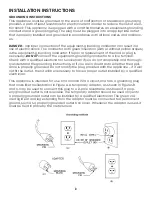
This appliance is intended for use on a nominal 120 V circuit, and has a grounding plug
that looks like the illustration in Figure A. A temporary adaptor, as shown in Figures B
and C, may be used to connect this plug to a 2-pole receptacle as shown if a prop-
erly grounded outlet is not available. The temporary adaptor should be used only until
a properly grounded outlet can be installed by a qualified electrician. The green col-
ored rigid ear and lug extending from the adaptor must be connected to a permanent
ground, such as a properly grounded outlet box cover. Whenever the adaptor is used, it
must be held in place by the metal screw.


