background image

Magellan NAV 6500/NAV 6510

63

4

T

Tutorial

utorial

40 00 00.00

30 00 00.00

This section will walk you through creating waypoints, creat-
ing a route, editing the route, and, finally, activating the route
you created.  The area chosen for this example was intention-
ally selected so that there is little or no land mass to interfere
with the tutorial.  You may follow along with your receiver,
just bear in mind that coordinate values displayed in this tu-
torial may differ from the ones you view on your receiver.

Some of the steps and features displayed can be performed in
other manners.  For example, in this tutorial, a waypoint could
have been created using the MARK key or created from the
waypoint list.  The objective here is to demonstrate the cre-
ation of waypoints and routes using the Map Screen.

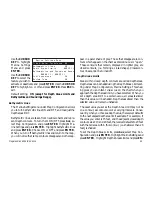
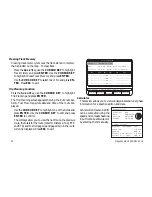
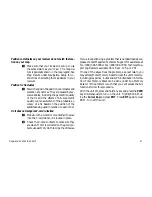
The first step is to look at the Map Screen we are going to use.
The receiver has been turned on and the 

NxtScrn

 softkey

pressed, causing the Map Screen to be displayed.  Next, the

Hide

 softkey is pressed to allow a larger area of the map to

be displayed. The cursor is moved with the 

Cursor Key

 until

the area in which the route is to be created is displayed.

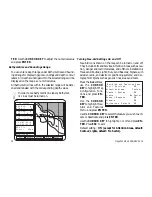
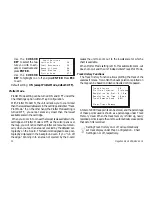
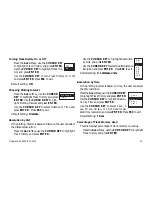
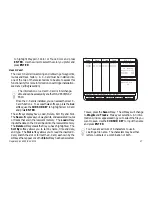
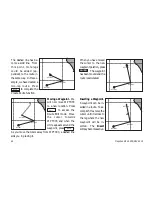
Press 

Waypts

 to access the

waypoints map screen.  Use
the 

CURSOR KEY

 to

move the cursor (arrow) to
the location of a waypoint
that will be used in the
route.

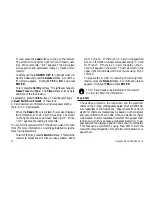
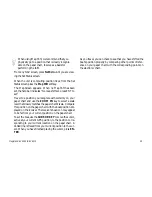
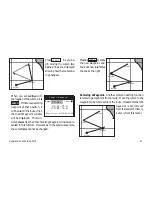
Press the 

Create

 softkey.

Summary of Contents for NAV 6500

Page 1: ...NAV 6500 NAV 6510 User Manual M A G E L L A N...

Page 2: ...ansmitted in any form or by any means electronic or mechanical including photocopying and recording for any purpose other than the purchaser s personal use without the written permission of Magellan C...

Page 3: ...Magellan NAV 6500 NAV 6510 User Manual...

Page 4: ...data with extreme caution USE PROPER ACCESSORIES Use only Magellan cables and antennas the use of non Magellan cables and antennas may severely degrade performance or damage the receiver and will void...

Page 5: ...rientation 14 Track Plot Mode 15 Viewing Nav Aid Attributes 15 Finding Distance Bearing from a Point on the Map 17 Viewing Tide Information 18 Viewing Port Information 18 NAV 1 Screen 19 NAV 2 Screen...

Page 6: ...f a Route 34 Moving a Waypoint in a Route 35 Replacing a Waypoint in a Route Using Text Edit 35 Activating a Leg of a Route 36 Deleting a Route on the Map 37 Deleting a Route in the List 37 Copying a...

Page 7: ...53 Choosing Plotting Interval 53 Resolution by Dist 53 Resolution by Time 53 Percentage of Track Memory Used 53 Clearing Track Memory 54 Trip Planning Function 54 Calculator 54 Calculating Sunrise Sun...

Page 8: ...Coordinate Systems 93 What Is GPS 95 Explanation of Data Terms 97 Glossary 99 Index 102...

Page 9: ...It is very important that you go through the Getting Started chapter first as it prepares your receiver for use and provides basic instruction The third chapter is a Reference Section for the feature...

Page 10: ...more common terms are described here with a simple explanation as to their meaning Position Fix The receiver attains information from GPS satel lites to compute a value coordinates that describes you...

Page 11: ...eys ZOOM IN Changes the displayed map scale to view a smaller area in greater detail ZOOM OUT Changes the displayed map scale to view a larger area in less detail CURSOR KEY Controls cursor movement a...

Page 12: ...AV 6500 NAV 6510 4 Magellan NAV 6500 NAV 6510 GPS Receiver Display Softkeys ZOOM IN ZOOM OUT Cursor Key ENTER Key CTR Center Key GOTO Key MARK Key PWR Power and Light Key ESC Escape Key Cartridge Slot...

Page 13: ...tions you may perform on the current screen Power ON OFF To turn power on Press and release the PWR key The start up screen and navigation warning screen are displayed From the warning screen press an...

Page 14: ...ition time and date is called initializing your receiver initializing enables it to begin track ing satellites and therefore calculating your position much faster You need not reinitialize your receiv...

Page 15: ...n will be displayed with dashes until a position fix is acquired tion press ENTER as you are instructed to do by the help bar Now the help bar displays the word Initializing and the receiver returns t...

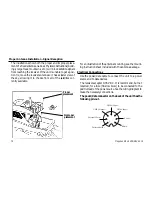
Page 16: ...on is active press CTR and the boat appears at the center of your screen press it again and the cursor is cen tered Also make sure that the unit is computing fixes then it is ready to update navigatio...

Page 17: ...series for data entry Use the UP DOWN indicators on the CURSOR KEY to scroll up and down through the alphanumeric list stop ping on the selection Then use the RIGHT LEFT indi cators on the CURSOR KEY...

Page 18: ...A TUS MAP NAV 1 and NAV 2 From any NAV screen press the Nxt Scrn soft key repeatedly to cycle through the four NAV screens The SAT STATUS screen MAP screen NAV 1 and NAV 2 screens are constantly updat...

Page 19: ...of the line is updated when ever COG changes When the unit is computing fixes the GPS status field will indicate GPS Fix and the active softkeys at the bottom of the Satellite Status screen are Aux Wa...

Page 20: ...s the name of the destination waypoint of the active route if any the distance and bearing from the present position to the destination waypoint the cartographic scale and GPS status as well as COG SO...

Page 21: ...se the ZOOM IN and ZOOM OUT keys to zero in on a small area of the map or pan over a larger area The receiver retains the scale level last used when you go to view other screens or when the receiver i...

Page 22: ...else on the map and is not shown on the screen that cursor position is lost As you scroll across the map the map will follow the cursor movement when the cursor comes near the edge The map redraws wit...

Page 23: ...ON grid and label are turned on automatically even if they are off in the Map Configuration and a warning appears for two seconds to let you know you have zoomed to a scale not supported by cartograph...

Page 24: ...ock Navigational aid generic Expand All Info Set Ref Use Cursor ENT to set reference pnt To Cursor BRG 035 M DTG 7061 n m COG 164 M SOG 0 9 XTE TRN 33 20 66 N 117 31 94 W GPS Fix Scale 6 k h n m Under...

Page 25: ...an find the distance and bearing from one point to an other on the Map screen using a built in measuring stick ENTER Move cursor to Ref Point Set Ref Move cursor to 2nd Point Use the CURSOR KEY to pla...

Page 26: ...rt Info Carlo Forte High Water max 0 51 Ft 17 00L Low Water min 0 18 Ft 09 00L Sunrise 05 54L Sunset 18 59L 0 2 4 6 8 10 12 14 16 18 20 22 24 0 51 0 43 0 35 0 26 0 18 and the tide graph will show the...

Page 27: ...to Go TTG Estimated Time of Arrival ETA and Course Deviation In dicator CDI The boat icon on the CDI points in the direc tion of COG with respect to Bearing BRG The active softkeys are Aux Waypts Rout...

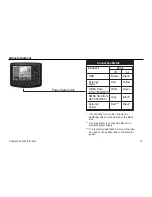
Page 28: ...Aux softkey highlight Navigation Setup and press ENTER Highlight Nav 2 Screen Setup and press ENTER Use the CURSOR KEY to highlight the field you wish to change and press ENTER to access the complete...

Page 29: ...atically name the waypoint or naming it yourself Saving the Cursor Position as a Waypoint Waypts Set Cursor Position Create Modify or Accept Default Data Done From any NAV screen press the Waypts soft...

Page 30: ...the field press ENTER You may now use the CURSOR KEY to move to another field Notes on the Data Fields Name A receiver generated name is automatically generated in the format WPTXXX where XXX is a se...

Page 31: ...any screen except the full map screen press the MARK key The Mark GPS Position window appears or the Mark Cursor Position window appears if the Map screen is shown and the cursor is active You may now...

Page 32: ...ype of the waypoint you wish to find Press ENTER when you have selected the icon and the receiver returns to the Waypoint List with all the waypoints with the icon you selected displayed To return the...

Page 33: ...reen appears Highlight YES to delete or NO to exit and press ENTER If a waypoint is contained in an active route it cannot be deleted without first deactivating the route If a waypoint is contained in...

Page 34: ...he cursor or nearest the present position boat As the help bar indicates you may Review Edit a waypoint in the Nearest list as you would in the Waypoint List see Edit ing a Waypoint Deleting a Waypoin...

Page 35: ...oute Edit Routes A route is a planned course of travel defined by a series of waypoints stored in the receiver s memory These waypoints are then connected to form the segments or legs of the route The...

Page 36: ...evious GOTO route If the previous GOTO route was a GOTO MOB you must confirm to delete it On the Map screen you will notice a solid line showing the GOTO route created from the current position boat i...

Page 37: ...revious GOTO route was a GOTO MOB you must confirm to delete it A solid line shows the GOTO route created from the present position to the cursor position Creating a MOB Route GOTO MOB The MOB or Man...

Page 38: ...A line appears on the map connecting the first point to the second and so on Continue to add waypoints to the route until you have completed it then press the Done softkey Press ESC to exit the route...

Page 39: ...the CURSOR KEY to select the starting waypoint of the route and press ENTER The selected waypoint appears in the first field Use the CURSOR KEY to step down to the next line and press ENTER Select th...

Page 40: ...wish to deactivate and press the Deactiv softkey The arrow to the left of the route number in the list disap pears and the route has been deactivated The display remains on the Route list screen Press...

Page 41: ...ypoint for that position Highlight route ENTER From any NAV screen press Routes List softkeys Use the CURSOR KEY to highlight the route in which you wish to insert a waypoint and press ENTER To edit t...

Page 42: ...ypoint and press ENTER To edit the active route a shortcut is to press Routes Edit Use the CURSOR KEY to place the cursor over the waypoint in the route that you wish to remove Press the Remove softke...

Page 43: ...en press the Routes List softkeys Use the CURSOR KEY to highlight the route in which you wish to move a waypoint and press ENTER To edit the active route a shortcut is to press Routes Edit Use the CUR...

Page 44: ...the Routes List and use the CURSOR KEY to select the route in which you wish to activate a leg Press ENTER then press the Txt Edit softkey If you wish to activate a leg in the active route simply pre...

Page 45: ...Use the CURSOR KEY to highlight the route you wish to delete and press the Delete softkey A confirmation window appears Delete Route Are you sure YES NO Highlight YES and press ENTER The route is dele...

Page 46: ...t activate and deactivate the beeper Auxiliary Functions The receiver offers various auxiliary functions that are acces sible from any of the four NAV screens by pressing the Aux softkey From the Aux...

Page 47: ...se theCURSOR KEY to input Local Offset in hours and press ENTER Press ESC to exit Default setting UTC Initializing Date Time In order for the receiver to locate satellites and compute posi tion fixes...

Page 48: ...Highlight Date Format press ENTER and a window opens that lists MMM DD YY and DD MMM YY Use the CURSOR KEY to highlight your choice and press ENTER to accept Press ESC to exit Default setting MMM DD Y...

Page 49: ...value will always be between 00 and 59 whereas fractions of a minute are expressed in decimal format from 00 to 99 or 000 to 999 Press the Aux softkey use the CURSOR KEY to highlight Navigation Setup...

Page 50: ...ighlight North Reference using the CURSOR KEY press ENTER Use the CURSOR KEY to highlight True or Auto Mag and EN TER to accept Press ESC to exit Default setting Auto Mag Selecting Map Orientation Whe...

Page 51: ...efault setting OFF and press ENTER Use the CURSOR KEY to highlight one of the following parameters BRG COG CTS Drift DTG SOA Set SOG STR TRN VMG XTE Press ENTER to accept Use the same procedure to cha...

Page 52: ...ht Distance Units and press ENTER Use the CURSOR KEY to select desired units and press ENTER Press ESC to exit Default setting Nautical miles Nm Setting Speed Units Speed units can be set to Knots Mil...

Page 53: ...distance of the destination waypoint s of the route The arrival radius can be set between 0 01 and 9 99 distance units Press the Aux softkey use the CUR SOR KEY to highlight CDI Units Alarm and press...

Page 54: ...KEY to set on or off and press ENTER Press ESC to exit Default setting OFF Data Port Setup Functions Setting NMEA Output The receiver can output NMEA messages to interface with external devices such a...

Page 55: ...EA Input and press ENTER Use the CURSOR KEY to select on or off and press ENTER Press ESC to exit Default setting OFF Changing NMEA Input Baud Rate Press the Aux softkey use the CURSOR KEY to highligh...

Page 56: ...ads railways cables and pipelines and Land marks such as buildings water tanks etc Press the Aux softkey use the CURSOR KEY to highlight Map Con figuration Functions and press ENTER Use the CURSOR KEY...

Page 57: ...Those that disappear are con tours which appear on the chart as discontinuous or open Those contours that remain displayed in lighter grey are closed contours i e forming a closed shape Closed con to...

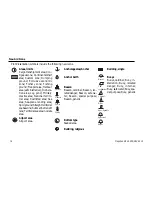
Page 58: ...wn on the map can be turned on and off They include Ports and Services Attention Areas such as cau tion danger and restricted areas and offshore installations Tracks and Routes Lights Buoys and Beacon...

Page 59: ...ayed to show the range of coverage for the light In the No Sector setting the light will be shown without sectors Light House Lights ON light sector shows range of coverage Light House NO SECTOR setti...

Page 60: ...graphy displayed in the background even if you run off the edge Panning into an area not covered by the C card causes the unit to zoom out to the lowest scale for which a chart is available When Plott...

Page 61: ...ey use the CURSOR KEY to highlight Track History and press ENTER Use the CURSOR KEY to highlight Resolution by Dist and press ENTER Use the CURSOR KEY to select desired distance resolution and press E...

Page 62: ...o confirm The softkeys allow you to view the next route the previous route the totals for the route total for Distance Fuel ETE and ETA and to scroll page up and page down in the route currently displ...

Page 63: ...the date is selected the sunrise sunset times and lunar phase information are recalculated and displayed Press ESC Calculating Actual Current Use the CURSOR KEY to access the Actual Current win dow a...

Page 64: ...se the color of Waypoints and Tracks Press the Aux softkey use the CURSOR KEY to highlight Color Setup and press ENTER Use the CURSOR KEY heading NMEA 0183 Different combinations of these sen tences c...

Page 65: ...are in the receiver s memory The Load softkey inputs the data on the C Card back into the receiver s memory The Delete softkey erases the file you have highlighted The Sort By softkey allows you to s...

Page 66: ...a Cartridges section To switch the Slot press the Switch softkey This tells the receiver to access the slot that you have chosen either Slot 1 or Slot 2 If there is no C Card in the specified slot an...

Page 67: ...e the ZOOM IN key to select a scale level that closely matches the paper chart s scale Compare this position on the paper chart with the boat position dis played on the receiver The receiver s boat ic...

Page 68: ...obstructed view of the sky 2 Check the antenna connections Make sure the coaxial cable is firmly secured to the back of the unit Check along the length of the cable to make sure it is not cut With a...

Page 69: ...ted all the way into the C card slot so it is locked in place 2 Check the C card contacts to make sure they are clean If dirt is collected on the gold con tacts use a soft dry cloth to wipe the dirt a...

Page 70: ...Warnings Alarms This message appears when posi tion fix is more than 20 seconds old The alarm will sound when the message appears Is displayed when anchor alarm is on and boat moved more than X XX fr...

Page 71: ...n other manners For example in this tutorial a waypoint could have been created using the MARK key or created from the waypoint list The objective here is to demonstrate the cre ation of waypoints and...

Page 72: ...played The circle around the waypoint indicates that the cursor is pointing to the waypoint and that the waypoint can be edited by pressing the ENTER key The next step is to cre ate a second waypoint...

Page 73: ...int identical to the window dis played earlier appears The only difference is that the co ordinates cannot be changed from this window Press Done WPT001 WPT002 Press the Routes softkey This screen loo...

Page 74: ...ocation Press Edit to access the Route Edit mode Move the cursor towards WPT003 and when the circle appears around the waypoint press Move As you move the cursor away from WPT003 a dashed line aids yo...

Page 75: ...er Creating Waypoint windows pre sented in this tutorial However as in the previous example the coordinates cannot be changed WPT001 WPT002 WPT003 WPT004 WPT001 WPT002 WPT003 WPT004 Pressing Done acce...

Page 76: ...ctivated at a time Activat ing a route automatically deactivates the previous active route An arrow appears next to the number of the activated route in the list and a window appears briefly Route x i...

Page 77: ...ush Mount Installation Instructions 72 Proper Antenna Installation Signal Reception 74 Electrical Connections 74 Wiring Instructions 75 Nav Aid Icons 76 Data Cartridges 81 List of Available Datums 82...

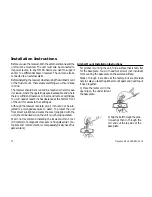
Page 78: ...h the receiver is splash proof it should not be sub jected to prolonged exposure to water To protect the unit from direct sunlight and water the cover supplied with the unit should be used when the un...

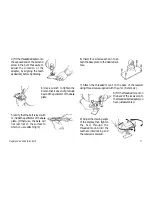
Page 79: ...the perimeter of the base plate 5 Verify that the bolt is level with or inside the perimeter of the base plate Otherwise the base will not rest flat on the surface to which you are attaching it 7 Att...

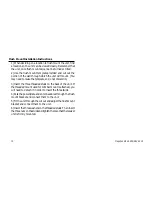
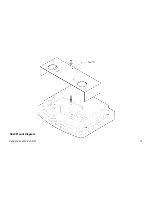
Page 80: ...reuse the template so do not discard it 3 Insert the three threaded studs on the back of the unit If the threaded mount used for Gimbal mount is attached you will need to detach it in order to insert...

Page 81: ...Magellan NAV 6500 NAV 6510 73 Flush Mount Diagram...

Page 82: ...oose from all of the satellites cur rently available 1 2 3 4 5 6 7 NMEA Input NMEA Input Power Shield NMEA Output External Alarm Differential In For an illustration of the antenna mounting see the mou...

Page 83: ...lack wire You may prefer to connect the alarm to a separate power supply It is recommended that a 3 amp in line fuse be used on the positive lead to the external power Connection Matrix Connect Wire D...

Page 84: ...a Con tiguous zone Continental shelf area Custom zone Dumping ground Exclusive economic zone Fishery zone Fishing ground Free port area Harbour area administrative Incinera tion area Log pond Military...

Page 85: ...Road part Run way Sloping ground Square C Cairn Cartographic objects Closing line Cartographic symbol Cartographic line Cartographic area TEXT Line generic Text Area generic National Character Set Te...

Page 86: ...tallation Marine farm culture Mast Meta objects Accuracy of data Compilation scale of data Horizontal datum of data Nautical publication information Production infor mation Sounding datum of data Surv...

Page 87: ...crown Floating dock Gate Grid iron Harbour facility Hulk Landing place Landing stairs Lock basin Oil barrier Pon toon Ramp Shoreline con struction Slipway Weir Small craft facility Production Objects...

Page 88: ...Magellan NAV 6500 NAV 6510 80 Water Turbulence Tideway Water turbulence Weed Kelp Windmill Windmotor Wrecks...

Page 89: ...he cartridge into one of the slots at the bottom of the unit Push the cartridge all the way in When it will go no further press the edge of the cartridge down gently until rests in place behind the pl...

Page 90: ...NDIAN INDIAN 1954 INDIAN 1975 IRELAND 1965 ISTS 73 AS 69 ISTS AS 1968 JOHNSTON 1961 KANDEWALA KERGUELEN 1949 KERTAU 1948 KUSAIE AS 51 L C 5 ASTRO LEIGON LIBERIA 1964 LISBOA LUZON M MERCURY 68 MAHE 197...

Page 91: ...to destination and velocity toward the destination RMC Time latitude longitude speed heading and date VTG Track magnetic and true and groundspeed knots and KPH Your GPS receiver can be set to output...

Page 92: ...c c x x a x x a hh 1 Status V Loran C Blink or SNR warning A general warning flag for other navigation systems when a reliable fix is not available 2 Status V Loran C cycle lock warning flag A OK or n...

Page 93: ...n the WGS 84 earth ellipsoid and mean sea level geoid mean sea level below ellipsoid 12 Units of geoidal separation meters 13 Age of Differential GPS data Time in seconds since last SC104 Type 1 or 9...

Page 94: ...o the course line and which passes through the destination waypoint 14 CHECKSUM Mandatory in this sentence RMC Transit Specific to be followed by RMB 1 2 3 4 5 6 7 8 9 10 12 RMC XXXXXX A XXXX XX N XXX...

Page 95: ...or 0 fix not available or invalid 1 GPS SPS Mode Fix valid 2 Differential GPS SPS Mode fix valid 3 GPS PPS Mode fix valid 7 Number of satellites in use 00 12 may be different from the number in view 8...

Page 96: ...le If range exceeds 999 9 nm display 999 9 11 Bearing True Great Circle Present fix to dest waypoint 12 Closing velocity to destination knots 13 Arrival OR ed arrival circle and crossing of line which...

Page 97: ...alid V invalid 3 5 Cross Track Error Sense L steer left R steer Right N Mi Units 6 7 Arrival Circle Arrival Perpendicular crossing of the line which is perpendicular to the course line and which passe...

Page 98: ...error ESC Escape key ETA Estimated time of arrival FM Fathoms Ft Feet GPS Global Positioning System HDOP Geometric quality INIT POS Initialize position Km Kilometers Kph Kilometers per hour K H Kilom...

Page 99: ...ition PWR Power Key SA Selective Availability SEC Seconds SET REF Set reference SOG Speed over ground SPD Speed TDs Loran based coordinate system TRN Direction to turn TTG Time To Go Txt Crt Text Crea...

Page 100: ...meters second RMS Speed limit up to 951 MPH 1 530 kilometers per hour Time to First Fix Cold start less than 1 minute Warm start 30 seconds Warm start the receiver has obtained a position fix within...

Page 101: ...Each of these sections is called a zone There are 60 zones to cover the entire earth between 84 N and 80 S polar areas are not described by UTM Each zone is 6 wide as projected from the earth s cente...

Page 102: ...by the UTM coordinate system extends to 84 N and to 80 S 6 7 8 9 16 17 18 19 21 22 23 24 26 27 28 29 31 32 33 34 36 37 38 39 41 42 43 44 46 47 48 49 51 52 53 54 56 57 58 59 Other Coordinate Systems O...

Page 103: ...than anyone anticipated DoD has decided that 25 meter ac GPS is a constellation of navigation satellites that orbit the earth The precise time and position information transmitted by these satellites...

Page 104: ...y a radio beacon at the control site to any differential beacon receiver that is within range of the signal The differential beacon receiver receives and demodulates the signal then relays it to the u...

Page 105: ...NM he moved only 30 NM along the courseline If he moves 30 A A 1 B B 1 A 1 A B B 1 N 0 E 90 W 270 S 180 NW 315 NE 45 SW 225 SE 135 BRG Bearing is the direction of a point waypoint or cursor position i...

Page 106: ...estination i e VMG SOG Should the boat veer away from this course and travel in a line parallel to the original courseline A1 B1 it would be travelling on a course that would not intercept the destina...

Page 107: ...cular to your position and the current leg destination waypoint Datum Refers to the theoretical mathematical model of the earth s sea level surface Map makers may use a different model to chart their...

Page 108: ...ee legs with the first leg being from waypoint A to waypoint B Longitude The angular distance east or west of the prime meridian Greenwich meridian as measured by lines perpendicular to the parallels...

Page 109: ...TDs by converting from LAT LON Time To Go The estimated time for the receiver to reach the destination from its current position based on the current VMG True North The direction to the geographical...

Page 110: ...s 2 Contrast 5 39 Coordinate System 41 93 Color Setup 56 Customizing the NAV 2 screen 20 Data cartridges 81 Data input 9 Data Port Setup 46 Date format 40 Distance Units 44 finding distance and bearin...

Page 111: ...ing a waypoint in 33 removing a waypoint 34 replacing a waypoint in a route using text edit 35 Satellite Sat Status 10 General Setup Function 38 Signal reception 74 Simulation Mode 56 Specifications 9...

Page 112: ...Magellan NAV 6500 NAV 6510 104...

Page 113: ......

Page 114: ...630323 960 Overland Court San Dimas CA 91773 USA 909 394 5000...

Reviews: