background image

30

Working with Geocaches

The Magellan eXplorist GC receiver is designed to connect with millions of passionate adventure seekers 
at www.geocaching.com.  Geocaching.com is the premier website for organizing the world’s geocaches.  
Whether you want to learn about geocaching, hide or seek a cache, log your experiences, or find out 
about a local geocaching event, Geocaching.com is your one-stop shop for all things geocaching!  No 
need to worry about clumsy data conversion as the eXplorist GC receiver connects seamlessly with the 
website for popular features such as Send to GPS, Upload Field Notes, and transfer Pocket Queries.

Your purchase of an eXplorist GC receiver comes with a 30 day free trial for a Geocaching.com premium 
membership*.  A premium membership will enable the download of more than 20 unique attributes for 
each geocache, access to “members only” cache listings, Pocket Query generation, and a number of 
other advanced features.  A basic membership is all you need to go geocaching, but the features of the 
eXplorist GC receiver are further enhanced with premium access.

Installing Geocaches (Send to GPS) 

Installing Geocaches with ‘Send to GPS’ (List Page)

1. Go to www.geocaching.com on your browser.

2. Use the search tools on geocaching.com to view a list of geocaches.

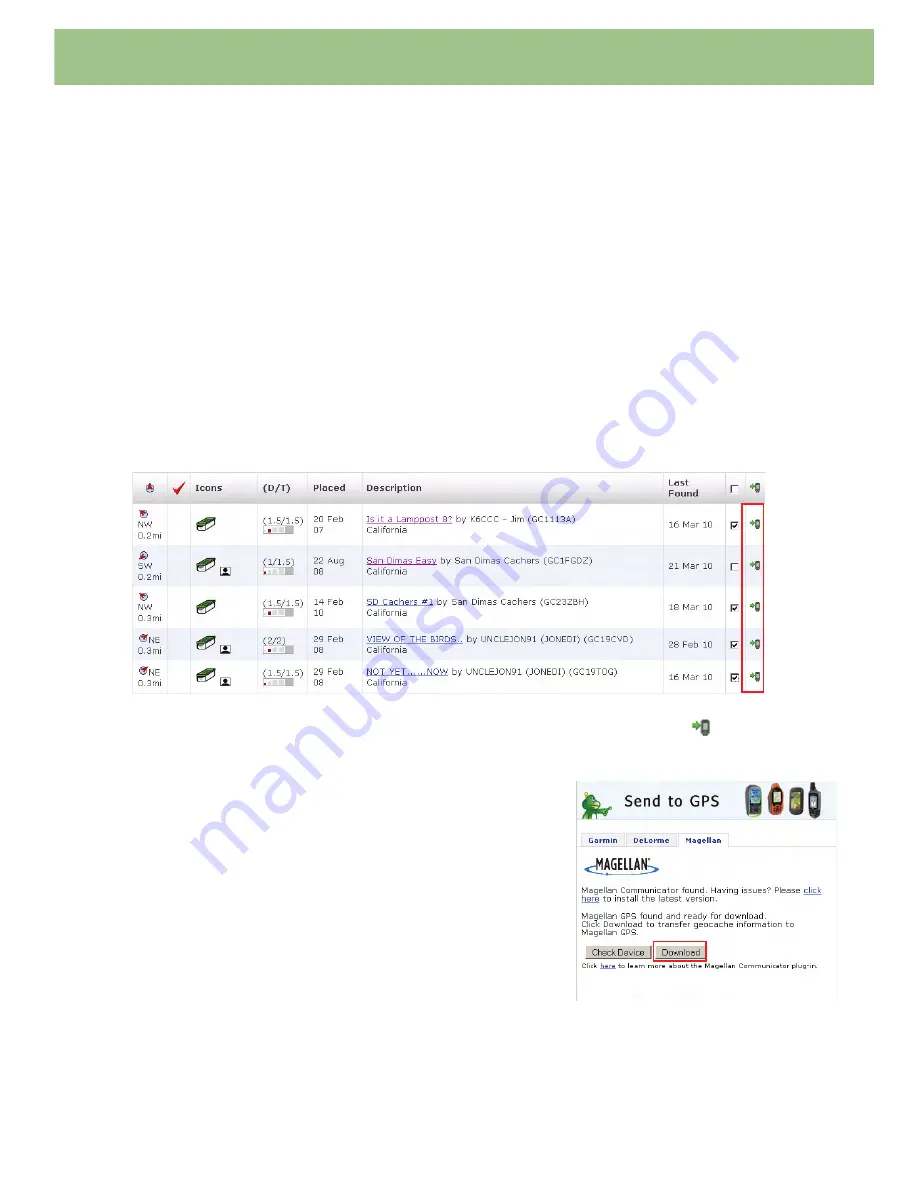
3. In the row indicated above with the red box, click on the ‘Send to GPS’ icon 

which opens the 

“Send to GPS” window.

4. Select the Magellan tab in the “Send to GPS” window. 

5. The Send to GPS function first detects if you have the 

Magellan Communicator installed.  If not, the message 
“Magellan Communicator not found...” appears.  Select 
the “click here” link to install the Magellan 
Communicator.  The Magellan Communicator only 
needs to be installed the first time a connection is made 
between an internet browser and the receiver.

6. Click on the “Download” button.

7. The geocache selected is uploaded to your GPS 

receiver and can be accessed from the 

Geocaches


function of the 

Main Menu

 on your receiver.

If these buttons are greyed out, check to see 
if your browser is requesting you to run 
Active X.

* Annual premium membership fee is $30.

Summary of Contents for eXplorist GC

Page 1: ......

Page 2: ...Radionavigation Plan Accuracy can also be affected by poor satellite geometry and obstructions like buildings and large trees USE PROPER ACCESSORIES Use only Magellan cables and antennas the use of n...

Page 3: ...evice must accept any interference received including interference that may cause undesired operation FCC Caution Any changes or modifications not expressly approved by the party responsible for compl...

Page 4: ...e information provided in this document is subject to change without notice Improvements and enhancements to the product may occur without any formal notification Check the Magellan website www magell...

Page 5: ...Main Menu 8 Selecting an Function 8 The Map Screen 8 Accessing the Map Screen 8 Zooming In and Zooming Out 9 Panning Around the Map 9 Exiting Map Pan Mode 9 Creating a Waypoint at the Pan Cursor Posit...

Page 6: ...Display 14 Selecting Geocache Icons to be Displayed 14 Selecting Waypoint Icons to be Displayed 14 Selecting POI Points of Interest Icons to be Displayed 14 Selecting the Current Location Icon 15 Turn...

Page 7: ...ngs On Off 21 Map Options 21 Selecting Geocache Icons to be Displayed 21 Selecting Waypoint Icons to be Displayed 21 Selecting POI Points of Interest Icons to be Displayed 22 Selecting Number of Field...

Page 8: ...Memory Use 26 Clearing Memory 26 Language Options 26 Selecting Language 26 Product Info Options 26 Viewing Product Information EULA Copyright Information 26 Trip Summary 27 Viewing the Last Trip Summ...

Page 9: ...aches Send to GPS 30 Installing Geocaches with Send to GPS List Page 30 Installing Geocaches with Send to GPS Detail Page 31 The Magellan Communicator 31 Installing Geocaches Drag n Drop 32 Installing...

Page 10: ...eceiver is a sealed flap G which protects the USB connection to the receiver The back of the receiver holds the battery door which accesses the two AA batteries used to power the receiver The beeper a...

Page 11: ...ockwise to lock it in place and the Magellan eXplorist GC receiver is ready to go Maintenance The only maintenance required is to clean the screen with a soft cloth occasionally Also using a screen pr...

Page 12: ...our requirements To access the different functions use the joystick and move it left or right to change the highlighted icon With the icon highlighted press ENTER Battery Life All green indicates full...

Page 13: ...avigation Data Fields Up to four Nav Fields can be displayed on the Map Screen at any given time The number of Nav Fields and the data to display can be customized by the user by accessing the Options...

Page 14: ...ter Geocache Waypoint List The Geocache List and the Waypoint List are similar and are designed to provide ample information about the item without having to access the details The details of each poi...

Page 15: ...ils about the waypoint using icons as well as the date and time it was created Highlight the fields below the header bar to access additional information about the waypoint Press ENTER to view the det...

Page 16: ...7 Icons Geocache Found Not Found Favorite Not Attempted Needs Maintenance Associated Waypoints Travel Bug Pictures Description Hints Recent Logs...

Page 17: ...bottom of the screen displays the name of the function selected 2 Press ENTER to select the highlighted icon The Map Screen The Map screen is a commonly used screen while searching for a geocache Thi...

Page 18: ...to exit panning and return the map to your current location Creating a Waypoint at the Pan Cursor Position 1 Press MENU to bring up the Options menu 2 Select New Waypoint 3 Optional Use the joystick...

Page 19: ...d trip timer Begins recording track Stop and Save Trip End the recording of the track and saves the trip Pause Trip Pauses the recording Resume Trip Resumes the recording Map Sets the Map screen to di...

Page 20: ...kmark box and press ENTER 4 Save the waypoint by pressing MENU and selecting Save from the menu Managing Trip A trip is defined as a recording of your movement or track This trip can then be viewed in...

Page 21: ...diting the Navigation Fields 1 Press MENU Highlight Edit Nav Fields and press ENTER 2 Use the joystick to highlight the navigation field you want to change 3 Press ENTER 4 Use the joystick to highligh...

Page 22: ...light View Dashboard and press ENTER 3 When you want to return to the Map screen press BACK Marking your Destination Geocache or Waypoint as a Favorite This is available only while travelling on a rou...

Page 23: ...en as well has what format they are displayed in 1 Press MENU 2 Highlight Map Options and press ENTER 3 There are two fields under the Geocache heading The top one selects what types of geocaches are...

Page 24: ...se the joystick to select ON or OFF and press ENTER 5 Pressing BACK returns you to the Map screen Geocaches Geocaches can be uploaded from www geocaching com or you can create your own geocache that y...

Page 25: ...n the geocache or waypoint Preview Route Displays the geocache selected and your current position on the Map screen Sort Search Used to set the sorting method used and the search criteria for the geoc...

Page 26: ...isplayed using the criteria you defined Searching Geocaches by Name or ID 1 Press MENU and select Sort Search from the Options menu 2 Use the joystick to highlight Search by Name or ID and press ENTER...

Page 27: ...Flag the geocache as being in need of maintenance and add comments Add a Field Note Add field notes to the geocache Edit My Last Log Edit the log file Delete My Last Log Delete the log file Favorites...

Page 28: ...ht Timer Having the backlight on all the time will diminish the battery life of the receiver The backlight timer sets a time limit for the backlight to be on with no key presses 1 Access the Tools men...

Page 29: ...Access the Tools menu and select Settings 2 Highlight Power and press ENTER 3 Highlight the Power OFF Timer field 4 Use the joystick to select the desired time or Never 5 Press BACK Select the Type of...

Page 30: ...ap screen as well has what format they are displayed in 1 Access the Tools menu and select Settings 2 Highlight Map Options and press ENTER 3 There are two fields under the Geocache heading The top on...

Page 31: ...R 5 Select how many fields you want displayed 6 Pressing BACK Selecting the Current Location Icon 1 Access the Tools menu and select Settings 2 Highlight Map Options and press ENTER 3 Highlight the Cu...

Page 32: ...ls 1 Access the Tools menu and select Settings 2 Highlight Track and press ENTER 3 Highlight the Interval Between Points field and press ENTER 4 Use the joystick to select time interval and press ENTE...

Page 33: ...elect Settings 2 Highlight Compass and press ENTER 3 Use the joystick L R to step through the various compass styles 4 Press BACK Background Options You can select the type of background to be display...

Page 34: ...OFF Press ENTER 5 Press BACK Setting the GPS Position Set GPS position provides a way to view map areas other then you present position When setting GPS position the GPS Sirf chip is disabled and the...

Page 35: ...ng the Geocache or Waypoint files to you PC using steps below 1 Connect the eXplorist to your PC select Connect To PC when pop up appears on GPS 2 Double click onto my computer and browse to the Magel...

Page 36: ...on Projecting and Saving a Waypoint from Your Current Location 1 Access the Tools menu and select Waypoint Projection 2 Use the joystick to select the Bearing field and press ENTER 3 Using the joystic...

Page 37: ...ching Types page is displayed 3 Press BACK Geocaching FAQs Viewing Geocaching FAQs 1 Access the Tools menu and select Geocaching FAQs 2 The Geocaching FAQs page is displayed 3 Press BACK Product Demo...

Page 38: ...ols menu and select Screen Capture 2 Highlight the View Saved Screen Captures field and press ENTER 3 The saved screen captures are displayed one screen at a time Use the joystick L R to step through...

Page 39: ...ic membership is all you need to go geocaching but the features of the eXplorist GC receiver are further enhanced with premium access Installing Geocaches Send to GPS Installing Geocaches with Send to...

Page 40: ...found appears Select the click here link to install the Magellan Communicator The Magellan Communicator only needs to be installed the first time a connection is made between an internet browser and...

Page 41: ...ints folder not the Geocaches folder in the receiver Installing Geocaches with Drag n Drop 1 Go to www geocaching com on your browser 2 Use the search tools on geocaching com to select a geocache to l...

Page 42: ...There will be two extracted files one with a xxxxxxx gpx filename and one with a xxxxxxx wpts gpx filename 3 Connect your Magellan eXplorist GC receiver to your PC using a USB cable 4 When prompted s...

Page 43: ...gs about your journey in your GPS receiver Now you may want to take that information and post it to www geocaching com for others to use Uploading Field Notes and Logs from Receiver 1 Go to www geocac...

Page 44: ...m in a new window Click on the Browse button and go to the geocaches folder in the MAGELLAN directory 7 Select the file named newlogs txt Note the newlogs txt file contains all the field notes and log...

Page 45: ...e geocaches on Geocaching com web site Select Yes 6 The New Geocaches window opens Click on the geocache you want to publish 7 You are prompted to log in to geocaching com 8 The Report a New Cache win...

Page 46: ...perhaps an all time favorite list you can share with friends BYOP Bring Your Own Pen Pencil An acronym often used by cache owners to communicate to other geocachers that you will need to bring your wr...

Page 47: ...an see how our planet has been shaped by geological processes how we manage the resources and how scientists gather evidence to learn about the Earth Event Cache This is one of several unique cache ty...

Page 48: ...or letterbox you use the carved stamp from the box stamp your personal logbook and return that stamp to the letterbox You then use your carved stamp and stamp the letterbox s logbook LOC The original...

Page 49: ...still use the NAD27 datum so always check before using a GPS receiver with a map Pocket Query PQ A Premium Member feature a Pocket Query is custom geocache search that you can have emailed to you on a...

Page 50: ...llows you to track your item on Geocaching com The item becomes a hitchhiker that is carried from cache to cache or person to person in the real world and you can follow its progress online USDA Fores...

Page 51: ...e camera image You will need to have them to save the picture to log the cache If you are a tech savvy you can also use a wireless modem and save the image yourself on a laptop WGS84 The most current...

Page 52: ...re made using specially marked ammo containers Each cache had an original prop from the movie Only a few Project A P E caches exist today Mystery or Puzzle Caches The catch all of cache types this for...

Page 53: ...lve and benefit the larger community EarthCache An EarthCache is a special place that people can visit to learn about a unique geoscience feature or aspect of our Earth EarthCaches include a set of ed...

Reviews: