


Track Logs
58
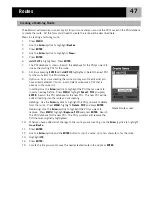
This function takes the track log and turns it into a multi-leg route that is saved in your route list. From here,
the route can be edited if necessary.
Note
: Convert to Route is available for both active track logs and track logs you have saved.
1.
Press
MENU
.
2.
Use the
Arrow
joystick to highlight
Track Log
.
3.
Press
ENTER
.
4.
Use the
Arrow
joystick to highlight Active Track or any track log you have previously saved.
5.
Press
ENTER
.
6.
Highlight
Convert to Route
.
7.
Press
ENTER
.
8.
Use the
Arrow
joystick and
ENTER
button to assign a name for the route. Route names can be up to ten
characters in length.
9.
Use the
Arrow
joystick to highlight
OK
when the name has been entered.
10.
Press
ENTER
.
11.
Use the
Arrow
joystick to select the file where you want the route saved.
12.
Press
ENTER
.
Selecting View on Map displays the track log chosen and plots it on the Map screen. This gives you the
opportunity to graphically view the track log.
Note
: View on Map is available for both active track logs and track logs you have saved.
1.
Press
MENU
.
2.
Use the
Arrow
joystick to highlight
Track Log
.
3.
Press
ENTER
.
4.
Use the
Arrow
joystick to highlight
Active Track
or any track log you have previously saved.
5.
Press
ENTER
.
6.
Highlight
View on Map
.
7.
Press
ENTER
.
The
Map
screen is displayed, in the Cursor mode, with the selected track log displayed on the screen. The
ZOOM IN
and
ZOOM OUT
buttons can be used to change the map scale, and the cursor can be moved by using
the
Arrow
joystick.
When you have finished viewing the track, press
ESC
to return to the
Track Log
screen.
Converting the Track Log to a Route
Viewing the Track Log on the Map


