background image


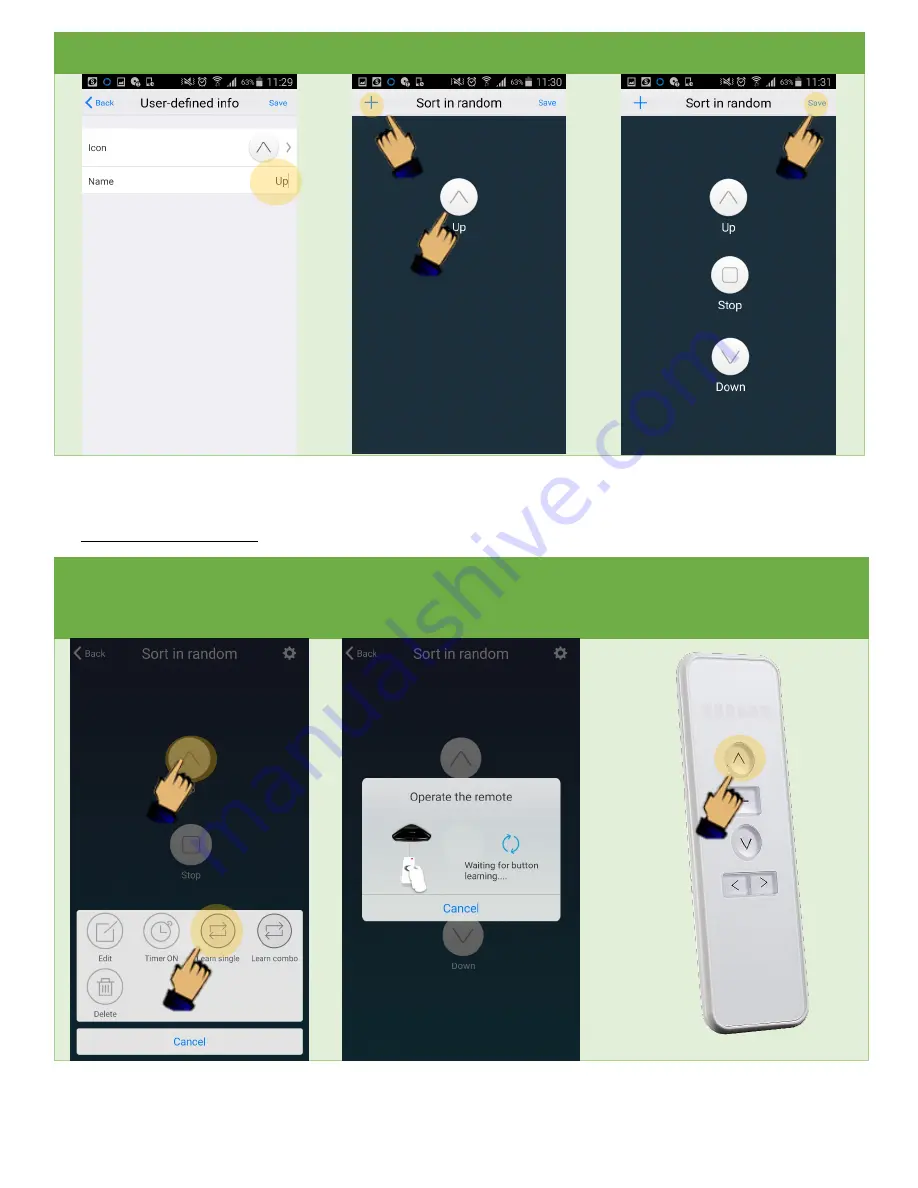
Change the Name of the Icon 

Or leave blank 

Drag Icon to the Desired Location 

Click [+] to add more buttons. 

Click Save to Exit 


11.


Programming the buttons 

Press and hold the button you would 

like to program. 

Select “learn single” from the menu. 


The Smart Controller is now in 

learning mode 


While in learning mode, press the 

button on the handheld remote that 

you would like the smart controller to 

learn 


Summary of Contents for Smart Controller

Page 1: ...1 Quick Setup Guide By...

Page 2: ...is connected to your home network Open the e Smart Home application You may create an account login or skip for now 3 Plug in the Smart Controller The blue light should begin to flash rapidly If the l...

Page 3: ...on the e smarthome app Select V2 device Enter the name and password for your Wi Fi Network then click Configure 5 After about 30 seconds you will see a page letting you know that the device has been s...

Page 4: ...and hold until the menu appears You can now edit the name of the Smart Controller device its icon or delete it Press Save to exit 7 Before proceeding update the firmware of the Smart Controller While...

Page 5: ...ton until the motor or receiver jogs or beeps Then push the corresponding Up button on your smartphone to complete programming The motor will jog or beep again to confirm successful programming To add...

Page 6: ...preferred control We suggest using the User Defined then sort in random option 10 Adding Buttons to the Remote Click on Sort Add to put a new button on the remote Click To Change the Button s Icon Ch...

Page 7: ...buttons Click Save to Exit 11 Programming the buttons Press and hold the button you would like to program Select learn single from the menu The Smart Controller is now in learning mode While in learni...

Page 8: ...on if necessary 12 Creating a Scene A scene allows you to set up a one click button that performs a series of commands In this example we will create a scene for sunset This will roll up our pool and...

Page 9: ...an now give the scene a name Repeat previous steps to add another command You will see a time interval between each command The circled area dictates the designated time If you click on that area you...

Page 10: ...ply click on it to execute the commands that you programmed If you ever need to edit copy or delete the scene press and hold the scene Troubleshooting If a button command requires multiple pushes for...

Reviews: